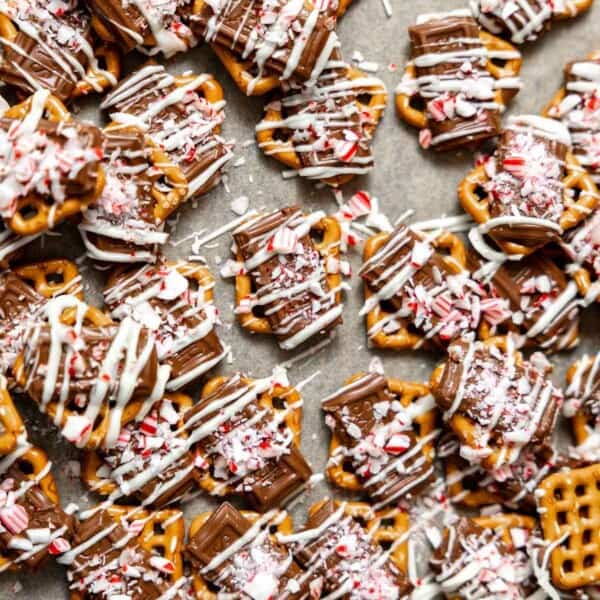
These peppermint pretzels are an easy and irresistible holiday treat! They come together in minutes and have the perfect combination of crunchy, sweet, and salty. The peppermint add a delicious holiday touch.
Looking for more simple recipes for a no-bake dessert? Try Ritz thin mints, dark chocolate coffee bark, or peanut butter Ritz cookies next. These buckeye bites are another super easy treat made with pretzels and melted chocolate.

You only need 4 ingredients to make these festive milk and white chocolate peppermint pretzels! They’re just as fun to make as they are to eat!
They make the perfect cookie box filler alongside polar bear oreos and Ritz thin mint, but they can also take center stage at a holiday party. You won’t be able to eat just one!
Just like the famous turtle pretzels with Rolos, just melt the chocolate right on top, drizzle with white chocolate and sprinkle. While i love chocolate dipped pretzels, these give you the same effect with half the effort.
Love peppermint desserts? Try peppermint bark cookies or peppermint bark cookie bars next.
Ingredients You Need
Here are 4 simple ingredients you need to make these peppermint bark pretzels. Skip to the recipe card for exact measurements.

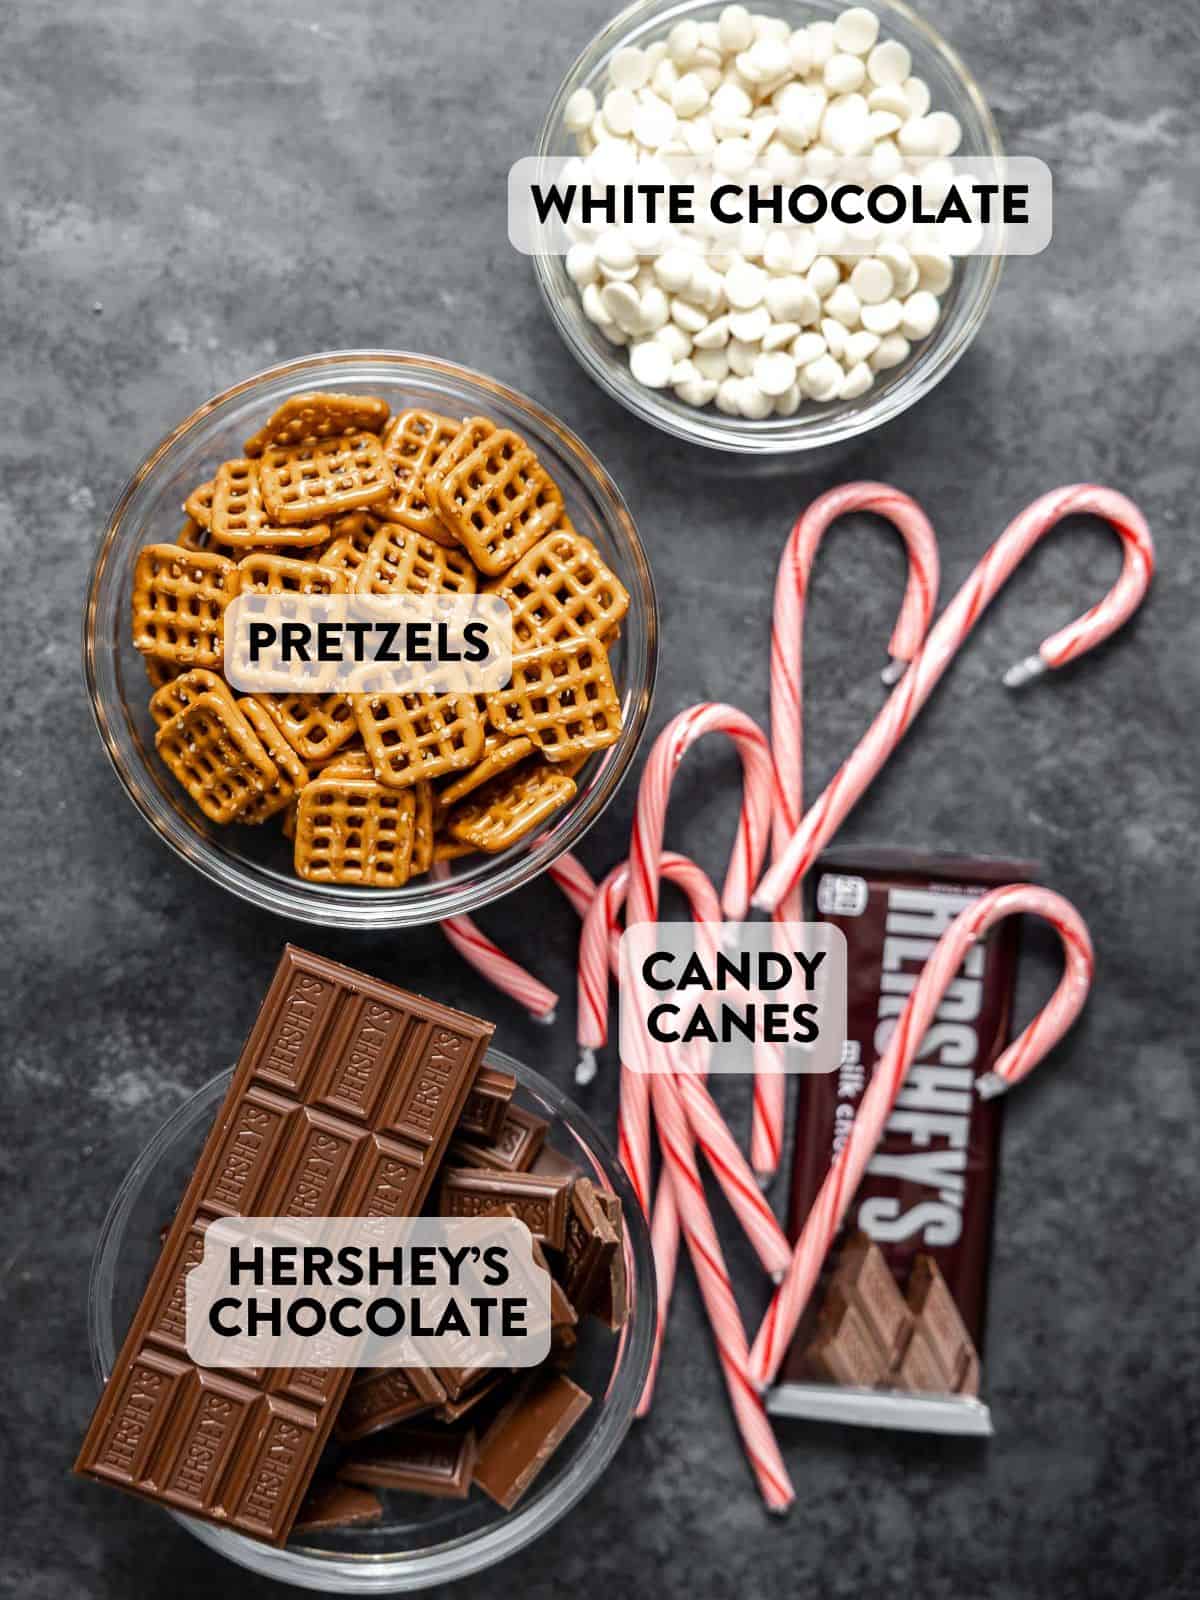
- Pretzels: you can use square Rold Gold pretzels, traditional shaped pretzels or even the Snack Factory flat pretzels.
- Milk chocolate: Hershey’s bars are easiest.
- White chocolate: white chocolate chips, baking bar, or white candy melts work.
- Candy canes: crush them small to sprinkle on top.
Recipe Variations
- Dip the entire pretzel in milk chocolate or white chocolate and sprinkle with peppermint, similar to the Costco or Trader Joe’s peppermint pretzels.
- Not a fan of milk chocolate? Swap it for dark chocolate or semi-sweet chocolate.
- Use pretzel rods. holiday-shaped pretzels, or mini pretzels instead of pretzel squares.
- Omit the peppermint and sprinkle the tops with sea salt.
- Use a Hershey’s kiss instead of the Hershey’s bar and press the peppermint pieces into the tops.
How to Make Peppermint Pretzels
Here are the basic steps, with images, for these peppermint pretzels. Skip down to the recipe card below for the full printable recipe.

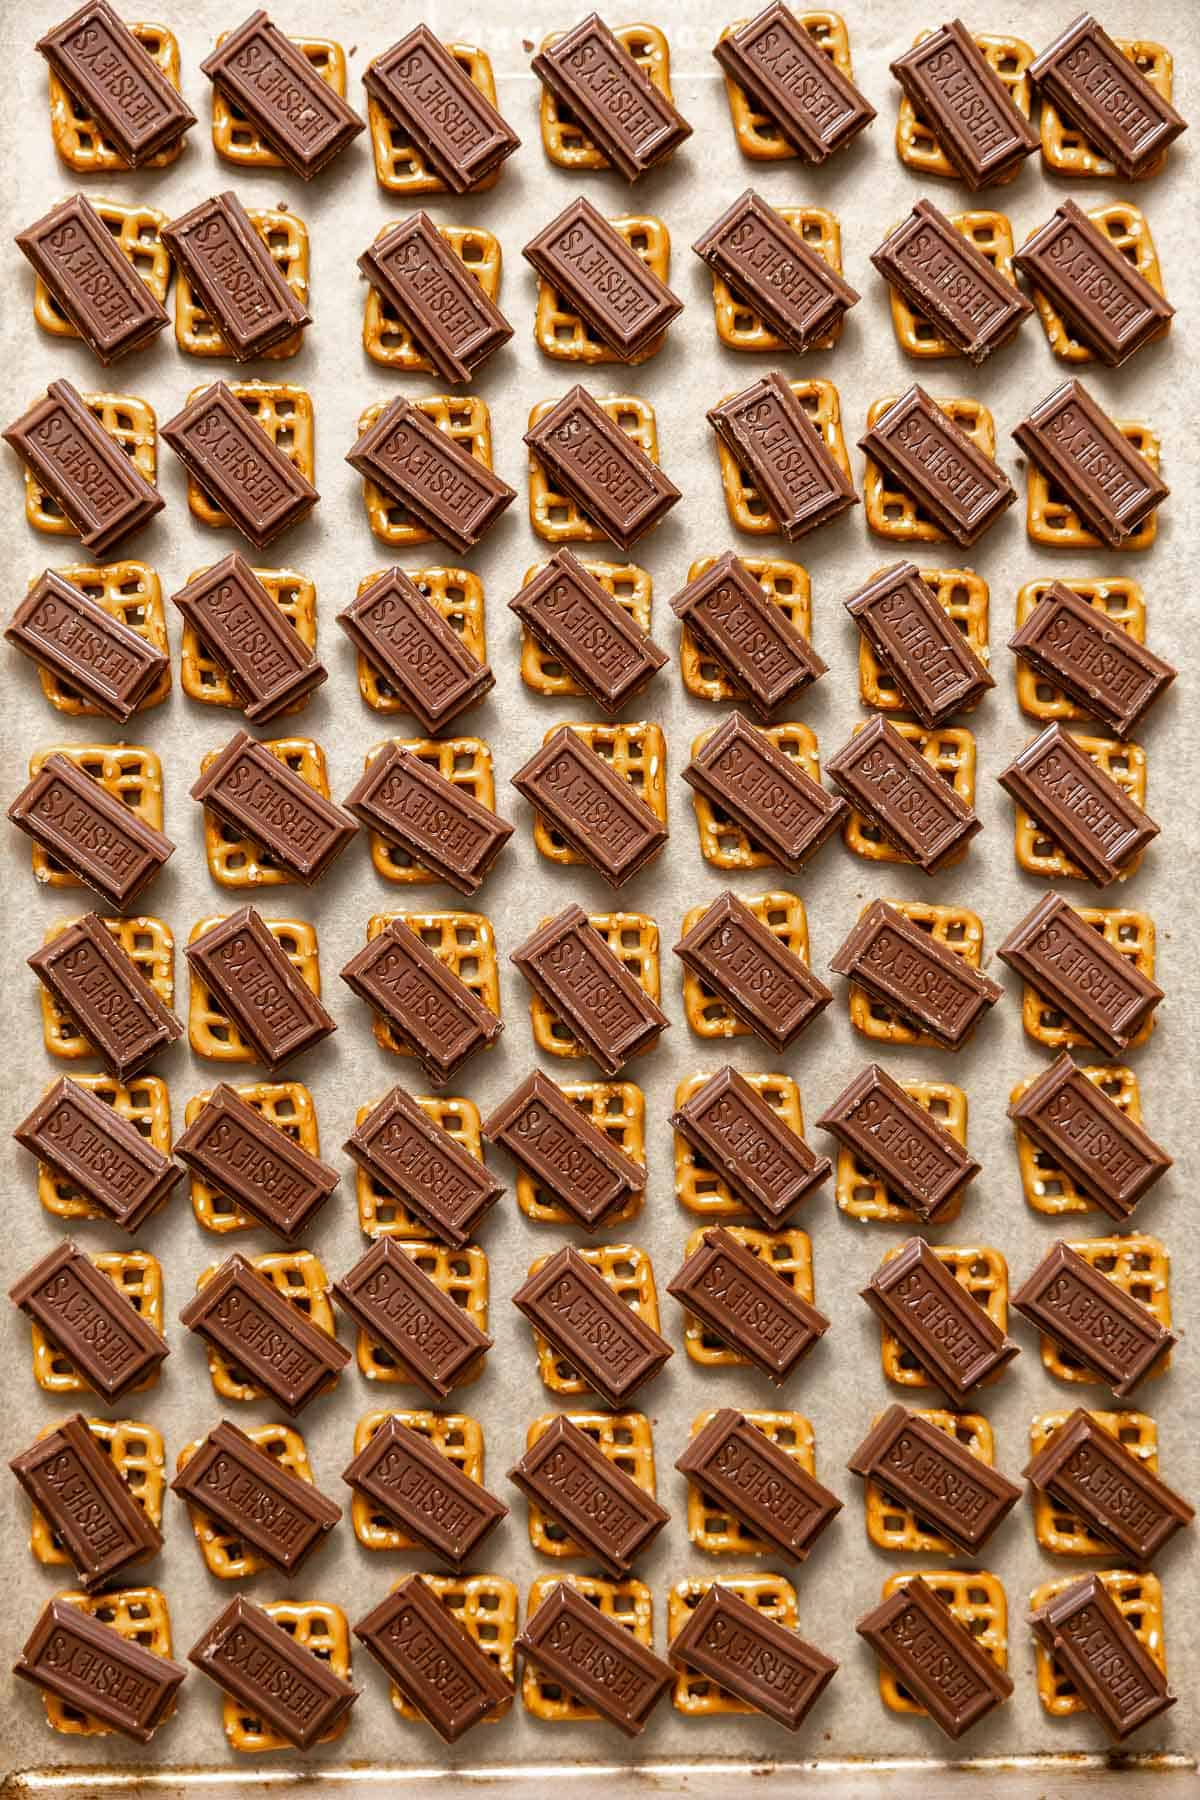
Step 1. Arrange on Baking Sheet. Lay the pretzels in an even layer on a baking sheet. Top each with one small Hershey’s rectangle.

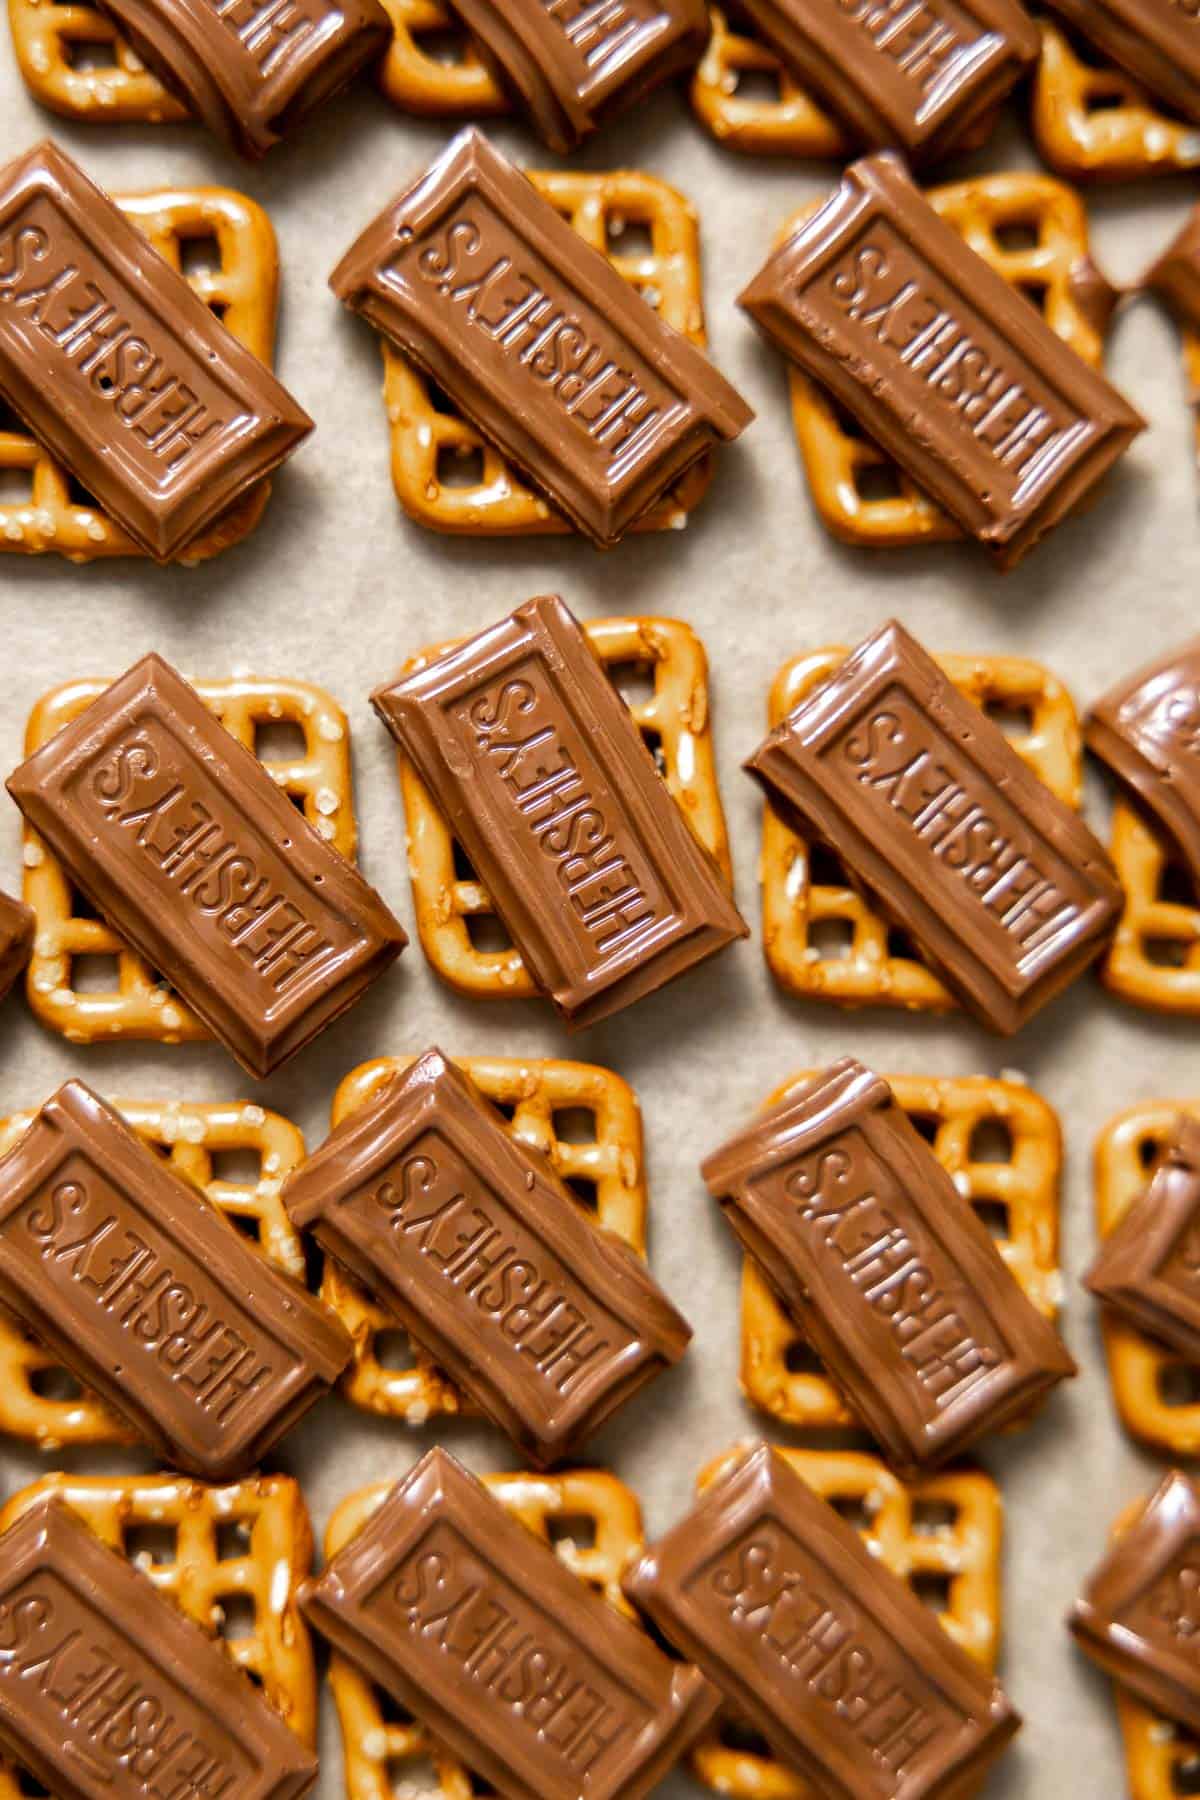
Step 2. Bake. Place the chocolate and pretzels in the oven for 4-5 minutes to melt. They should not spread.

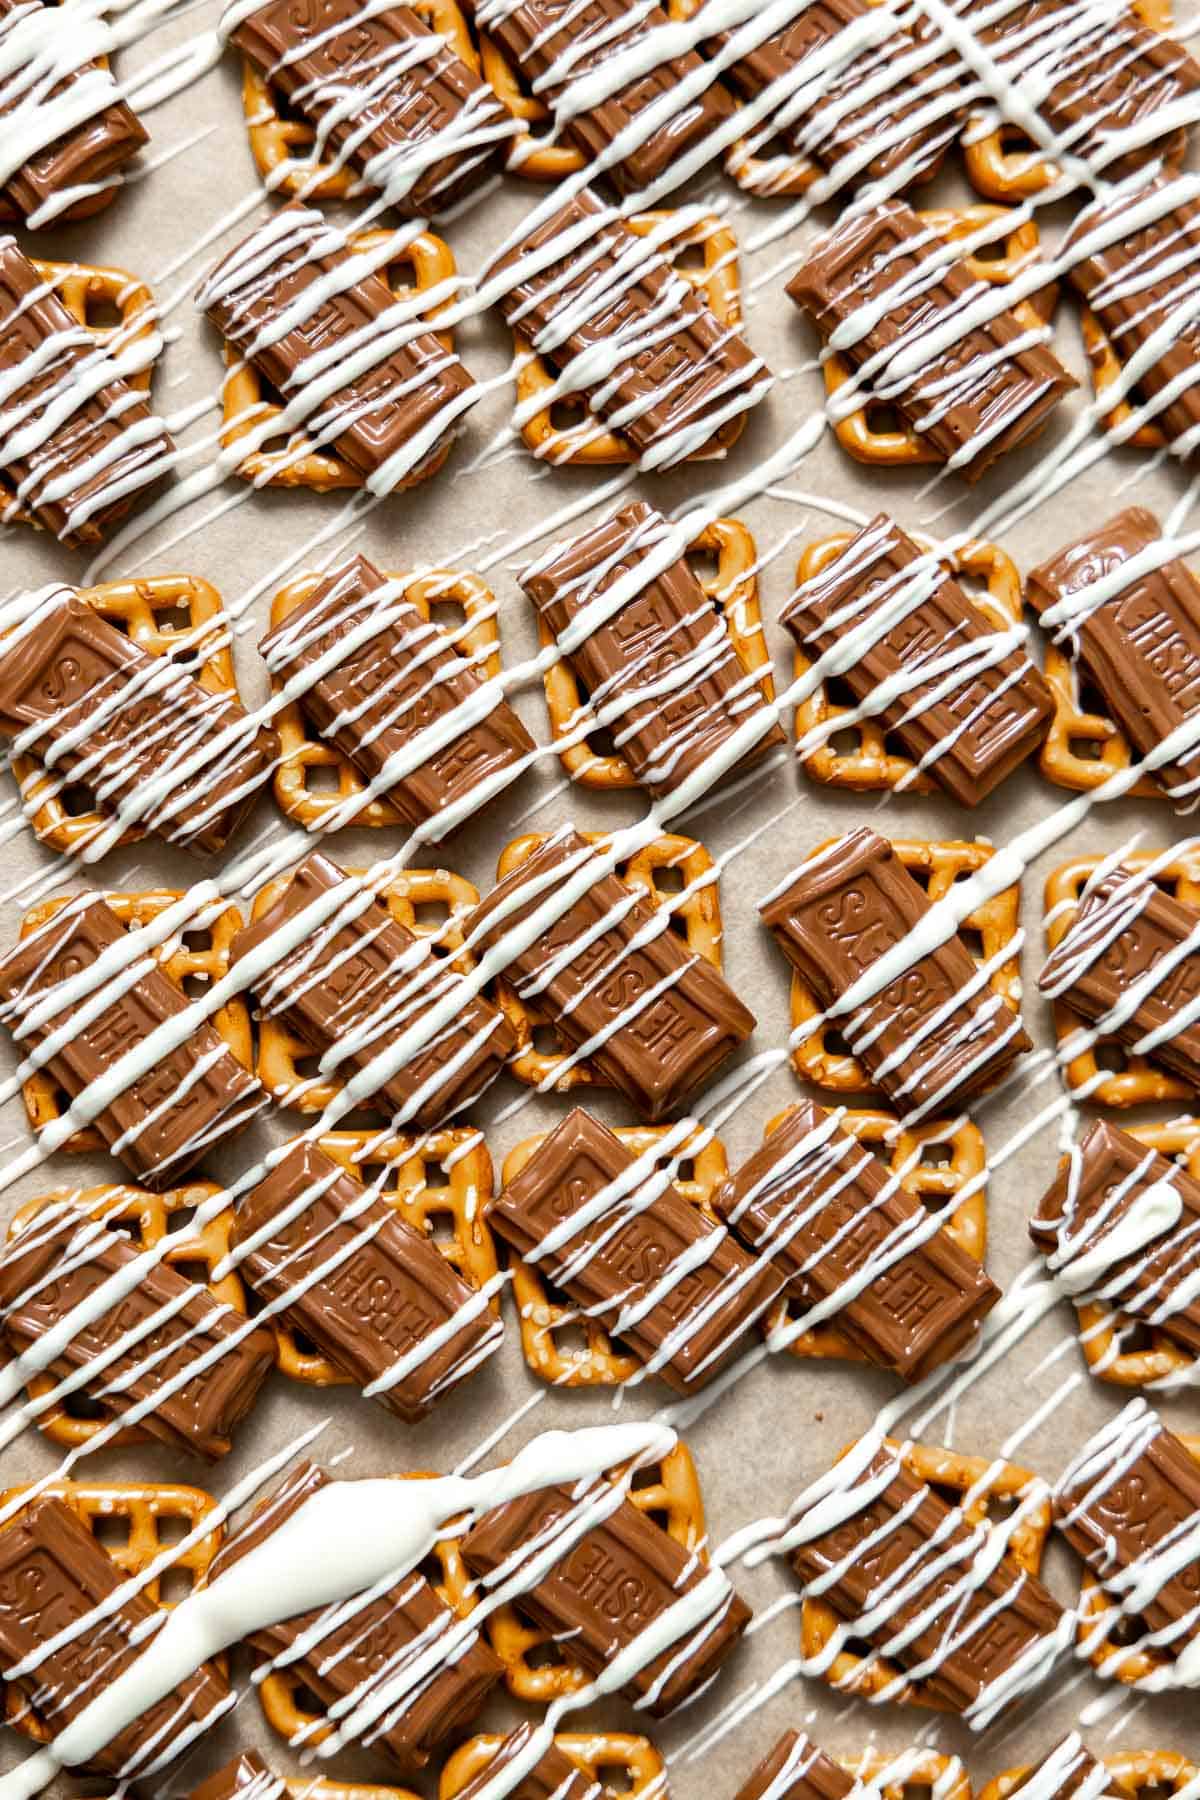
Step 3. Drizzle with White Chocolate. Melt white chocolate in the microwave and drizzle it over the pretzels.

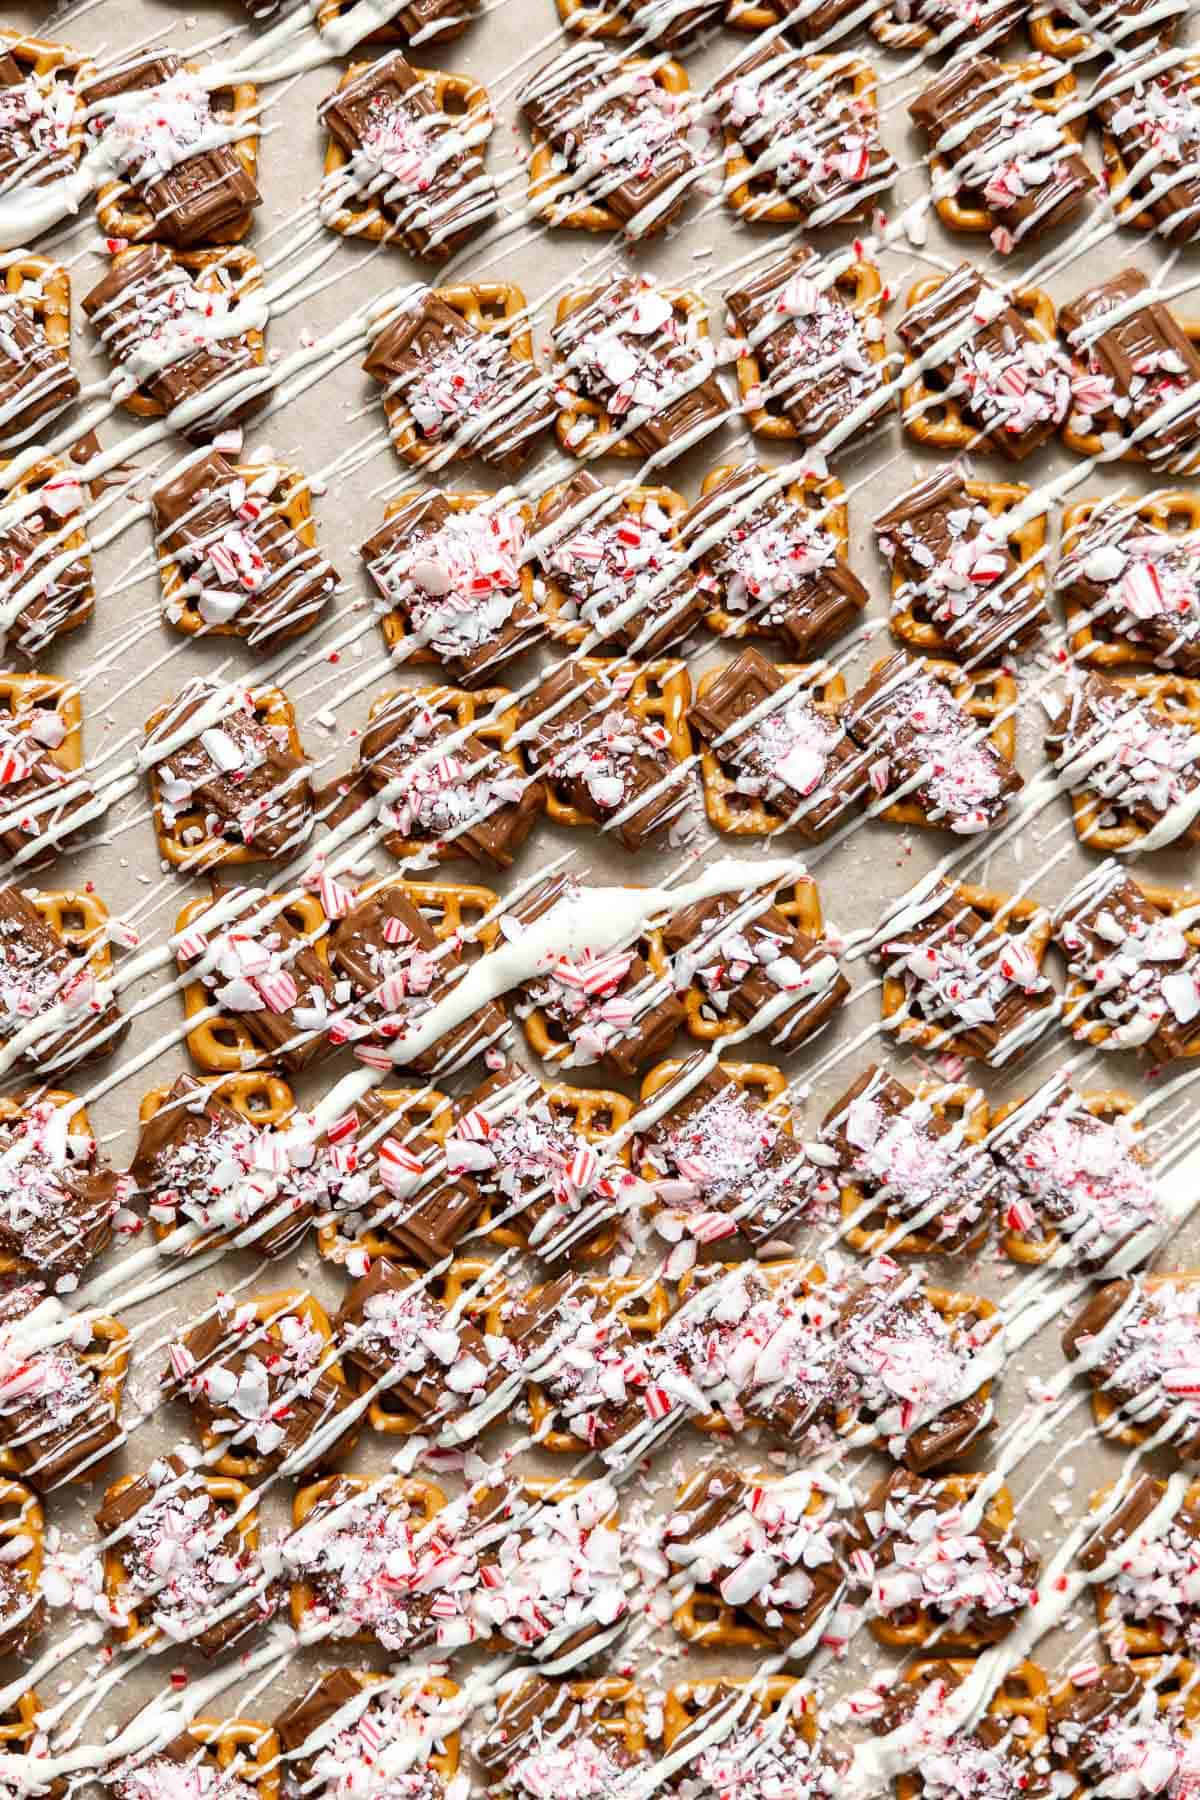
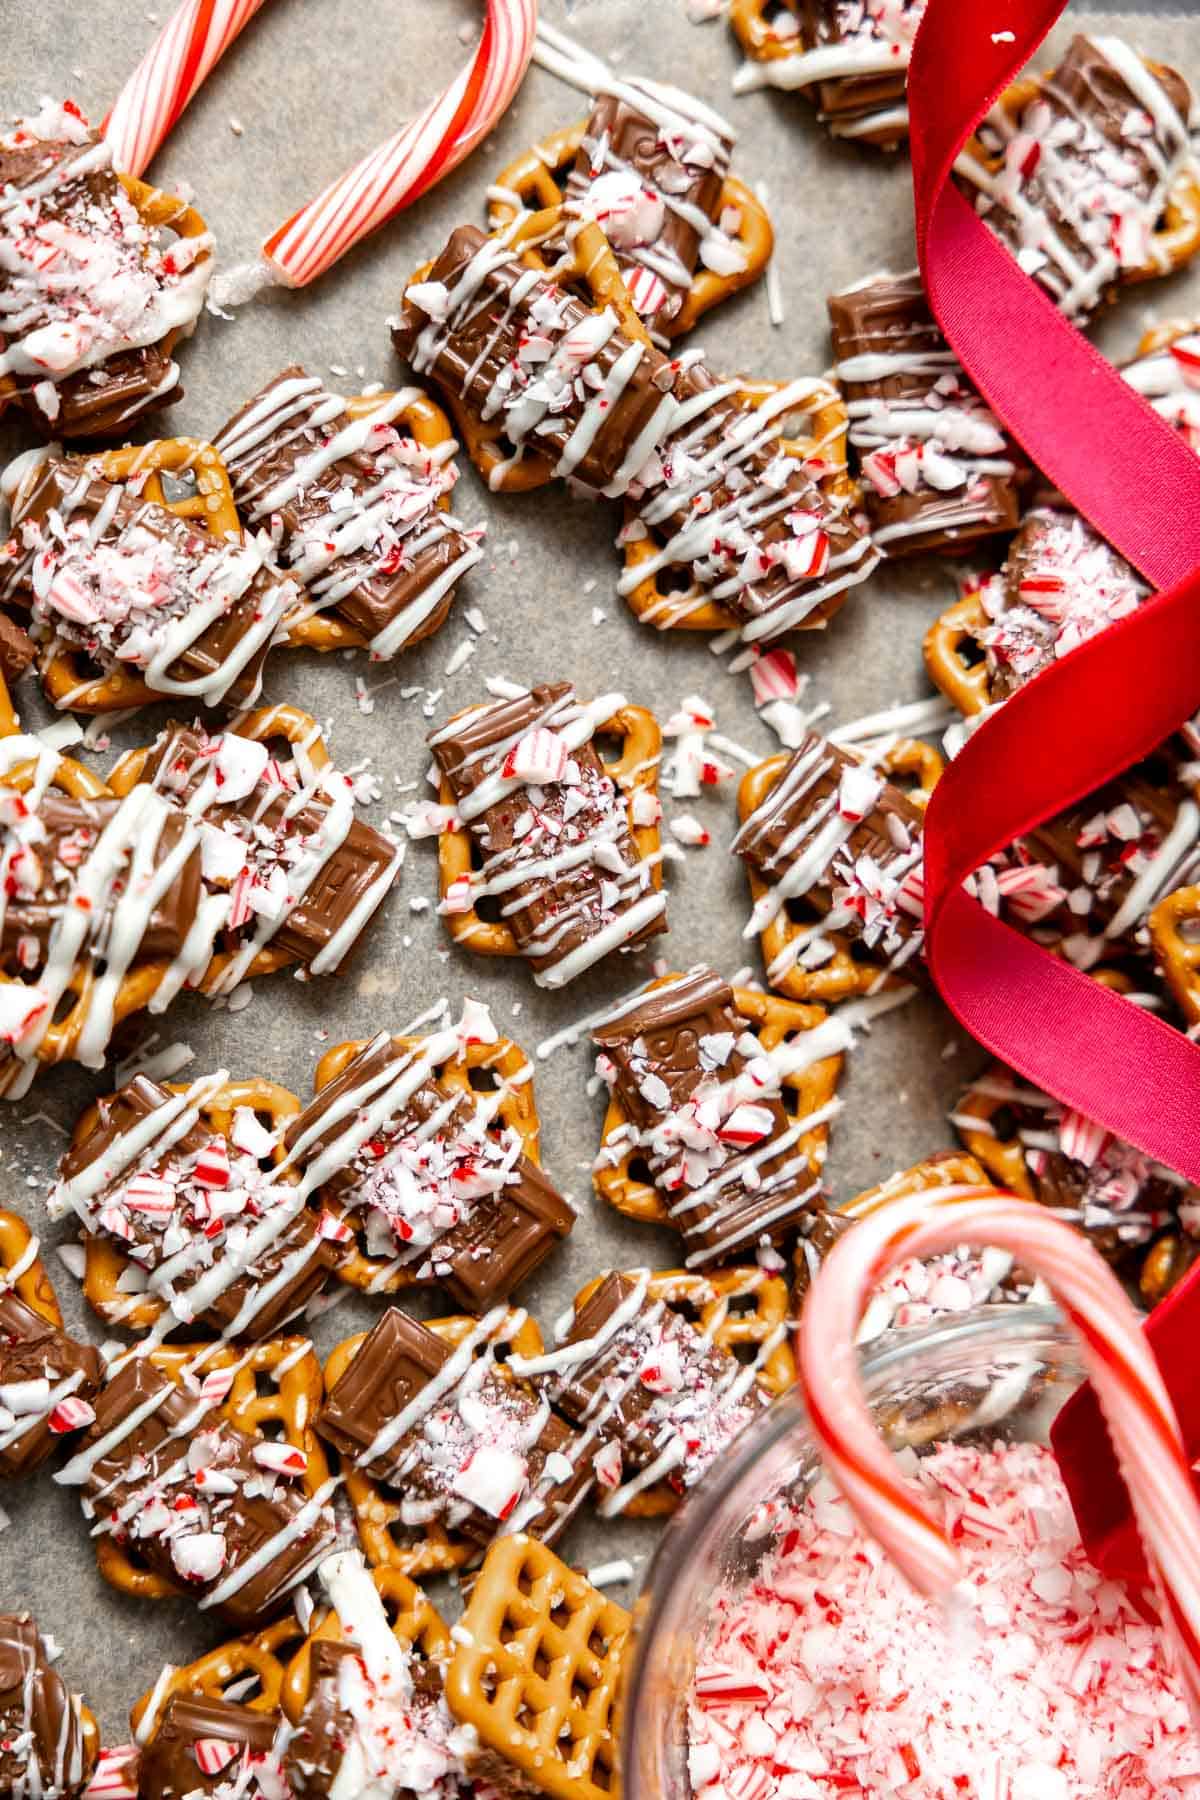
Step 4. Sprinkle with Candy Canes. Immediately sprinkle the chocolate pretzels with crushed candy canes. Allow them to set before serving. Put them in the fridge or freezer to speed this up.
Expert Recipe Tips
- I bought the mini candy canes from the grocery store and put them in a plastic bag and crushed them together. But you could get any size candy canes really! Just as long as they’re peppermint!
- If you’re really in a rush, throw them in your freezer when they’re done to set. They take about 5 more minutes to set in there so you really do have an easy dessert in under 10!
How to Freeze and Store
To Store: Keep leftover peppermint pretzel bites in an airtight container at room temperature for up to 2 weeks.
To Freeze: These crunchy pretzel crisps may be kept in the freezer for up to 6 months. Enjoy straight from the freezer or allow them to come to room temperature before serving.

Feels like Breakfast on the Beach!

- Thick and delicious with tons of coconut flavor
- Takes 5 minutes to make
- Easy to customize with your favorite toppings
- Full of healthy fats
- Add protein powder for a complete breakfast
- Sweet tropical flavors
Love refreshing smoothies? Try this pitaya smoothie bowl, blueberry raspberry smoothie, or tropical kale smoothie next!

Why You’ll Love This Smoothie Bowl
- Thick enough to scoop with a spoon. Not a drink.
- 5 minutes from freezer to bowl.
- One blender, no extra dishes.
- Add 25g of protein with a scoop of vanilla protein powder. Full breakfast, full morning.
- Naturally Gluten-Free, Paleo, Dairy-Free, and Vegan. No swaps needed.
- Pre-portion the fruit ahead so weekday mornings are zero decisions.
Ingredients You’ll Need

- Frozen banana. One whole. Banana is the texture anchor; don’t skip.
- Frozen pineapple. ¾ cup. Pre-cut from the freezer aisle works.
- Frozen mango. ½ cup. Same rule.
- Full-fat coconut milk. ⅓ cup, from the can. Shake the can well before measuring or you’ll pour off only the watery part.
- Coconut extract. Optional, ¼ teaspoon. Boosts the coconut flavor without making it taste like sunscreen. A little goes a long way.
- Vanilla protein powder. Optional, one 25g scoop. I use Be Well by Kelly because the ingredient list is short. If you add protein powder, add an extra splash of coconut milk to keep it blendable.
- Toppings. Whatever’s in the kitchen: shredded coconut, chia seeds, fresh fruit, granola, nut butter.
How to Make a Coconut Smoothie Bowl

- Add the Frozen Fruit First. Dump all the frozen into a high-speed blender. Don’t add the liquid yet. Start dry.

- Add the Liquid Slowly. Add the coconut milk, coconut extract, and protein powder if using. Blend on low first, then high. Stop and stir or tamp down as needed. If the blender stalls, add coconut milk one tablespoon at a time until it moves. Don’t drown it.

- Pour and Top. Pile the toppings on, hit it with a drizzle of nut butter or honey if you want, and serve immediately. Smoothie bowls melt fast.
Coconut Smoothie Bowl Toppings
The toppings are where you make it yours. A few that work:
- Chia seeds: crunch and fiber. Half a tablespoon goes a long way.
- Granola: crunch. Use one with chunky clusters.
- Shredded coconut or coconut flakes: doubles down on the coconut.
- Nut butter: coconut almond butter, macadamia butter, or cashew butter for a tropical feel. Warm it slightly so it drizzles.
- Extra fruit: kiwi, banana slices, mango, fresh pineapple. Sparingly, because there’s already a lot of fruit in the bowl.
- Bee pollen, hemp hearts, or cacao nibs if you want to lean health-y.
Prefer a more decadent smoothie? Try our cake batter protein shake, chocolate peanut butter protein smoothie, or chocolate and cherry smoothie.
FAQS
Too much liquid. Add more frozen fruit a handful at a time and blend until it thickens. Or remember the rule for next time: 2 parts frozen fruit to 1 part liquid, max.
Not enough liquid, fruit not chopped small enough, or the blender isn’t powerful enough. Stop, scrape the sides, tamp the fruit toward the blades, and pulse instead of running on high.
Yes. The recipe works as-is without protein powder. If you do add protein, add an extra splash of coconut milk so it blends.
Yes. With coconut milk and a plant-based protein powder, it’s naturally Gluten-Free, Dairy-Free, Paleo, and Vegan.
Yes. Pre-portion the frozen fruit into individual zip-top bags. In the morning, dump one bag in the blender, add coconut milk and protein powder, and blend.
Store the smoothie base (without toppings) in an airtight container in the fridge for up to 1 day. After that, it separates and loses creaminess. Give it a stir or a quick re-blend before serving.

Coconut Smoothie Bowl
Save this Recipe!
Ingredients
- 1 frozen banana
- 3/4 cup frozen pineapple
- 1/2 cup frozen mango
- 1/3 cup full fat coconut milk shaken
- 1/4 teaspoon coconut extract optional
- 1 scoop (25g) vanilla protein powder optional
- Toppings: mango, banana, granola, chia seeds, cherries, nut butter, or coconut
Instructions
- Add all ingredients to a highs-speed blender. Blend on high for 1-2 minutes until a smooth and thick consistency. If you don't have a high powered blender it may take a little longer or you may need to add another splash of coconut milk.1 frozen banana, 3/4 cup frozen pineapple, 1/2 cup frozen mango, 1/3 cup full fat coconut milk, 1/4 teaspoon coconut extract, 1 scoop (25g) vanilla protein powder
- Pour into a bowl and top with your favorite toppingsToppings: mango, banana, granola, chia seeds, cherries, nut butter, or coconut
Notes
- Use frozen fruit as the base.
- Start with less liquid and add more as needed to get the desired texture.
- Use a high-speed blender for best results.
Nutrition
Nutrition information is automatically calculated, so should only be used as an approximation.
Tips for Thick Smoothie Bowls
- Use frozen fruit as the base.
- Start with less liquid and add more as needed.
- Use a high-speed blender for best results.
Prep and Storage Tips
Prep ahead: Pre-portion the frozen fruit into individual zip-top bags so weekday mornings are just dump-and-blend.
Storage: Store the smoothie base in an airtight container in the fridge for up to 1 day. It separates after that.
Freezing: Store in a freezer-safe container for up to a month. Thaw in the fridge overnight, give it a stir, and pour into the bowl.

More Smoothie Recipes
Peppermint Pretzels
Save this Recipe!
Ingredients
- 70 pretzels gluten-free if needed
- 6 large Hershey’s bars broken into rectangles
- 8-10 ounces white chocolate melted
- 1/2 cup crushed candy canes (5-7 candy canes)
Instructions
- Preheat oven to 200°F. Line a cookie sheet with a parchment paper or a silpat mat.
- Arrange the pretzels on the prepared cookie sheet in a single layer then top each pretzel with rectangle square of the Hershey's bar. Bake in preheated oven for 4-5 minutes, just until chocolate is shiny and soft. Use a toothpick to gently spread and flatten the melted chocolate slightly over the pretzels.70 pretzels, 6 large Hershey’s bars
- Melt the white chocolate in a microwave safe bowl in 30 second increments, stirring between each, until melted and smooth. Drizzle the melted white chocolate over the pretzels.8-10 ounces white chocolate
- Immediately sprinkle generously with crushed candy canes. Press it down gently into the melted chocolate to make sure they stay put. Place in refrigerator or freezer to set for about 5 minutes. Store in an airtight container for up to 7 days or in the freezer for up to 3 months.1/2 cup crushed candy canes
Notes
Nutrition
Nutrition information is automatically calculated, so should only be used as an approximation.
Recipe by: Molly Thompson of What Molly Made | Photography by: Kate Poskochil
This post may contain affiliate links. Read our disclosure policy.


So stinkin’ cute and poppable and fun! Seriously love these- the perfect treats to have out on the table!