
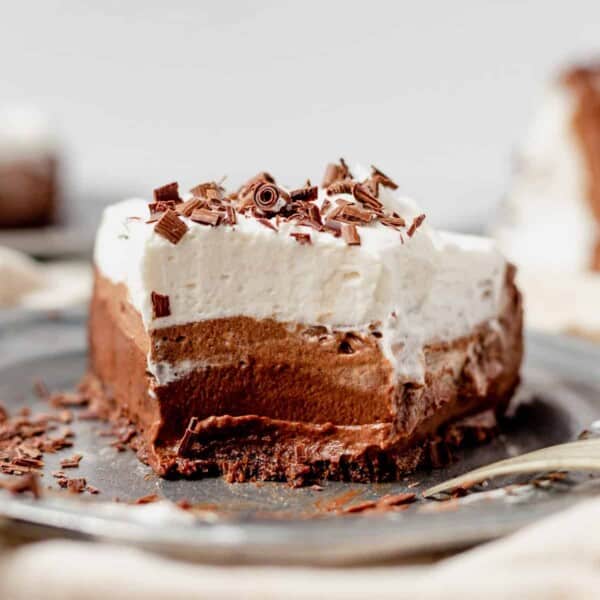

This dairy-free chocolate pie starts with a gluten-free crunchy chocolate cookie crust and layers of chocolate pudding and whipped cream. It’s easy to make, quick to cook, and completely irresistible. You’re going to love this easy vegan pudding cream pie!
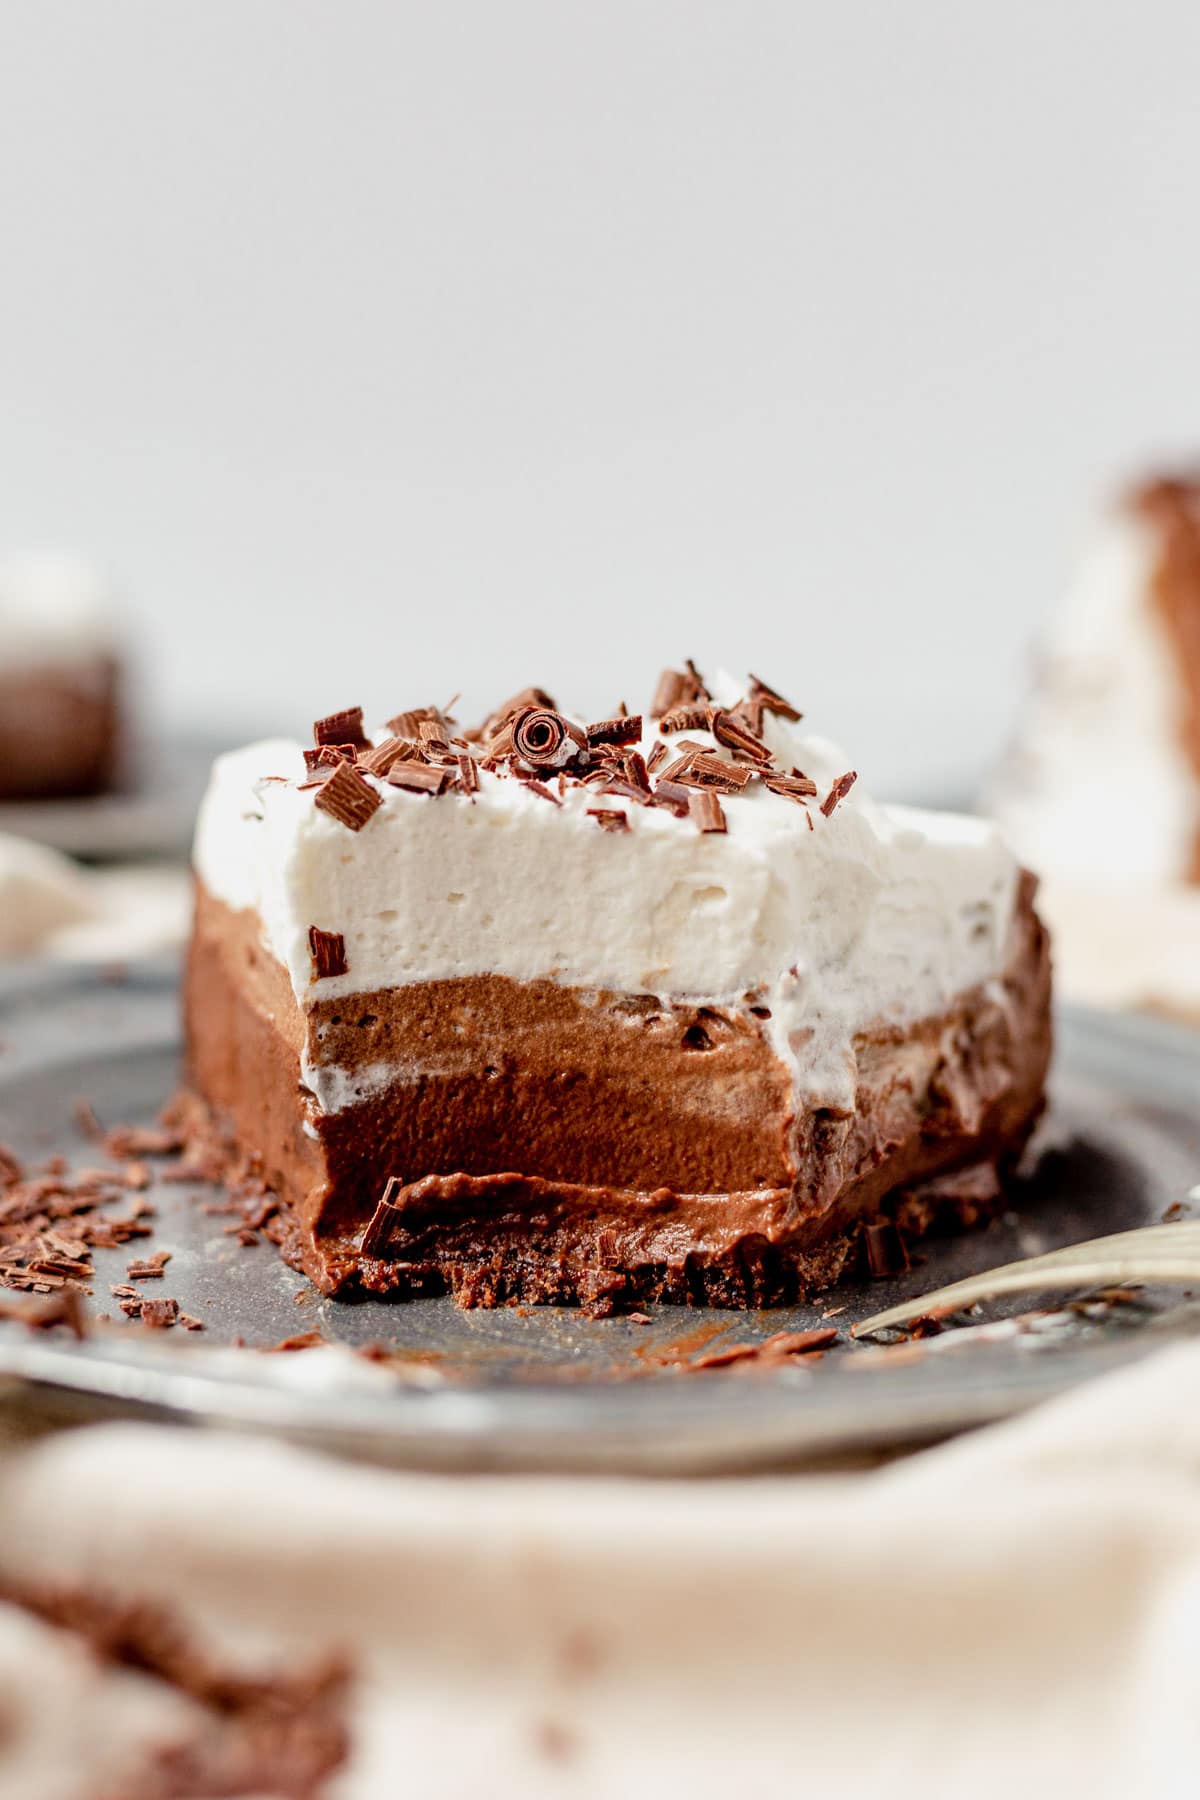
Table of Contents
This is one of the best pie recipes, maybe even one of my favorite recipes, I’ve had in a long time. Everyone is going to drool over this simple pie, especially pie and chocolate lovers. Make this recipe for everyone, but especially those with food allergies. This vegan chocolate cream pie is free from all common allergens including gluten, dairy, and eggs, and we’re sharing an option to keep it free of tree nuts.
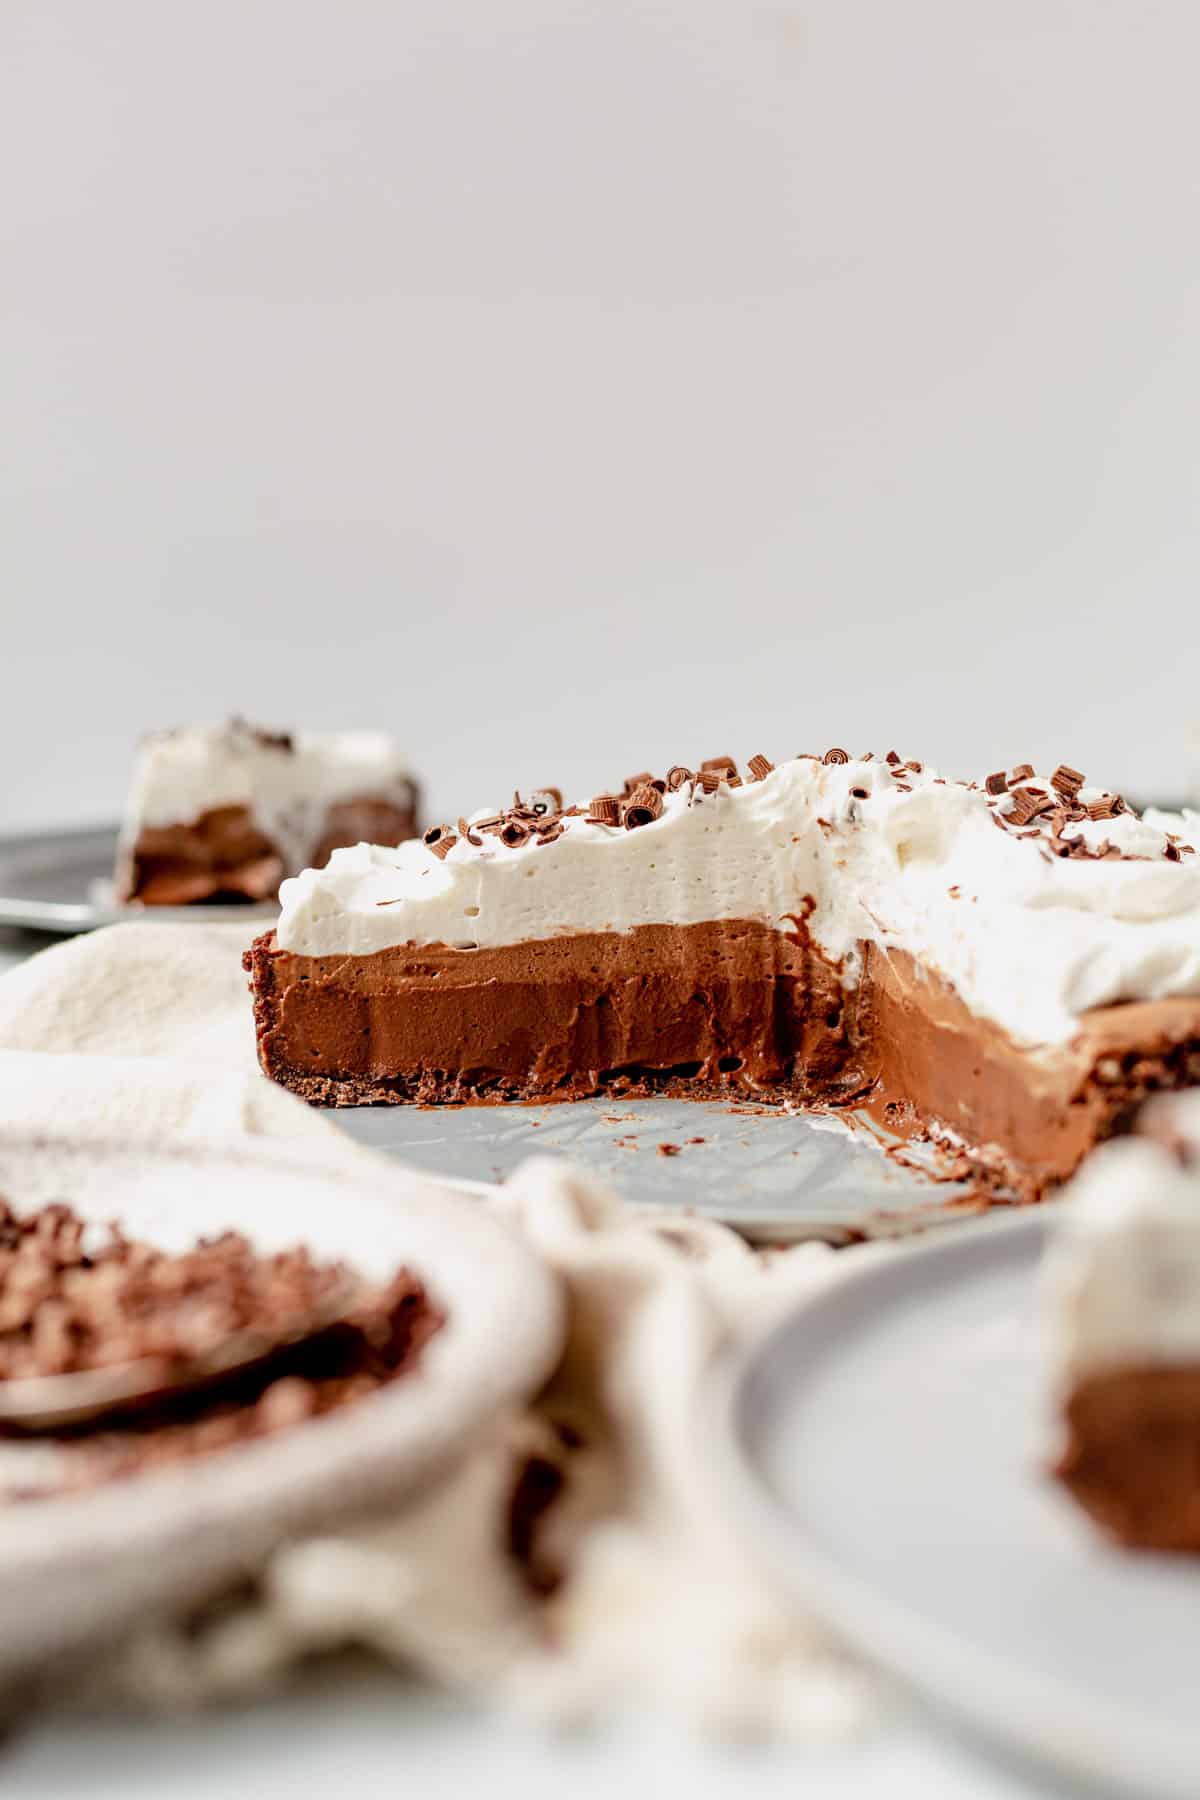
No one will have a clue this recipe is gluten and dairy free because it is out-of-this-world delicious. The silky smooth chocolate filling, the light and fluffy whipped cream, and the crunchy crust make this irresistible. Make this ASAP the next time you need an impressive pie (like Thanksgiving!). Speaking of, let’s break down all the layers (it’s so much easier than it looks!)
4 Easy Layers of Dairy-Free Chocolate Pie
First layer: make your own crust in less than 15 minutes using vegan crunchy cookies, vegan butter, and brown sugar. It only bakes for 10 minutes!
Second layer: a thick layer of chocolate pudding sits on top of the crust.
Third Layer: a mix of the chocolate pudding and whipped topping for a light and fluffy chocolate cream.
Fourth Layer: all whipped cream to finish off this dreamy pie!
If you love pie for the holidays, you have to try this Christmas Piecaken. It’s an over-the-top Christmas dessert that is sure to impress!
Ingredients You Need
Here are the main ingredients to make this easy vegan chocolate pie. Skip down to the recipe card for exact measurements.
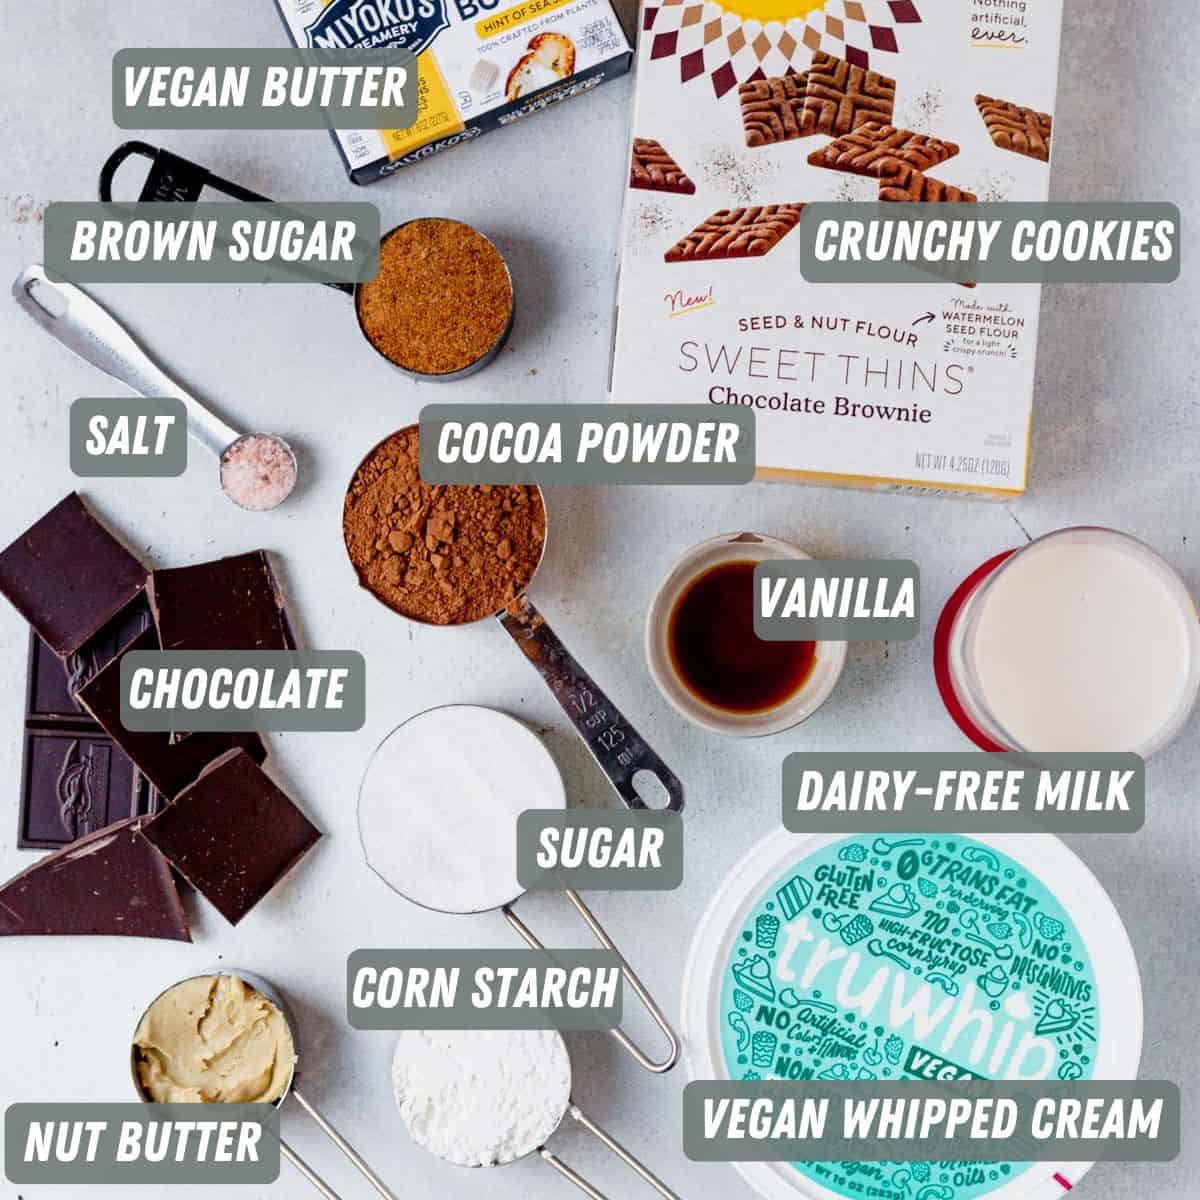
- Chocolate cookies: we used Simple Mills crunchy cookies for a dairy-free and gluten free pie crust. You could also use Oreo cookies (without the cream), or bake our vegan pie crust instead. Simple Mills has honey crunchy cookies if you’d prefer a graham cracker crust.
- Sugar: we’re using both brown sugar and granulated sugar in the crust and pie. You can substitute coconut sugar in the crust.
- Vegan butter: our favorite vegan butter brand is Myokos! Coconut oil is another great option, but it won’t have as much flavor.
- Non-dairy milk: we used unsweetened almond milk, but you could also use coconut milk, soy milk, or cashew milk (I don’t recommend oat milk)
- Cornstarch: this helps thicken the pudding without eggs. Use Arrowroot starch for a grain-free option.
- Cocoa powder: this is part one of the double chocolate pudding. Make sure to grab unsweetened cocoa powder. Regular or dutch process work.
- Nut butter: this is the secret ingredient to make the pudding extra thick and smooth. We used cashew milk for its mild flavor, but you could also use peanut butter or almond butter. A seed butter, like tahini, is a great option if you have a tree nut allergy.
- Chocolate: we tested this recipe with chocolate chips and a chopped chocolate bar and they both worked well. I prefer dairy-free semi-sweet chocolate (like Enjoy Life), but you could also use dark chocolate.
- Whipped cream: I kept this super simple and used a pre-made dairy-free whipped topping (we like TruWhip), however, you can make your own whipped coconut cream.
How to Make Dairy-Free Chocolate Pie
Here are the simple steps (with photos!) to make this creamy vegan chocolate pie. Scroll down to the recipe card for full instructions and to make this pie with me.
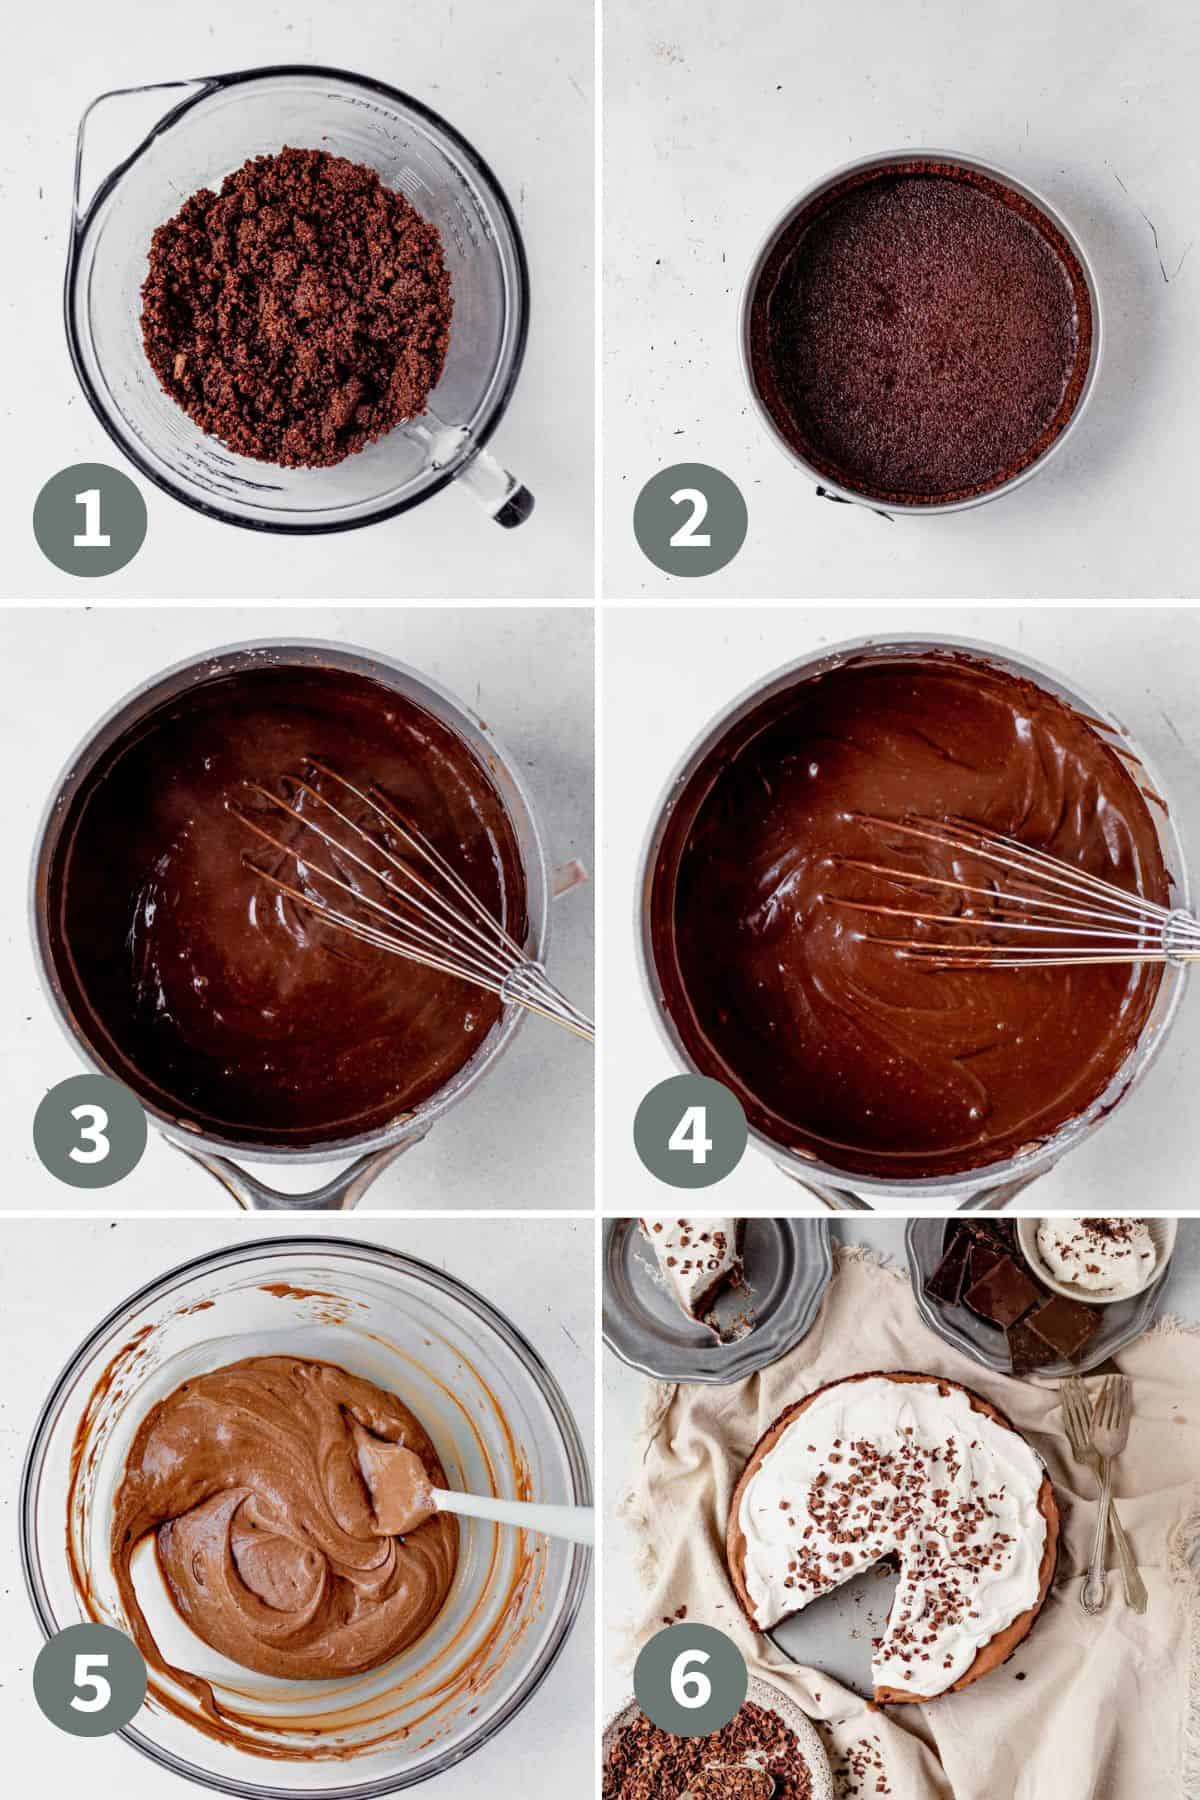
- Cookie crust: crush the cookies in a high-speed blender or food processor, then add the vegan butter and brown sugar and pulse until it’s combined and resembles wet sand.
- Bake crust: Press it into a springform pan, or a deep dish pie pan and bake crust for 10-12 minutes.
- Creamy chocolate pie filling: whisk together the dairy-free milk, cornstarch, sugar, salt, and cocoa powder in a medium saucepan, without turning the heat on. It may take a while to dissolve the cocoa powder, but keep whisking until it’s dissolved and combined. Turn the heat down to medium and stir frequently until it starts to boil, then turn the heat down to low and whisk constantly until it thickens.
- Finish the pudding: Remove the chocolate mixture from the heat and stir in the vanilla, cashew butter, and chopped chocolate. Pour 3/4 of the mixture into the prepared pan.
- Chocolate cream: add whipped topping to the remaining chocolate pudding and use a silicone spatula to carefully fold them together. Layer it on top of the chocolate pudding then cover the pie and chill for at least 4 hours to set.
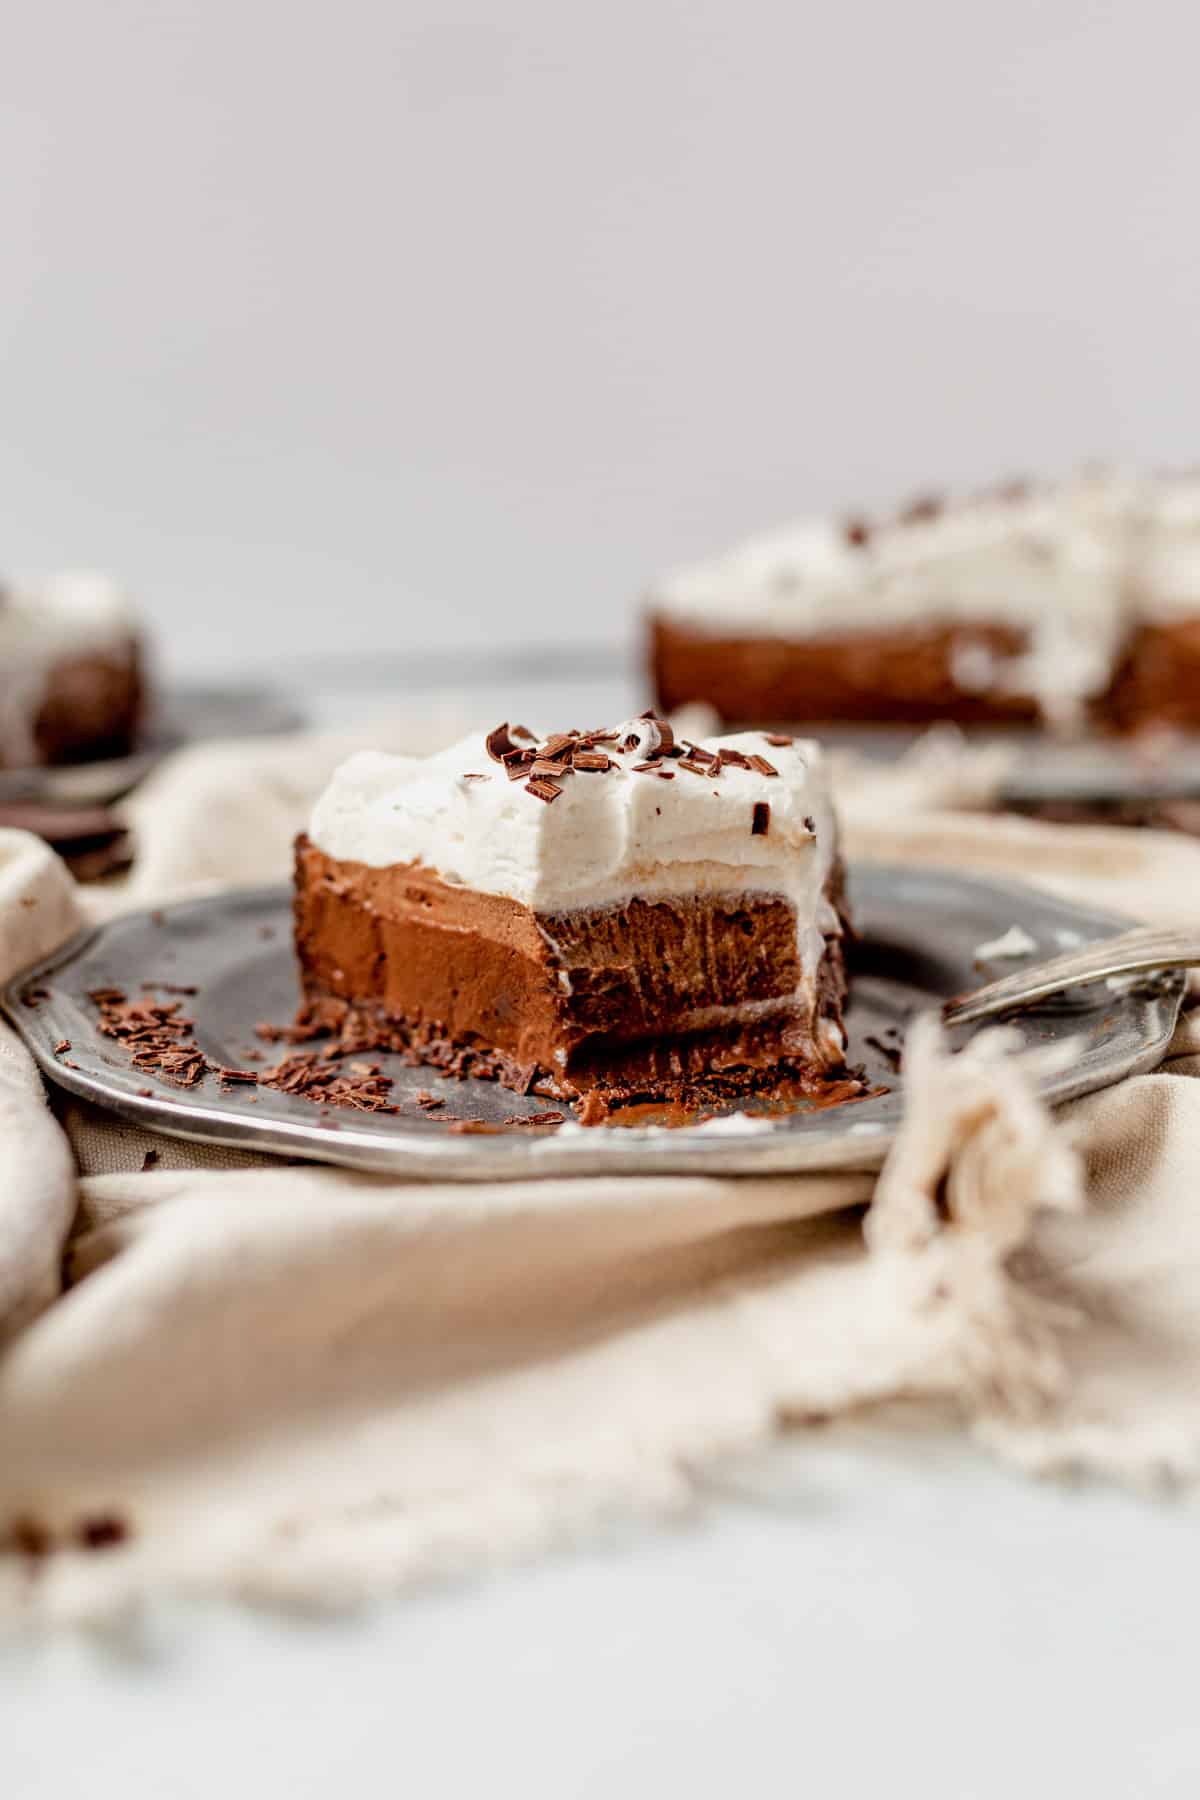
- Finish and serve: Top the pie with more dairy-free whipped cream and sprinkle with chocolate curls. Serve chilled!
Recipe FAQs
Traditionally, chocolate pie is thickened with eggs to make a custard/pudding texture. We’re using cornstarch to thicken the pudding to keep this recipe vegan.
Any pie that doesn’t include dairy, eggs or other ingredients not considered vegan is great. Our vegan banana cream pie and our vegan sweet potato pie are some of our favorites (aside from this one!)
It takes a few hours for the pudding to set, so you cannot skip chilling this pie or it will fall apart when you cut into it. Make sure to leave yourself enough time to make it!
Make-Ahead and Storage Instructions
This recipe needs to chill for several hours, making it the perfect pie to prep in advance. Here are a few options to prep this recipe to save time.
Make-Ahead: make the pie, except for the whipped cream layer, and store it in the fridge for up to 5 days. Wrap it in plastic wrap or foil and serve with whipped cream when you’re ready to eat.
Freeze: To freeze, wrap the pie, in the pie pan, in plastic wrap several times to keep it airtight. Store in the freezer for up to 1 month. Thaw overnight in the fridge and serve chilled or serve it frozen with whipped topping.
Storage: place leftover pie in an airtight container for up to 5 days or in the freezer for up to one month.
More Dairy-Free Pies
- Gluten-free apple pie
- Vegan banana cream pie
- Paleo chocolate pecan pie
- Dairy-free pumpkin pie
- Vegan sweet potato pie
Dairy Free Chocolate Pie
Save this Recipe!
Ingredients
Gluten-Free Cookie Crust
- 2 cups crushed vegan chocolate crunchy cookies (about 8 ounces) (we like Simple Mills chocolate brownie sweet thins)
- 5 tablespoons vegan butter melted, or coconut oil
- 1/4 cup brown sugar or coconut sugar (Note 1)
Vegan Chocolate Pudding
- 4 cups dairy-free milk I used unsweetened almond milk
- 1/3 cup cornstarch or arrowroot starch
- 1/2 cup granulated sugar or coconut sugar
- 1/2 cup unsweetened cocoa powder
- 1/2 teaspoon salt
- 2 teaspoons vanilla extract
- 1/4 cup cashew butter (any nut or seed butter will work)
- 4 ounces dairy-free chocolate chips or chopped chocolate bar
- 1 (9 ounce) carton vegan whipped cream or homemade coconut whipped cream
Instructions
- Grease a 9-inch springform pan or pie dish with non-stick spray then preheat the oven to 350°F.
- Add the cookies to the bowl of a food processor or high-speed blender and pulse a few times to create a fine crumb. Pour in the melted vegan butter or coconut oil and sugar, and pulse again a few times until the mixture resembles wet sand.2 cups crushed vegan chocolate crunchy cookies, 5 tablespoons vegan butter, 1/4 cup brown sugar
- Press the crust into the bottom and sides of the prepared pan. I recommend using a small measuring cup to press firmly down on the bottom and into the sides. Bake in the preheated oven for 10-12 minutes then remove it to a wire rack to cool.
- While it’s baking, make the chocolate pudding. Add the dairy-free milk, cornstarch, sugar, cocoa powder and salt to a medium saucepan. Without turning on the heat, whisk well until the cocoa powder and cornstarch are dissolved. Once the lumps are gone, turn the heat up to medium high and whisk frequently until it starts to boil, then turn the heat down and whisk constantly for one minute until the pudding thickens.4 cups dairy-free milk, 1/3 cup cornstarch, 1/2 cup granulated sugar, 1/2 cup unsweetened cocoa powder, 1/2 teaspoon salt
- Remove it from the heat and whisk in the vanilla, cashew butter and chocolate until its’ melted and smooth.2 teaspoons vanilla extract, 1/4 cup cashew butter, 4 ounces dairy-free chocolate chips
- Pour 3/4 of the pudding into the baked pie crust and smooth it out into an even layer. Place the pudding pie in the fridge and chill. Allow the remaining 1/4 of the pudding to cool. You can add it to the fridge to speed this up.
- Once it's cool, add the remaining 1/4 of the pudding to a medium bowl with 2 cups of the dairy-free whipped topping. Use a spatula to gently fold them together until they’re completely combined and the pudding is light and fluffy. Spread the chocolate cream over the first layer of pudding pie. Cover and chill for at least 4 hours, or up to 5 days.1 (9 ounce) carton vegan whipped cream
- When ready to serve, top the pie with the remaining whipped topping and chocolate curls, if desired. Serve chilled.
Notes
Video
Equipment
- 9-inch springform or deep dish pan
- Medium Saucepan
Nutrition
Nutrition information is automatically calculated, so should only be used as an approximation.
This post may contain affiliate links. Read our disclosure policy.


