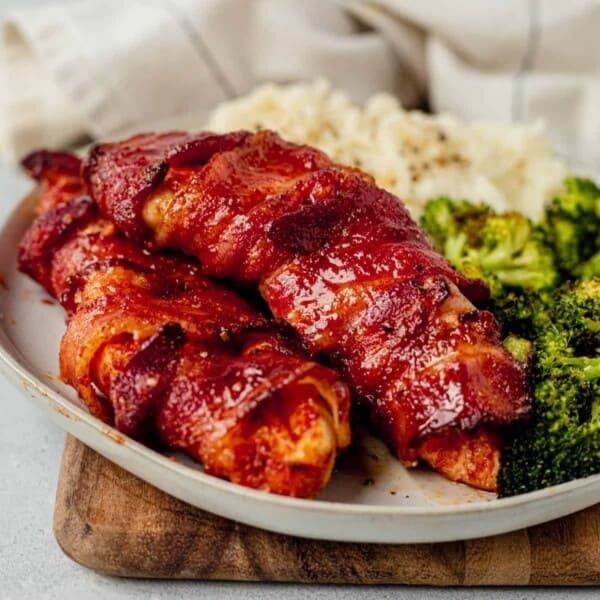
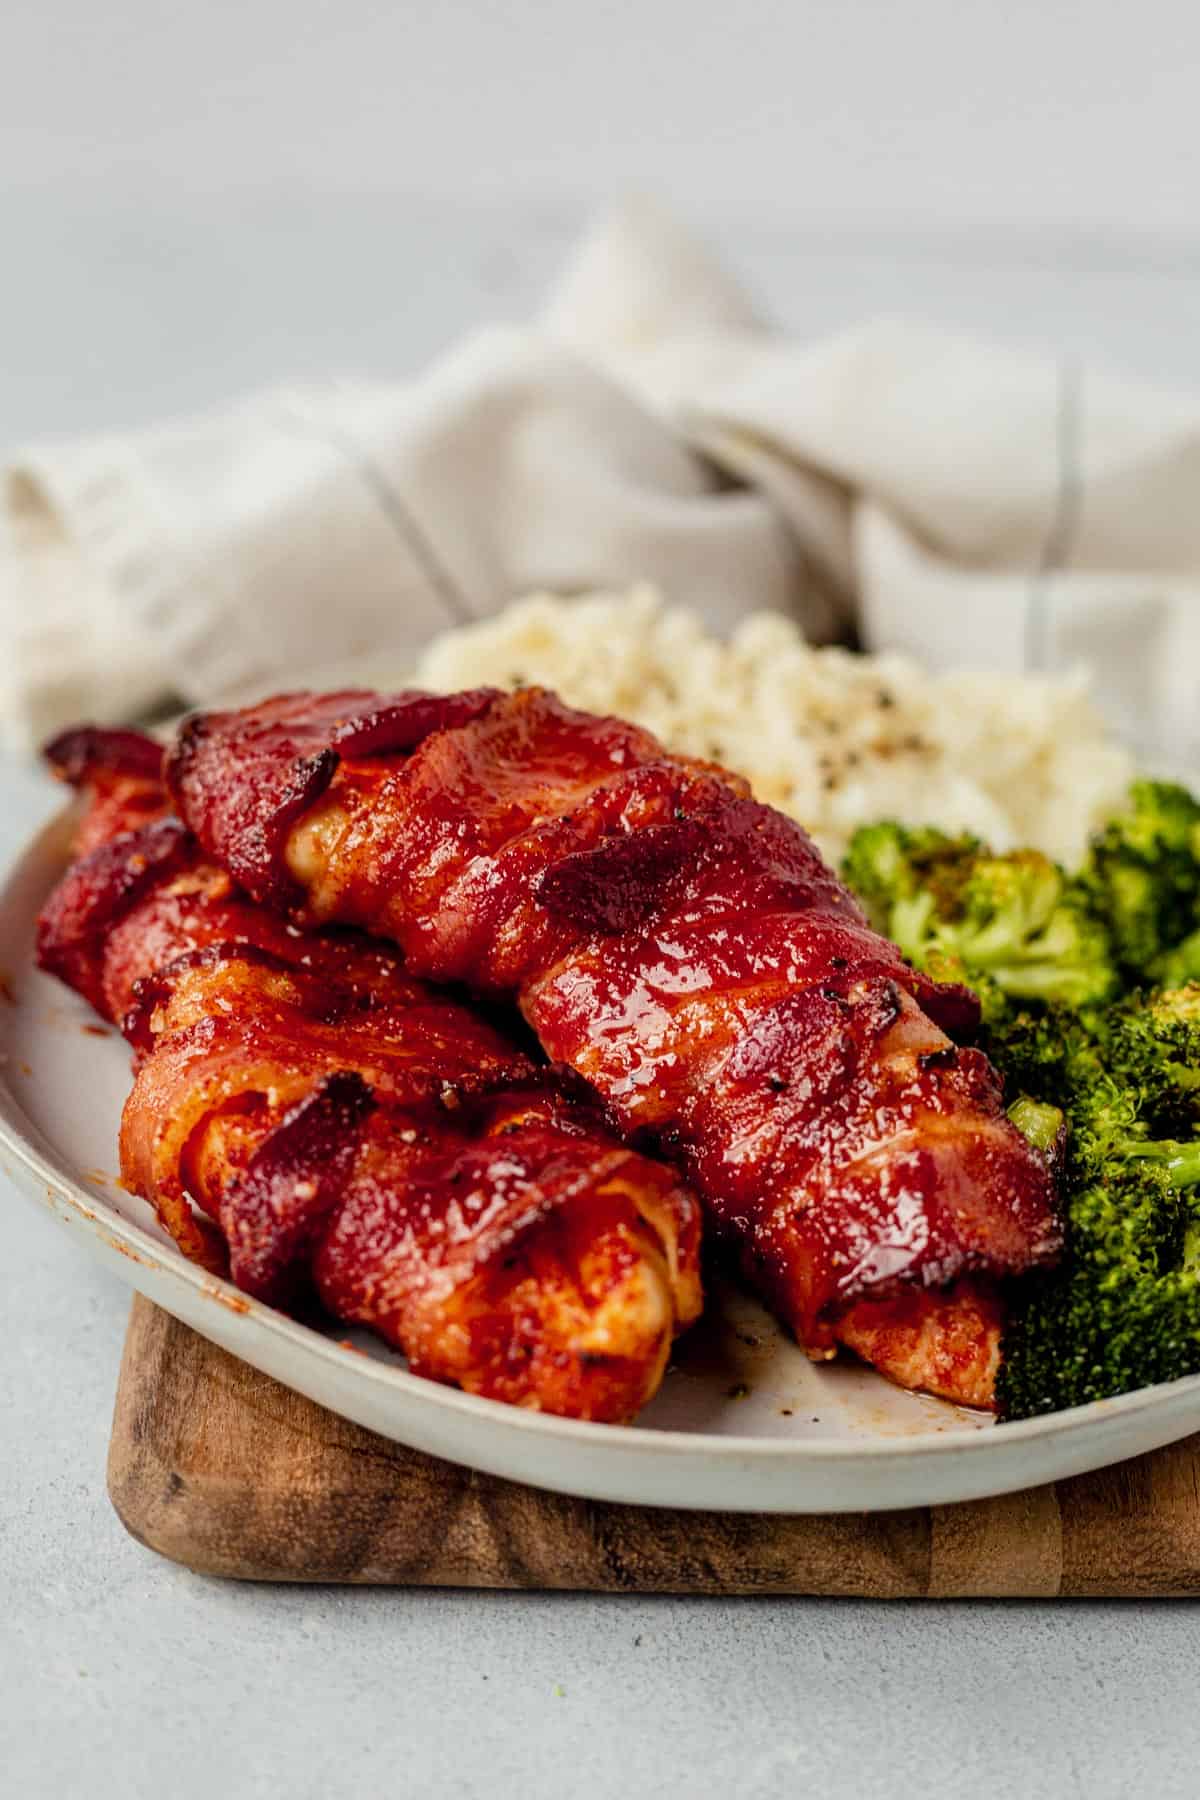
Bacon wrapped chicken breasts in the air fryer are not only quick and easy, but it also minimizes mess and maximizes taste. This dish combines the savory goodness of bacon with tender chicken breasts, all cooked to perfection in your air fryer. It’s perfect for busy weeknights or impressing guests without the hassle.

Why You’ll Love These Bacon Wrapped Chicken Breasts

bowl of turkey teriyaki vegetables and rice on a counter and then a close up of ground turkey teriyaki rice bowl
  • Savory & Sweet: Smoked paprika and maple syrup create a delicious flavor profile.
  • Even Cooking: The air fryer ensures the chicken remains juicy while the bacon crisps perfectly.
  • Healthier Method: Air frying reduces excess fat, making this dish leaner than traditional frying.
  • Quick & Easy: Minimal prep time and faster cooking for busy weeknights.
  • Protein-Packed: 34g of protein and naturally low in carbs.

Need more air fryer recipes? You will love these air fryer meatballs and air fryer salmon bites.

two pieces of air fryer bacon wrapped chicken breast on a plate with broccoli

Ingredients You Need

air fryer bacon wrapped chicken breast ingredients
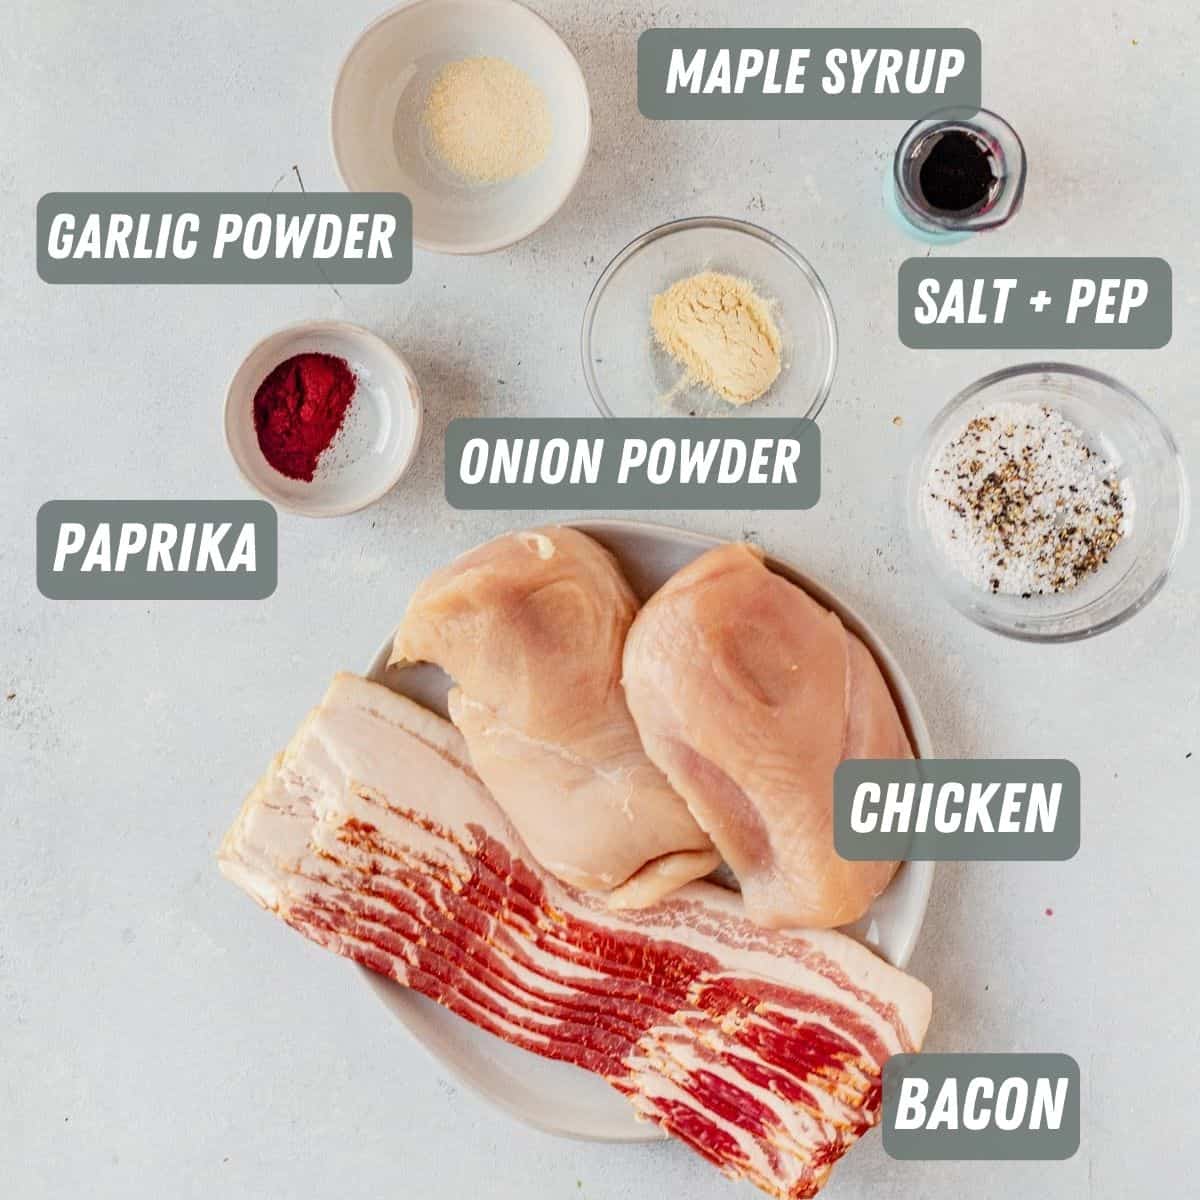
  • Chicken breast: Trimming excess fat prevents greasiness.
  • Spices: smoked paprika, garlic powder, onion powder, kosher salt, and black pepper for a smoky and savory flavor.
  • Bacon: The thinner the better. It cooks evenly and becomes crispy without overpowering the chicken’s tenderness.
  • Maple syrup: Adds a touch of sweetness that caramelizes with the bacon, creating a beautiful glaze.

How to Make Bacon Wrapped Chicken Breasts Air Fryer

seasoned chicken breasts on a cutting board.

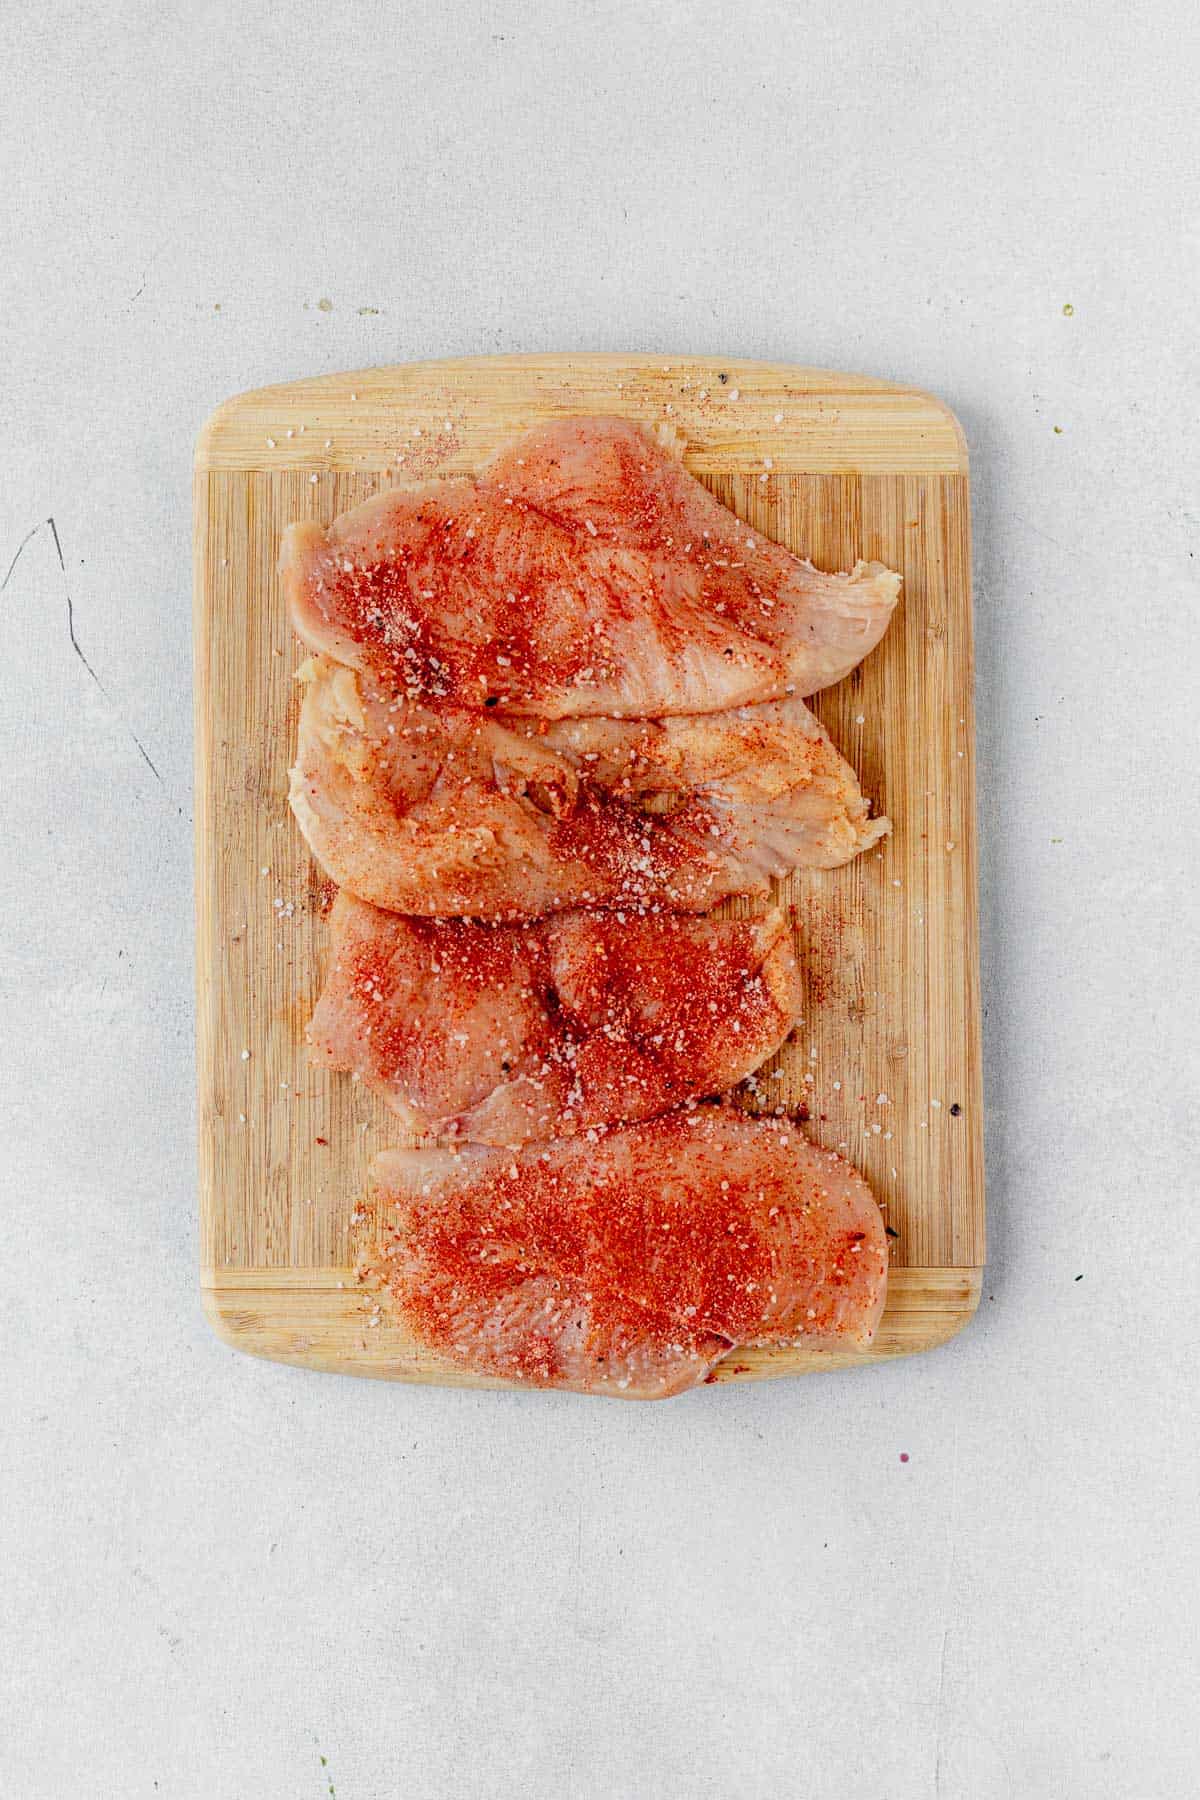
Season the Chicken: trim any excess fat from the chicken breasts and ensure each is 4-5 ounces. Combine seasonings an drub into each side.

four chicken breasts wrapped in bacon on a cutting board.

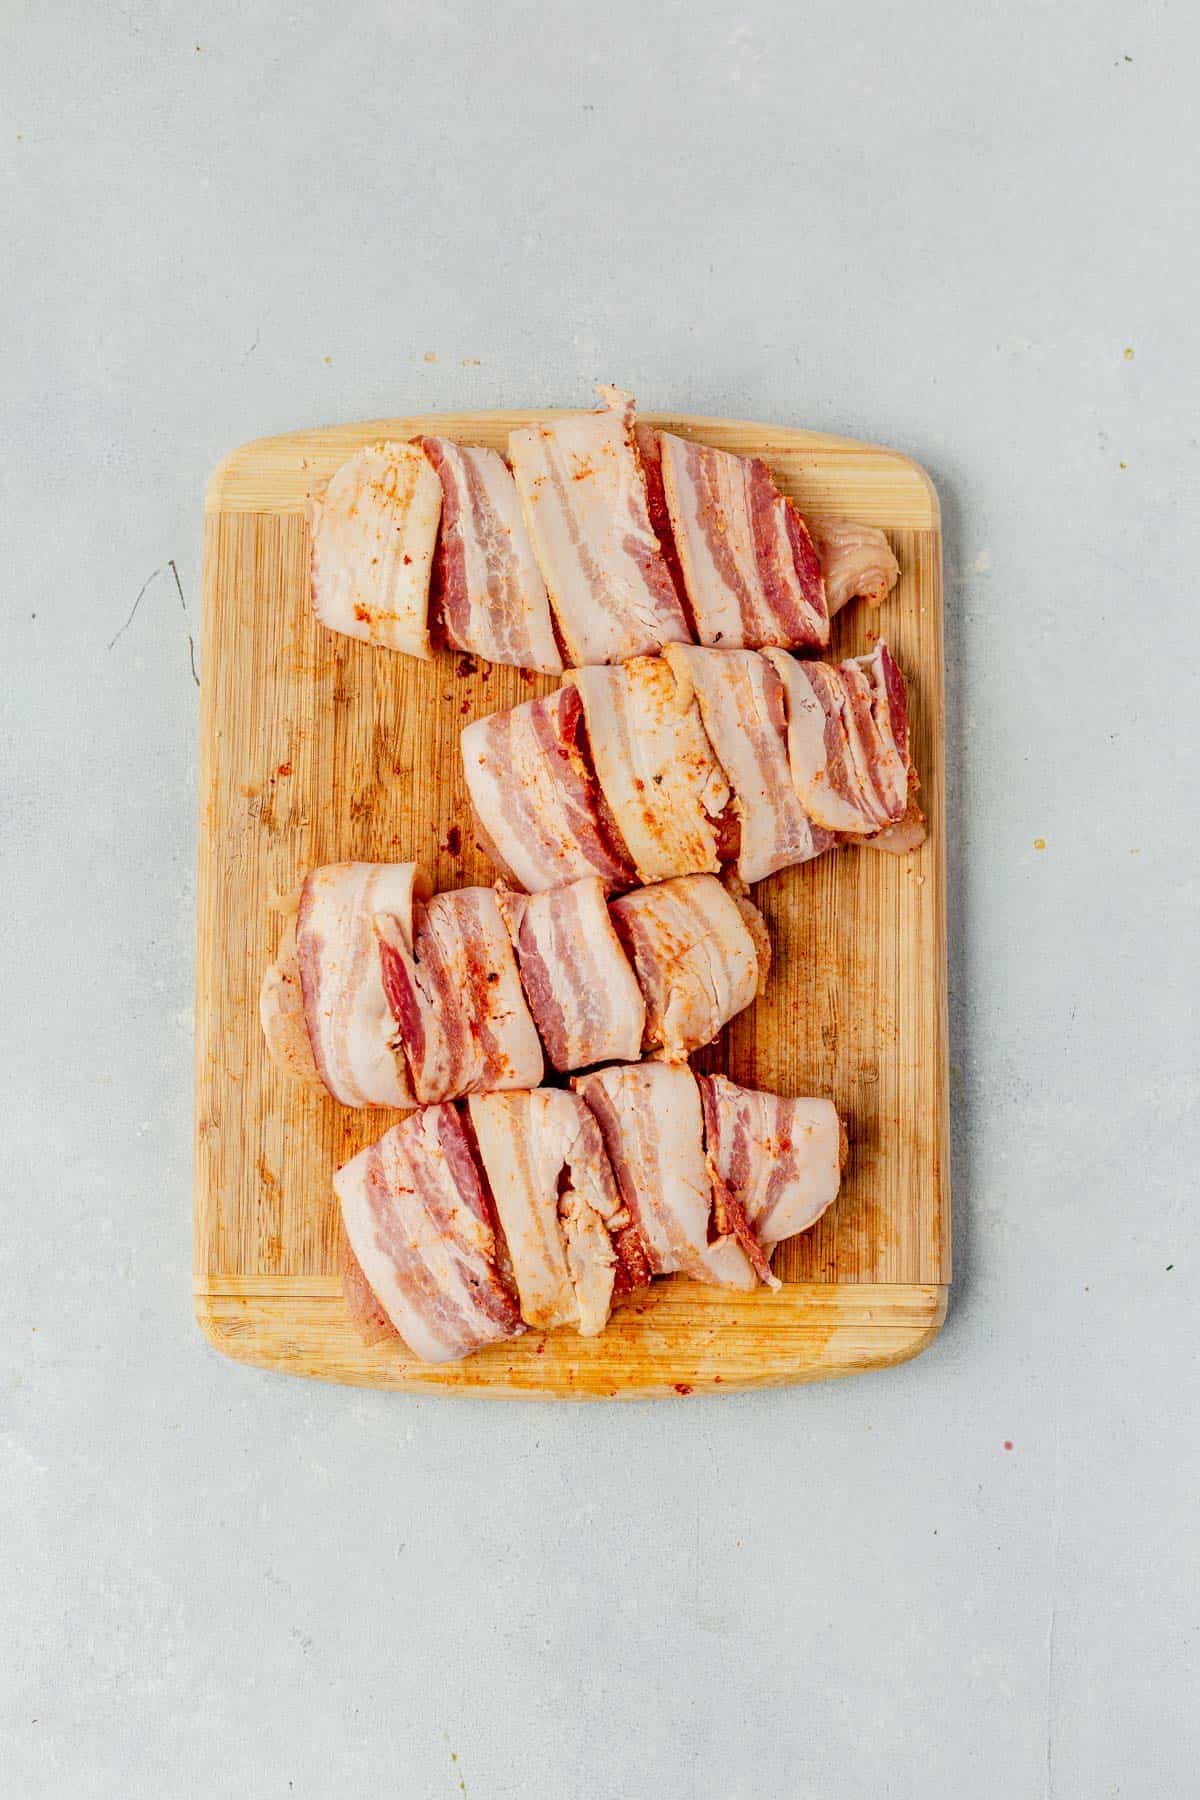
Wrap the Chicken in Bacon. Wrap each seasoned chicken breast with 2 slices of thin-cut bacon, overlapping slightly to account for shrinkage during cooking. Start and end the bacon strips underneath the chicken or use toothpicks to keep them in place.

brushing a maple glaze on top of bacon wrapped chicken.

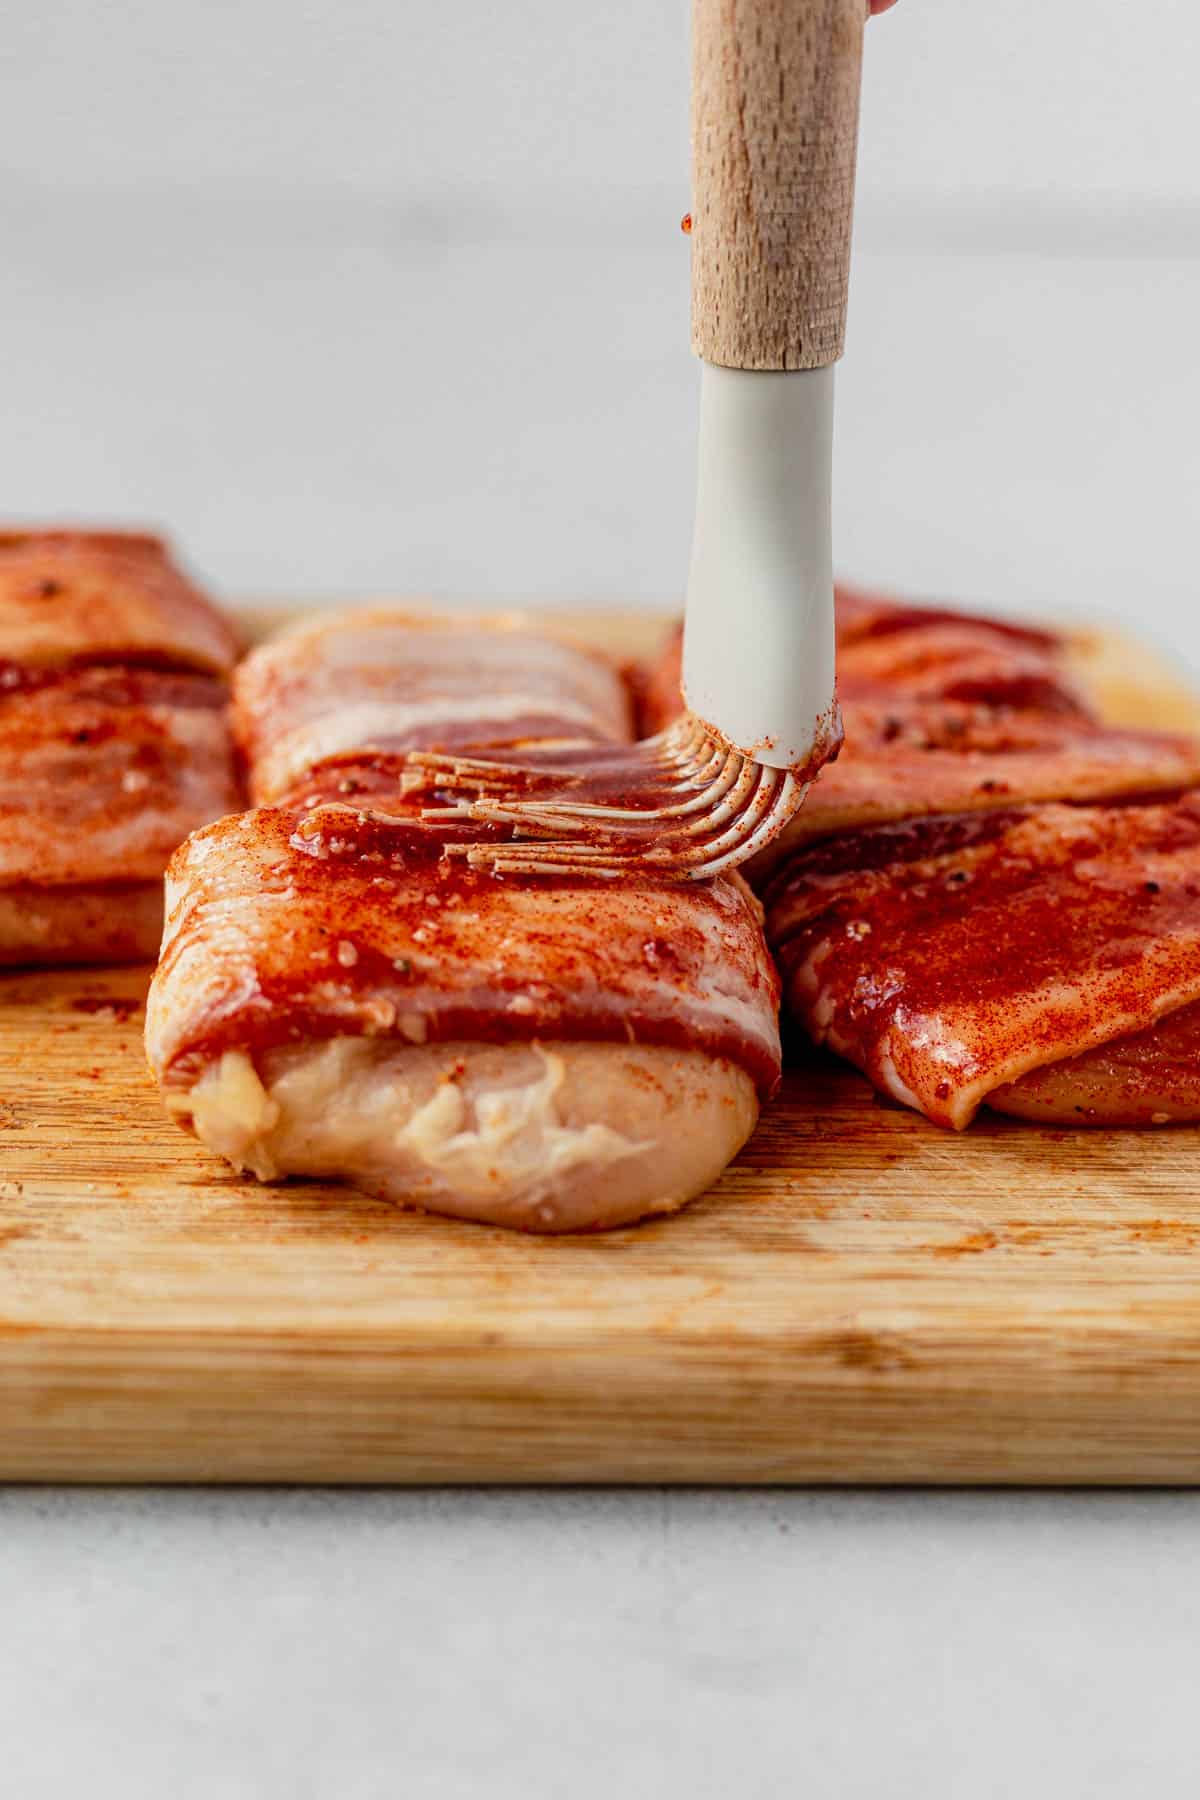
Glaze with Maple Syrup. Brush or spoon a spice and maple mixture evenly over the bacon-wrapped chicken.

uncooked bacon wrapped chicken breast in the air fryer.

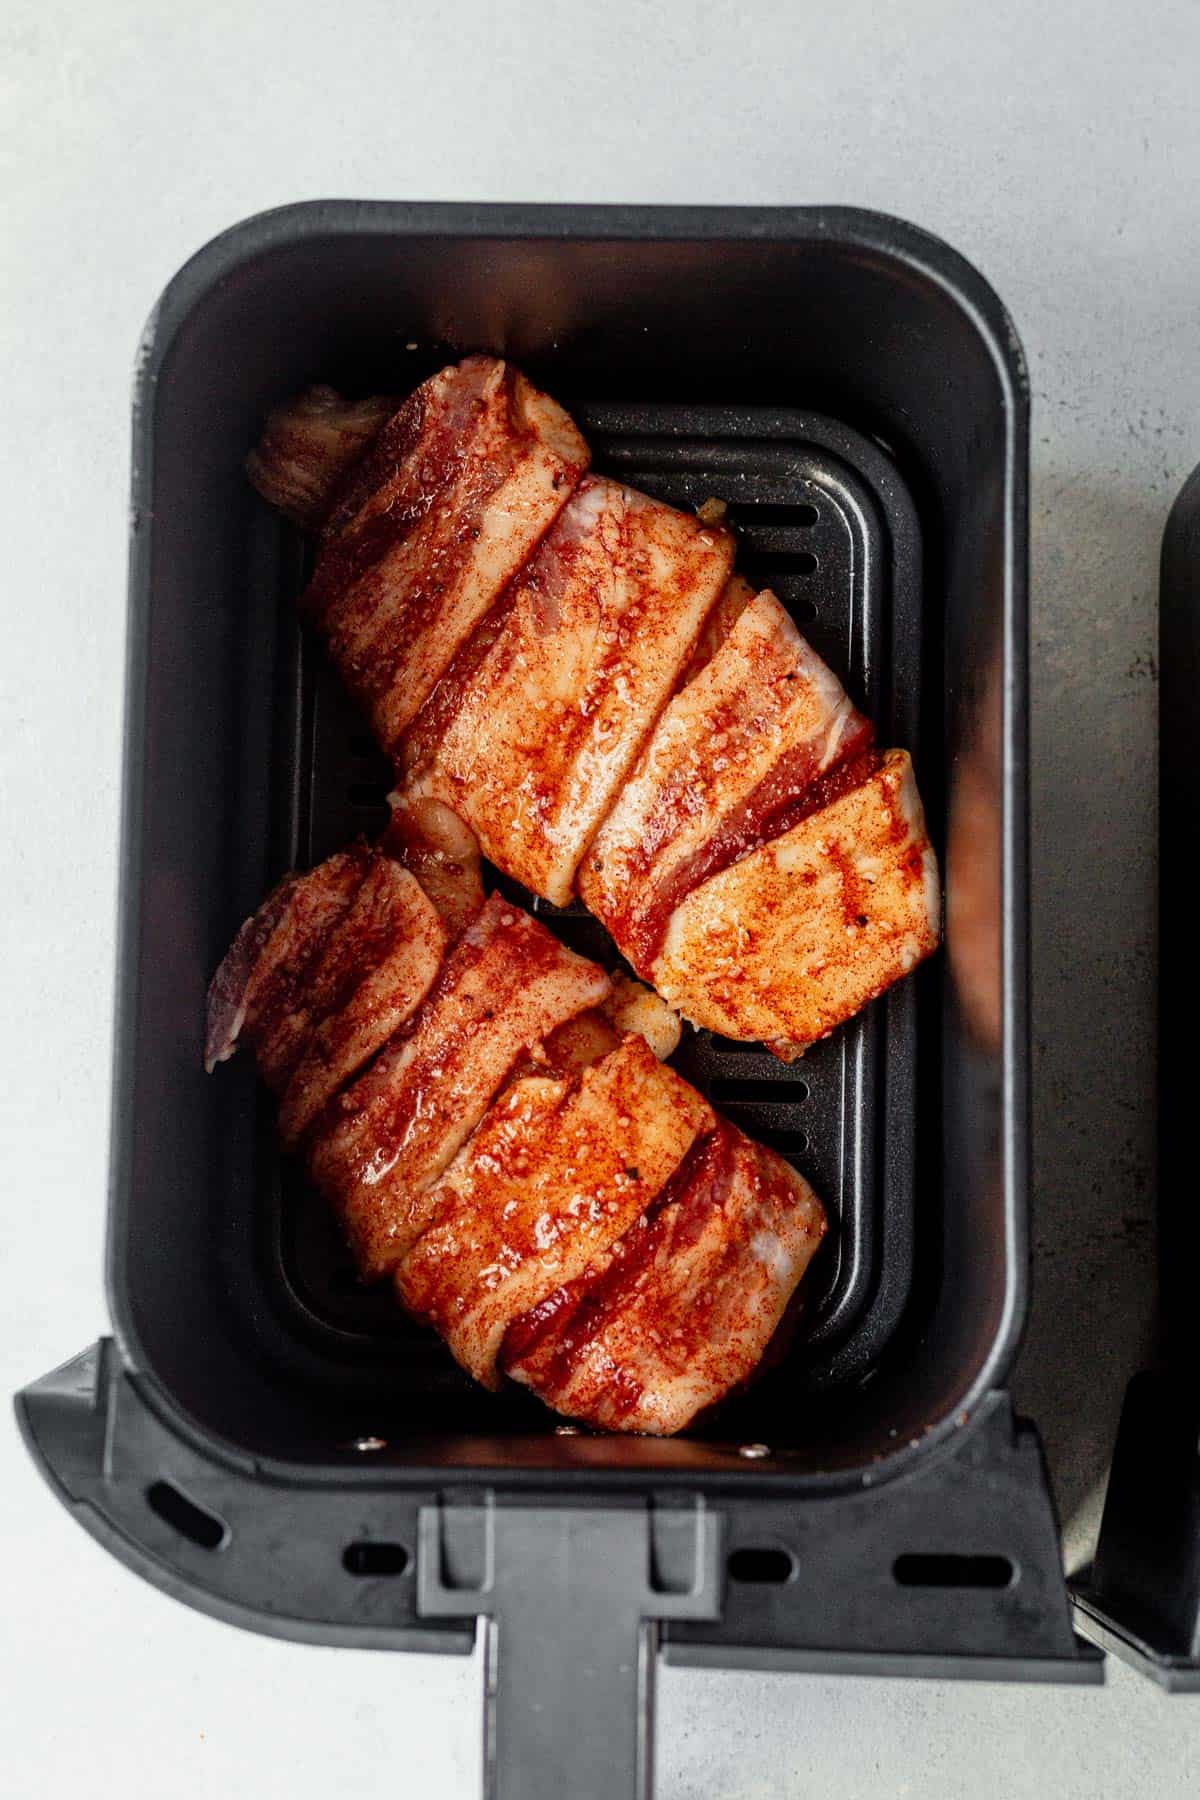
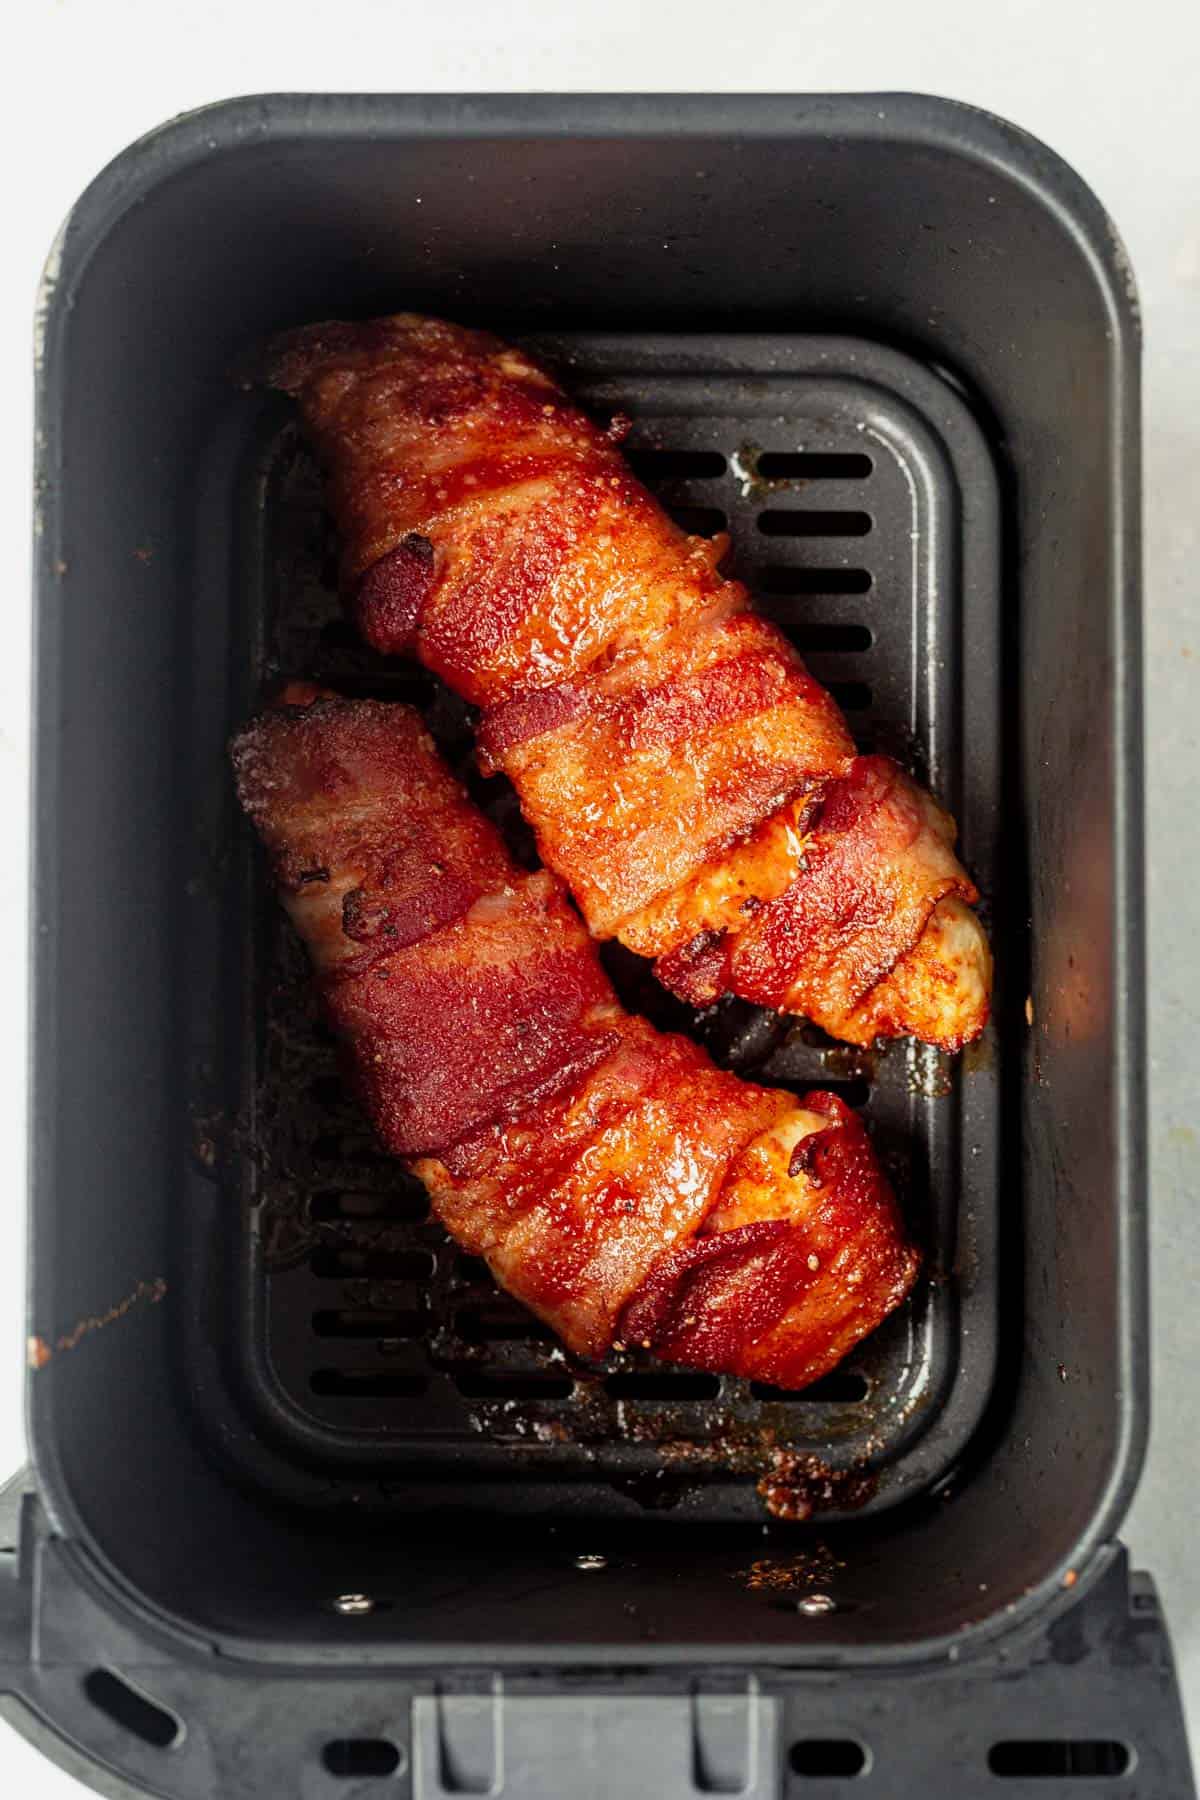
Air Fry. Place the bacon-wrapped chicken breasts in the air fryer basket in a single layer. Cook at 360 for 18-20 minutes.

Expert Tips for Juicy Chicken

  • The size of the chicken breasts matter: they’re all cooking at the same time, so we want to ensure they’re the same size so they cook evenly. You don’t want to end up with one piece of chicken that’s dry and one that’s still raw! Aim for 4-5ounces each. I found this is the sweet spot for this recipe because it allows the chicken to cook to the right temperature, while making sure the bacon is crispy. Use food scale and an instant read thermometer to check the internal temperature of the chicken (165°F).
  • Use thin cut bacon: if it’s too thick it will be undercooked and fatty when the chicken breast is done.
  • Overlap the pieces of bacon as much as possible while you wrap. It will shrink slightly as it cooks so this ensures there aren’t large gaps.
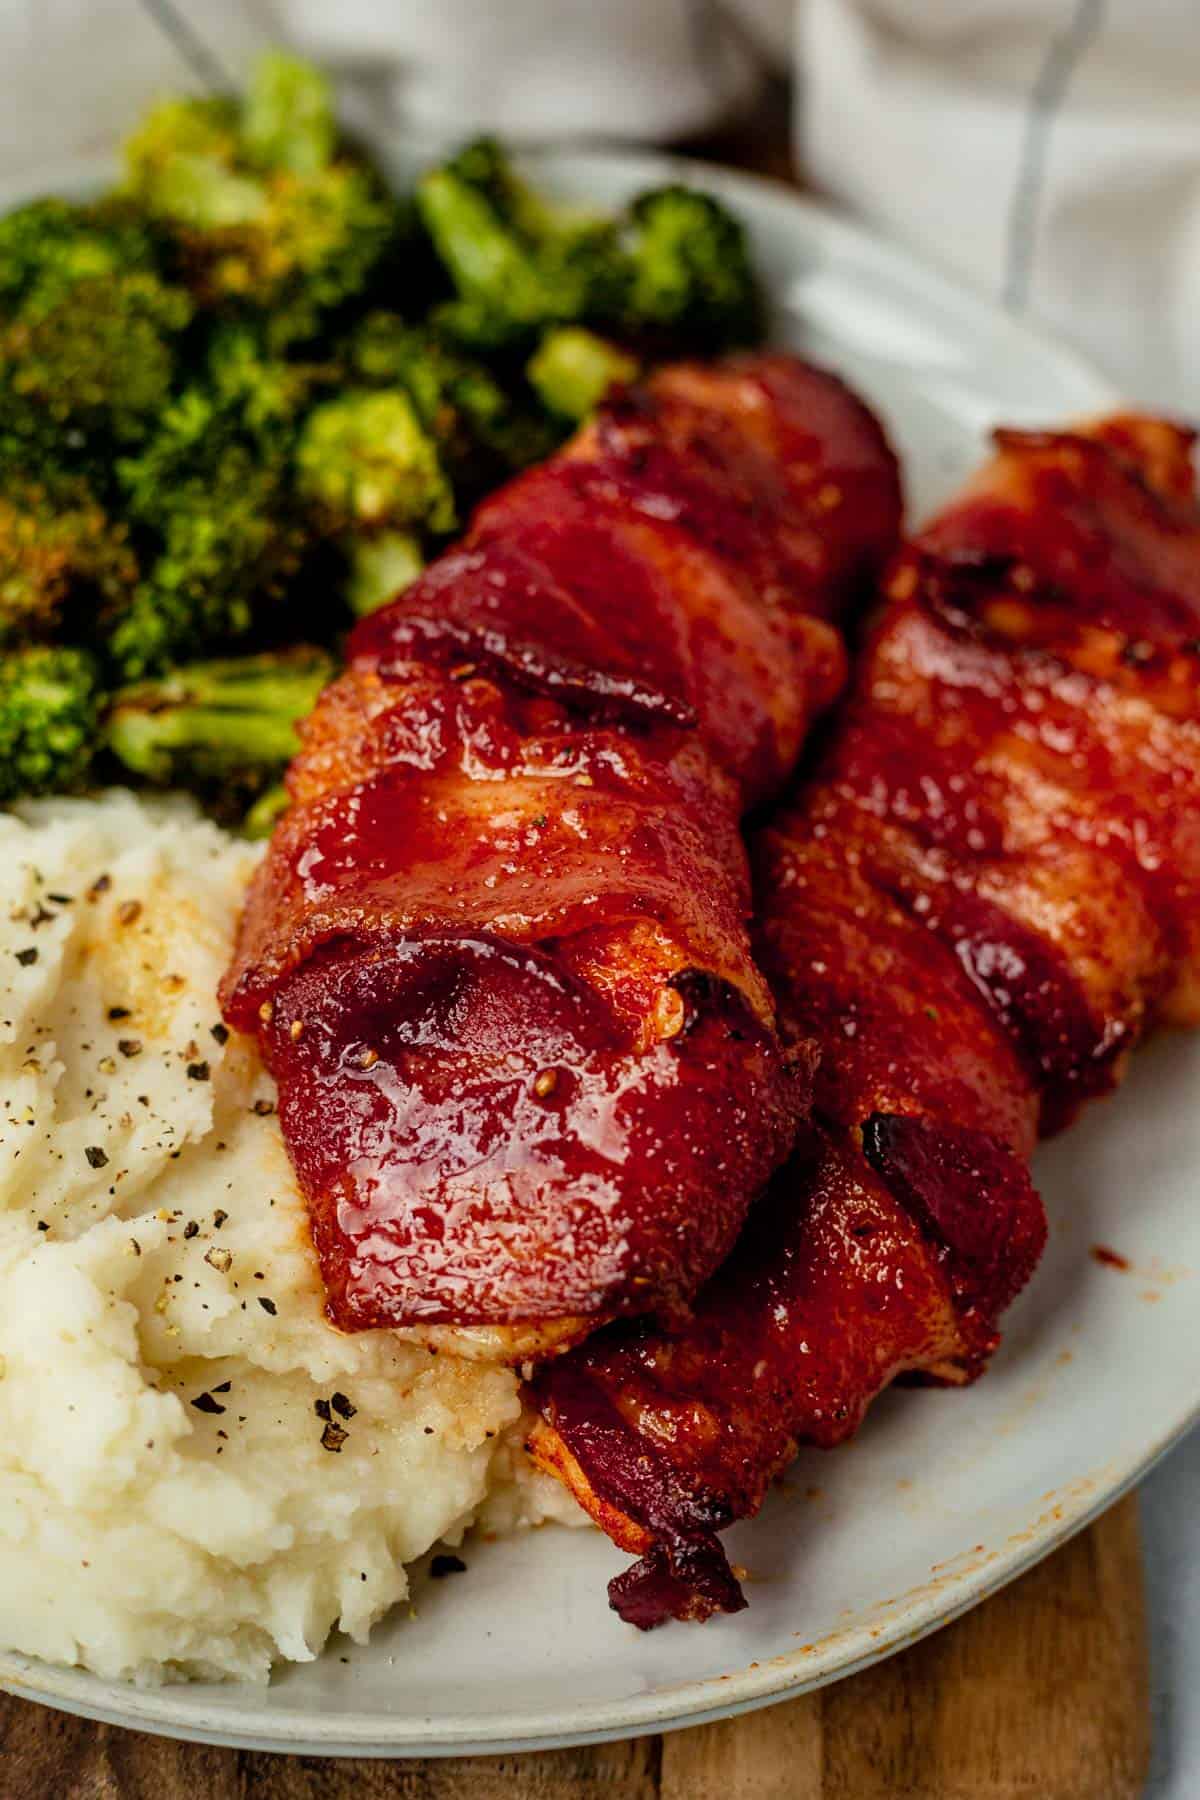
crispy bacon wrapped around chicken breast

Storage Tips

Allow the chicken to cool completely then store leftovers in an airtight container in the refrigerator for up to 3 days.

To reheat, place it back in the air at 375°F and heat until warmed through, about 5 minutes.

You could also cut it into chunks and serve the chicken bites on top of a fresh salad.

two bacon wrapped chicken breasts cooked and crispy in an air fryer basket

Feels like Breakfast on the Beach!

bowl of turkey teriyaki vegetables and rice on a counter and then a close up of ground turkey teriyaki rice bowl
  • Thick and delicious with tons of coconut flavor
  • Takes 5 minutes to make
  • Easy to customize with your favorite toppings
  • Full of healthy fats
  • Add protein powder for a complete breakfast
  • Sweet tropical flavors

Love refreshing smoothies? Try this pitaya smoothie bowl, blueberry raspberry smoothie, or tropical kale smoothie next!

spoon dipped into a coconut smoothie bowl topped with kiwi, banana, and mango slices

Why You’ll Love This Smoothie Bowl

  • Thick enough to scoop with a spoon. Not a drink.
  • 5 minutes from freezer to bowl.
  • One blender, no extra dishes.
  • Add 25g of protein with a scoop of vanilla protein powder. Full breakfast, full morning.
  • Naturally Gluten-Free, Paleo, Dairy-Free, and Vegan. No swaps needed.
  • Pre-portion the fruit ahead so weekday mornings are zero decisions.

Ingredients You’ll Need

coconut smoothie ingredients laid out on a counter
  • Frozen banana. One whole. Banana is the texture anchor; don’t skip.
  • Frozen pineapple. ¾ cup. Pre-cut from the freezer aisle works.
  • Frozen mango. ½ cup. Same rule.
  • Full-fat coconut milk. ⅓ cup, from the can. Shake the can well before measuring or you’ll pour off only the watery part.
  • Coconut extract. Optional, ¼ teaspoon. Boosts the coconut flavor without making it taste like sunscreen. A little goes a long way.
  • Vanilla protein powder. Optional, one 25g scoop. I use Be Well by Kelly because the ingredient list is short. If you add protein powder, add an extra splash of coconut milk to keep it blendable.
  • Toppings. Whatever’s in the kitchen: shredded coconut, chia seeds, fresh fruit, granola, nut butter.

How to Make a Coconut Smoothie Bowl

Vanilla protein powder and frozen fruit in a blender
  1. Add the Frozen Fruit First. Dump all the frozen into a high-speed blender. Don’t add the liquid yet. Start dry.
coconut smoothie ingredients combined in a blender
  1. Add the Liquid Slowly. Add the coconut milk, coconut extract, and protein powder if using. Blend on low first, then high. Stop and stir or tamp down as needed. If the blender stalls, add coconut milk one tablespoon at a time until it moves. Don’t drown it.
  1. Pour and Top. Pile the toppings on, hit it with a drizzle of nut butter or honey if you want, and serve immediately. Smoothie bowls melt fast.

How to Get the Texture Right

The whole thing comes down to ratio: 2 parts frozen fruit to 1 part liquid, give or take. If your bowl is:

  • Not sweet enough (off-season fruit can taste flat): add half a frozen banana or a small drizzle of honey or maple syrup.nt
  • Too thin to scoop: add a few more chunks of frozen fruit and blend again.
  • Too thick to blend: add coconut milk one tablespoon at a time. Not all at once.
  • Stalling the blender: scrape down the sides, tamp the fruit down toward the blades, or pulse instead of run.

Coconut Smoothie Bowl Toppings

The toppings are where you make it yours. A few that work:

  • Chia seeds: crunch and fiber. Half a tablespoon goes a long way.
  • Granola: crunch. Use one with chunky clusters.
  • Shredded coconut or coconut flakes: doubles down on the coconut.
  • Nut butter: coconut almond butter, macadamia butter, or cashew butter for a tropical feel. Warm it slightly so it drizzles.
  • Extra fruit: kiwi, banana slices, mango, fresh pineapple. Sparingly, because there’s already a lot of fruit in the bowl.
  • Bee pollen, hemp hearts, or cacao nibs if you want to lean health-y.

FAQS

Why is my smoothie bowl too thin?

Too much liquid. Add more frozen fruit a handful at a time and blend until it thickens. Or remember the rule for next time: 2 parts frozen fruit to 1 part liquid, max.

Why won’t my blender blend it?

Not enough liquid, fruit not chopped small enough, or the blender isn’t powerful enough. Stop, scrape the sides, tamp the fruit toward the blades, and pulse instead of running on high.

Can I make this without protein powder?

Yes. The recipe works as-is without protein powder. If you do add protein, add an extra splash of coconut milk so it blends.

Is this smoothie bowl dairy-free and vegan?

Yes. With coconut milk and a plant-based protein powder, it’s naturally Gluten-Free, Dairy-Free, Paleo, and Vegan.

Can I prep this ahead?

Yes. Pre-portion the frozen fruit into individual zip-top bags. In the morning, dump one bag in the blender, add coconut milk and protein powder, and blend.

How do I store leftovers?

Store the smoothie base (without toppings) in an airtight container in the fridge for up to 1 day. After that, it separates and loses creaminess. Give it a stir or a quick re-blend before serving.

coconut smoothie bowl with toppings on a counter next to a peeled banana and bowl of toasted coconut
Save this Recipe!
Enter your email & I’ll send it straight to your inbox.
Please enable JavaScript in your browser to complete this form.
Tap stars to rate!
4.34 from 24 votes

Coconut Smoothie Bowl

Prep: 5 minutes
Cook: 0 minutes
Total: 5 minutes
Thick, scoopable, and the closest thing to breakfast on the beach you can pull off in five minutes. Frozen pineapple, mango, and banana blended with full-fat coconut milk and a splash of coconut extract. Add a scoop of vanilla protein powder if you want a full breakfast. The whole thing takes one blender and four ingredients you already have if you keep frozen fruit in the freezer.

Save this Recipe!

Enter your email and we’ll send it directly to you.
Please enable JavaScript in your browser to complete this form.
Servings: 1 smoothie bowl

Ingredients

  • 1 frozen banana
  • 3/4 cup frozen pineapple
  • 1/2 cup frozen mango
  • 1/3 cup full fat coconut milk shaken
  • 1/4 teaspoon coconut extract optional
  • 1 scoop (25g) vanilla protein powder optional
  • Toppings: mango, banana, granola, chia seeds, cherries, nut butter, or coconut

Instructions 

  • Add all ingredients to a highs-speed blender. Blend on high for 1-2 minutes until a smooth and thick consistency. If you don't have a high powered blender it may take a little longer or you may need to add another splash of coconut milk.
    1 frozen banana, 3/4 cup frozen pineapple, 1/2 cup frozen mango, 1/3 cup full fat coconut milk, 1/4 teaspoon coconut extract, 1 scoop (25g) vanilla protein powder
  • Pour into a bowl and top with your favorite toppings
    Toppings: mango, banana, granola, chia seeds, cherries, nut butter, or coconut
Last step! If you make this, please leave a review letting us know how it was!

Notes

 
Protein. My absolute favorite protein is Be Well By Kelly protein powder because of the quality of ingredients. It only has 3 ingredients and not added sugars. 
Tips for Thick Smoothie Bowls
  • Use frozen fruit as the base.
  • Start with less liquid and add more as needed to get the desired texture.
  • Use a high-speed blender for best results.
 

Nutrition

Serving: 1bowl | Calories: 216kcal | Carbohydrates: 55g | Protein: 2.6g | Fat: 6.1g | Cholesterol: 0mg | Sodium: 3.2mg | Fiber: 6g | Sugar: 37.9g

Nutrition information is automatically calculated, so should only be used as an approximation.

Tips for Thick Smoothie Bowls

  • Use frozen fruit as the base.
  • Start with less liquid and add more as needed.
  • Use a high-speed blender for best results.

Prep and Storage Tips

Prep ahead: Pre-portion the frozen fruit into individual zip-top bags so weekday mornings are just dump-and-blend.

Storage: Store the smoothie base in an airtight container in the fridge for up to 1 day. It separates after that.

Freezing: Store in a freezer-safe container for up to a month. Thaw in the fridge overnight, give it a stir, and pour into the bowl.

coconut smoothie bowl with all of the toppings and a spoon dipped into it

Save this Recipe!
Enter your email & I’ll send it straight to your inbox.
Please enable JavaScript in your browser to complete this form.
Tap stars to rate!
5 from 4 votes

Bacon Wrapped Chicken Breasts (Air Fryer)

Prep: 10 minutes
Cook: 18 minutes
Total: 28 minutes
Juicy air fryer bacon wrapped chicken breasts seasoned with smoky spices and brushed with a maple glaze. The bacon gets perfectly crispy while keeping the chicken tender and flavorful—ready in under 20 minutes.

Save this Recipe!

Enter your email and we’ll send it directly to you.
Please enable JavaScript in your browser to complete this form.
Servings: 4 chicken breasts

Ingredients

  • 4 (4-5 ounce) boneless skinless chicken breasts
  • 1 1/2 teaspoons smoked paprika
  • 1 teaspoon EACH: garlic powder and kosher slat
  • 1/2 teaspoon onion powder
  • 1/4 teaspoon black pepper
  • 8 slices of bacon thin cut
  • 2 tablespoons pure maple syrup

Instructions 

  • Prepare the chicken breast by trimming excess fat and weighing each breast to ensure they’re 4-5 ounces each. If they’re too large, slice them in half lengthwise to make them thinner. Next, mix all of the spices together in a small bowl then use half of the mixture to rub it all over the chicken breast, reserving the other half for later.
    4 (4-5 ounce) boneless skinless chicken breasts, 1 1/2 teaspoons smoked paprika, 1 teaspoon EACH: garlic powder and kosher slat, 1/2 teaspoon onion powder, 1/4 teaspoon black pepper
  • Wrap each piece of chicken in two pieces of bacon, doing your best to overlap the bacon slightly because it will shrink while it cooks. Do your best to start and end the pieces of bacon underneath the chicken so that the weight of the chicken holds it in place as it cooks. You could also add toothpicks to the ends of each bacon strip to keep them in place.
    8 slices of bacon
  • Pour the maple syrup into the bowl with the remaining spices then use a brush or the back of a spoon to spread the mixture over the chicken breast and bacon.
    2 tablespoons pure maple syrup
  • Place the bacon wrapped chicken breast in the air fryer basket and air fry for 18-20 minutes, or until a meat thermometer reads almost 165°F. We like to pull it a few degrees before to allow for carry over cooking.
Last step! If you make this, please leave a review letting us know how it was!

Notes

Make it in the oven: place the bacon wrapped chicken breast in a baking dish or on a baking sheet with aluminum foil and bake at 425°F for 18-22 minutes.
Storage: Allow the chicken to cool completely then store leftovers in an airtight container, or covered in plastic wrap, in the fridge for up to 3 days.
Reheat: place it back in the air at 375°F and heat until warmed through, about 5 minutes. You could also cut it into chunks and serve the chicken bites on top of a fresh salad.
Boneless skinless chicken thighs: these are ok to use as well, just ensure they’re all the same size.
Chicken tenderloins: definitely make sure you’re using thin cut bacon if you opt for chicken tenders, because they will cook much faster. Start checking them around 12 minutes to see if they’re done.
Add BBQ sauce: open the lid of the air fryer 2-3 minutes before they’re done cooking and coat the top with your favorite barbecue sauce (we like Primal Kitchen), then finish cooking and let the sauce warm and bubble in the air fryer.

Video

Nutrition

Serving: 1chicken breast | Calories: 283kcal | Carbohydrates: 9.8g | Protein: 33.9g | Fat: 11.5g | Cholesterol: 105.5mg | Sodium: 752mg | Fiber: 1.3g | Sugar: 6.4g | Vitamin A: 90.7IU | Vitamin C: 0mg

Nutrition information is automatically calculated, so should only be used as an approximation.

FAQs

What temperature do you cook boneless chicken breast in the air fryer?

Chicken breast does well in the air fryer at 375°F or 400°F. The air fryer gets a little hotter than the oven, but still does well with a hotter temp and lower cook time. 

How many minutes for a chicken to cook through in an air fryer?

A 4-5 ounce chicken breast takes 18-20 minutes to cook in the air fryer at 375°F. The same size chicken breast takes 15-18 minutes to cook at 400°F. 

Can I use thick-cut bacon instead of thin-cut?

Yes, but be mindful that thick-cut bacon may require a longer cooking time to become crispy. Adjust the air frying time accordingly and check for desired crispiness.

How can I ensure the bacon stays crispy?

Ensure the bacon is overlapped slightly and securely wrapped around the chicken. Avoid overcrowding the air fryer basket to allow proper air circulation, which helps achieve crispiness.

This post may contain affiliate links. Read our disclosure policy.

5 from 4 votes (2 ratings without comment)

Leave a comment

Your email address will not be published. Required fields are marked *

Recipe Rating


8 Comments

  1. Ale says:

    Oh my goodness! This chicken is so yummy!
    I used my instapot on airfry mode at 375 F. I needed to check from time to time to avoid the burning of the bacon. I think they were done in less than 15min.

    1. Molly Thompson says:

      So glad you liked it!

  2. Laura says:

    5 stars
    These turned out moist& delicious. I made them per the recipe. It made a very nice light meal that took minimal time & my husband loved them!

  3. Dawn says:

    Chicken bacon wrap sounds good but she didn’t say what temperature to air fry it at

  4. Kellie says:

    Original air fryer temp is 375 degrees same as reheat temp?

  5. Kelly Meyers says:

    5 stars
    Soo Good!!!

    1. Ed says:

      What temperature did you air fry them at?

  6. Kelsey Warren says:

    So simple but SO flavorful! I love that the ingredients are staples you would typically keep at home. This would make a perfect weeknight meal!

    I browned the chicken breasts on both sides before baking at 425. It turned out great! We’ll definitely be adding this into our regular rotation!