

There’s this specific kind of weeknight that calls for something cozy. Not takeout-guilty cozy. Like, actually-made-something-great cozy. This is that recipe.
I started making baked chicken curry noodles because I was tired of standing at the stove and stirring.
The idea was simple: what if I just put everything in a pan, threw it in the oven, and walked away? Turns out, it works better than the stovetop version. The sauce gets thick and silky, the chicken stays juicy, the noodles soak up all that coconut curry goodness, and I only have one dish to clean.
My family has made this on rotation ever since. It disappears every single time.
Why These Chicken Curry Noodles Work in One Pan
Most chicken curry noodle recipes have you going back and forth between pans. Sauté the aromatics here, cook the chicken there, boil the noodles separately, combine everything at the end. It’s fine. But this isn’t that.
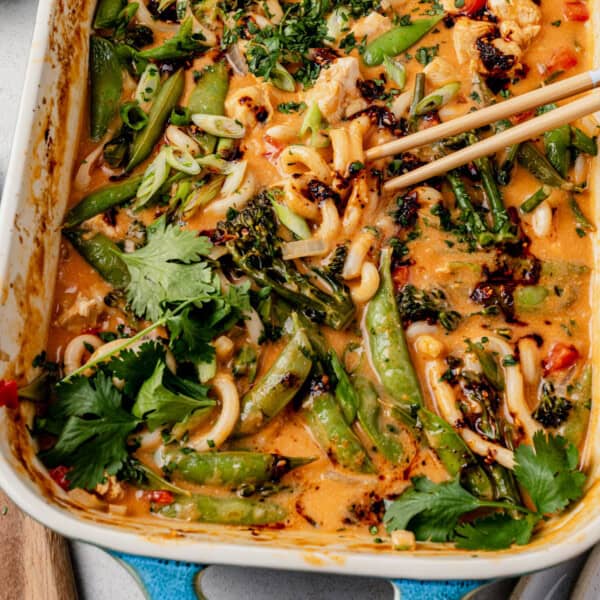
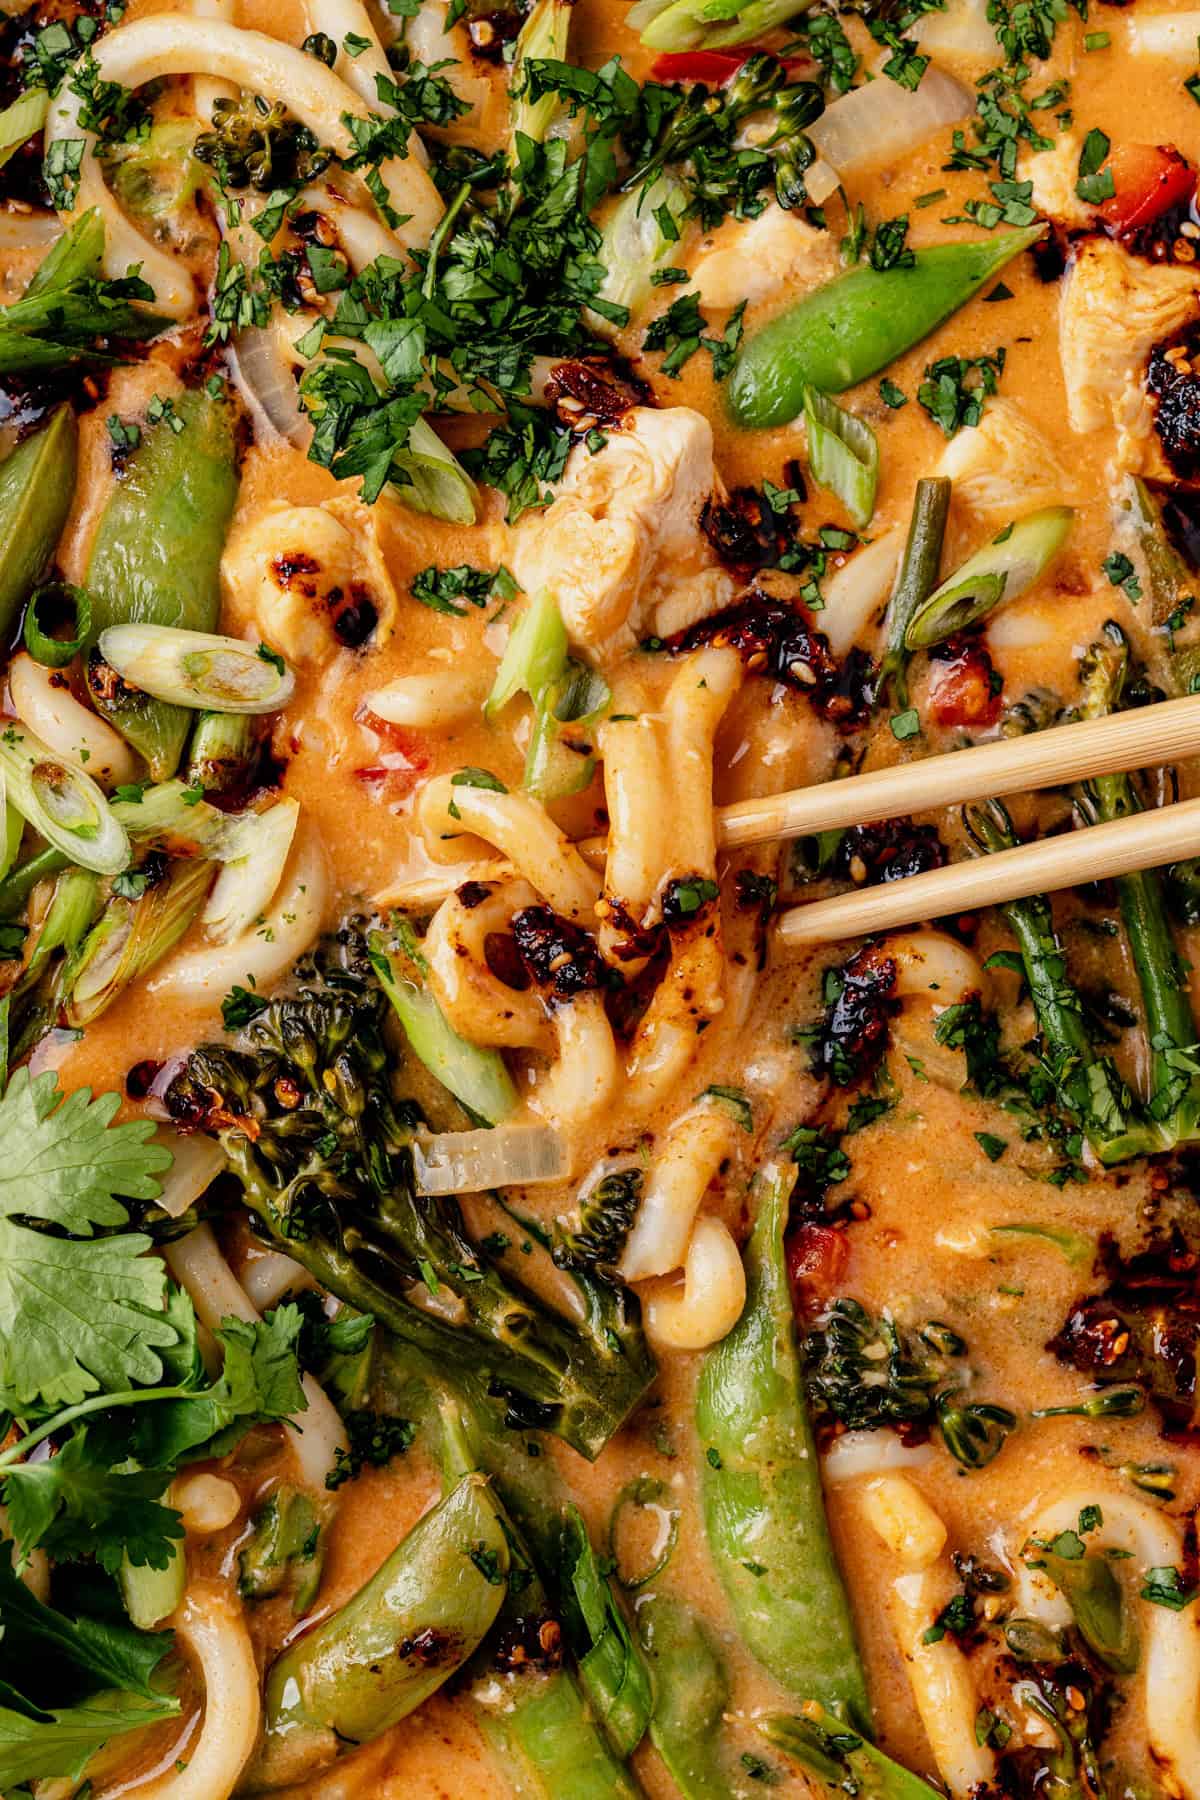
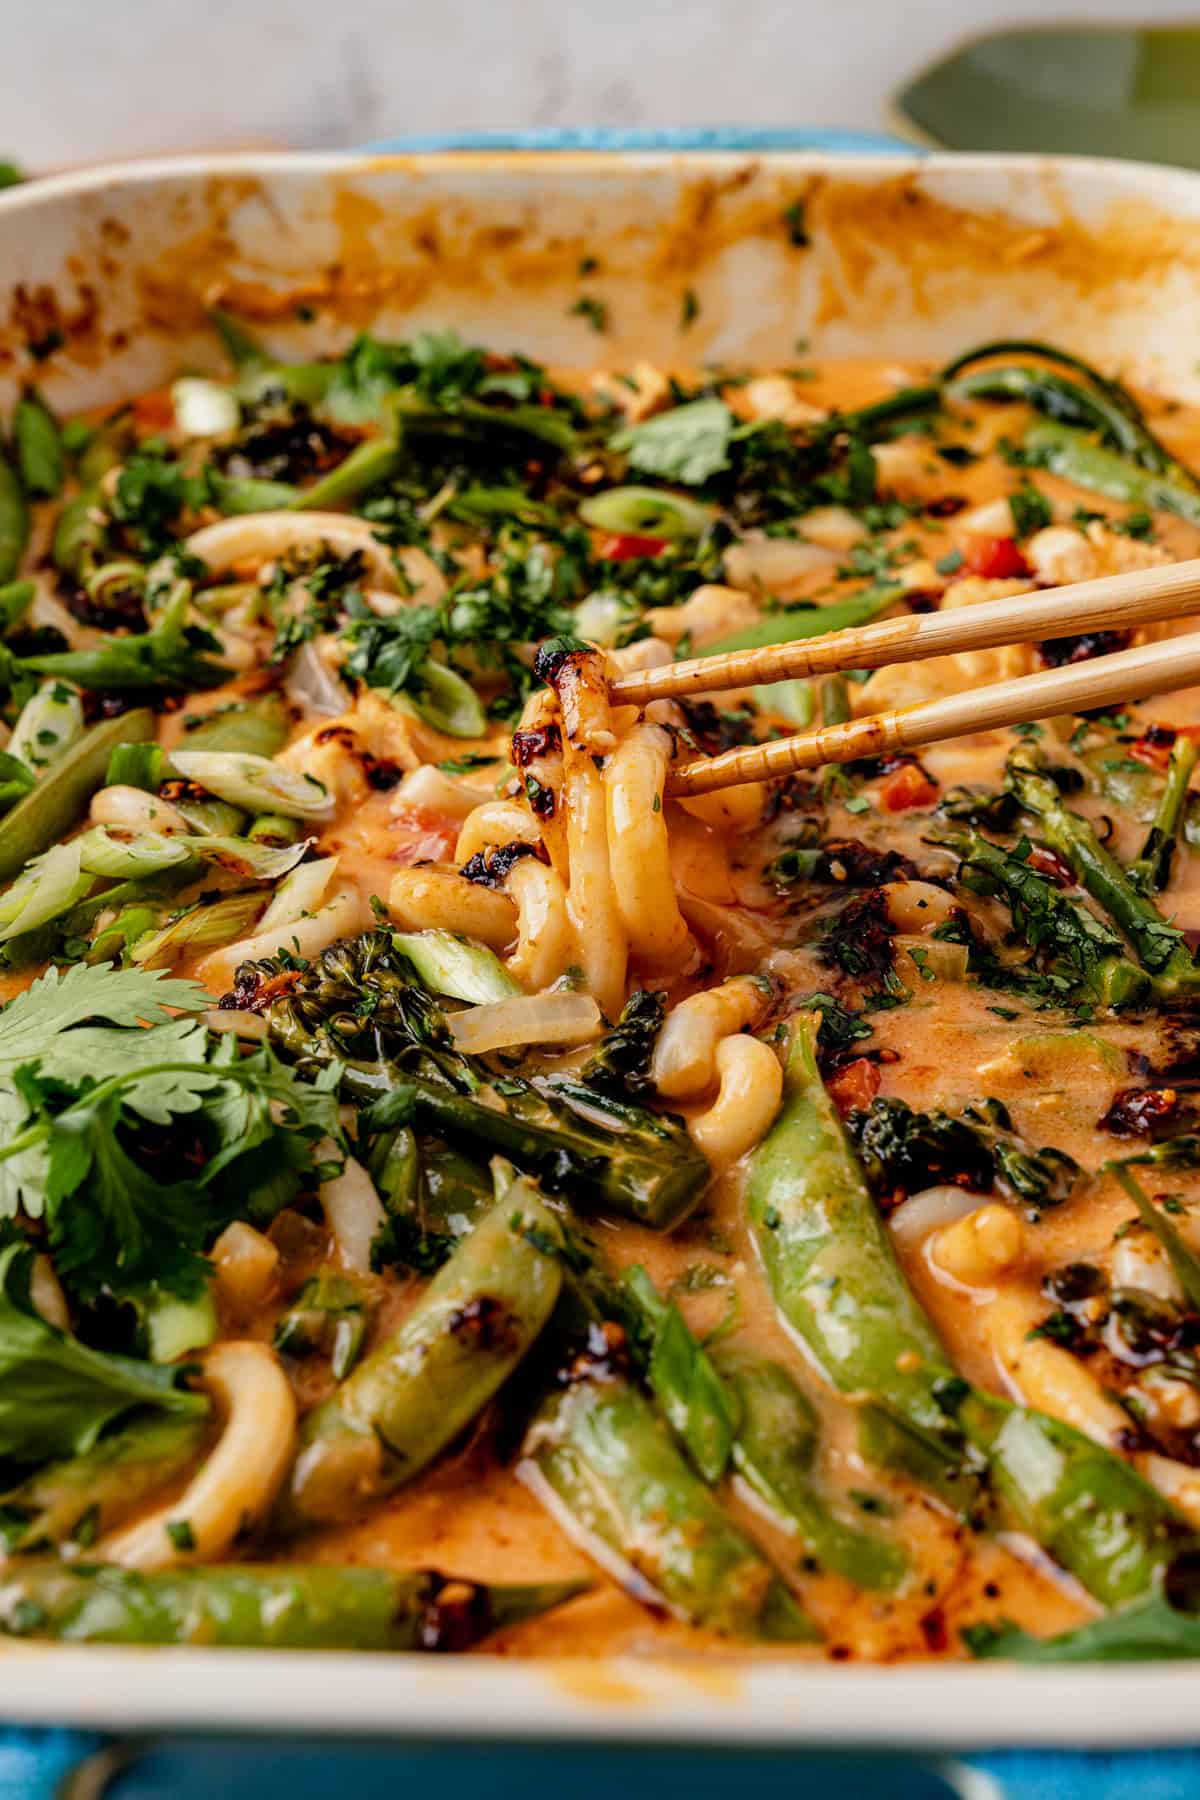
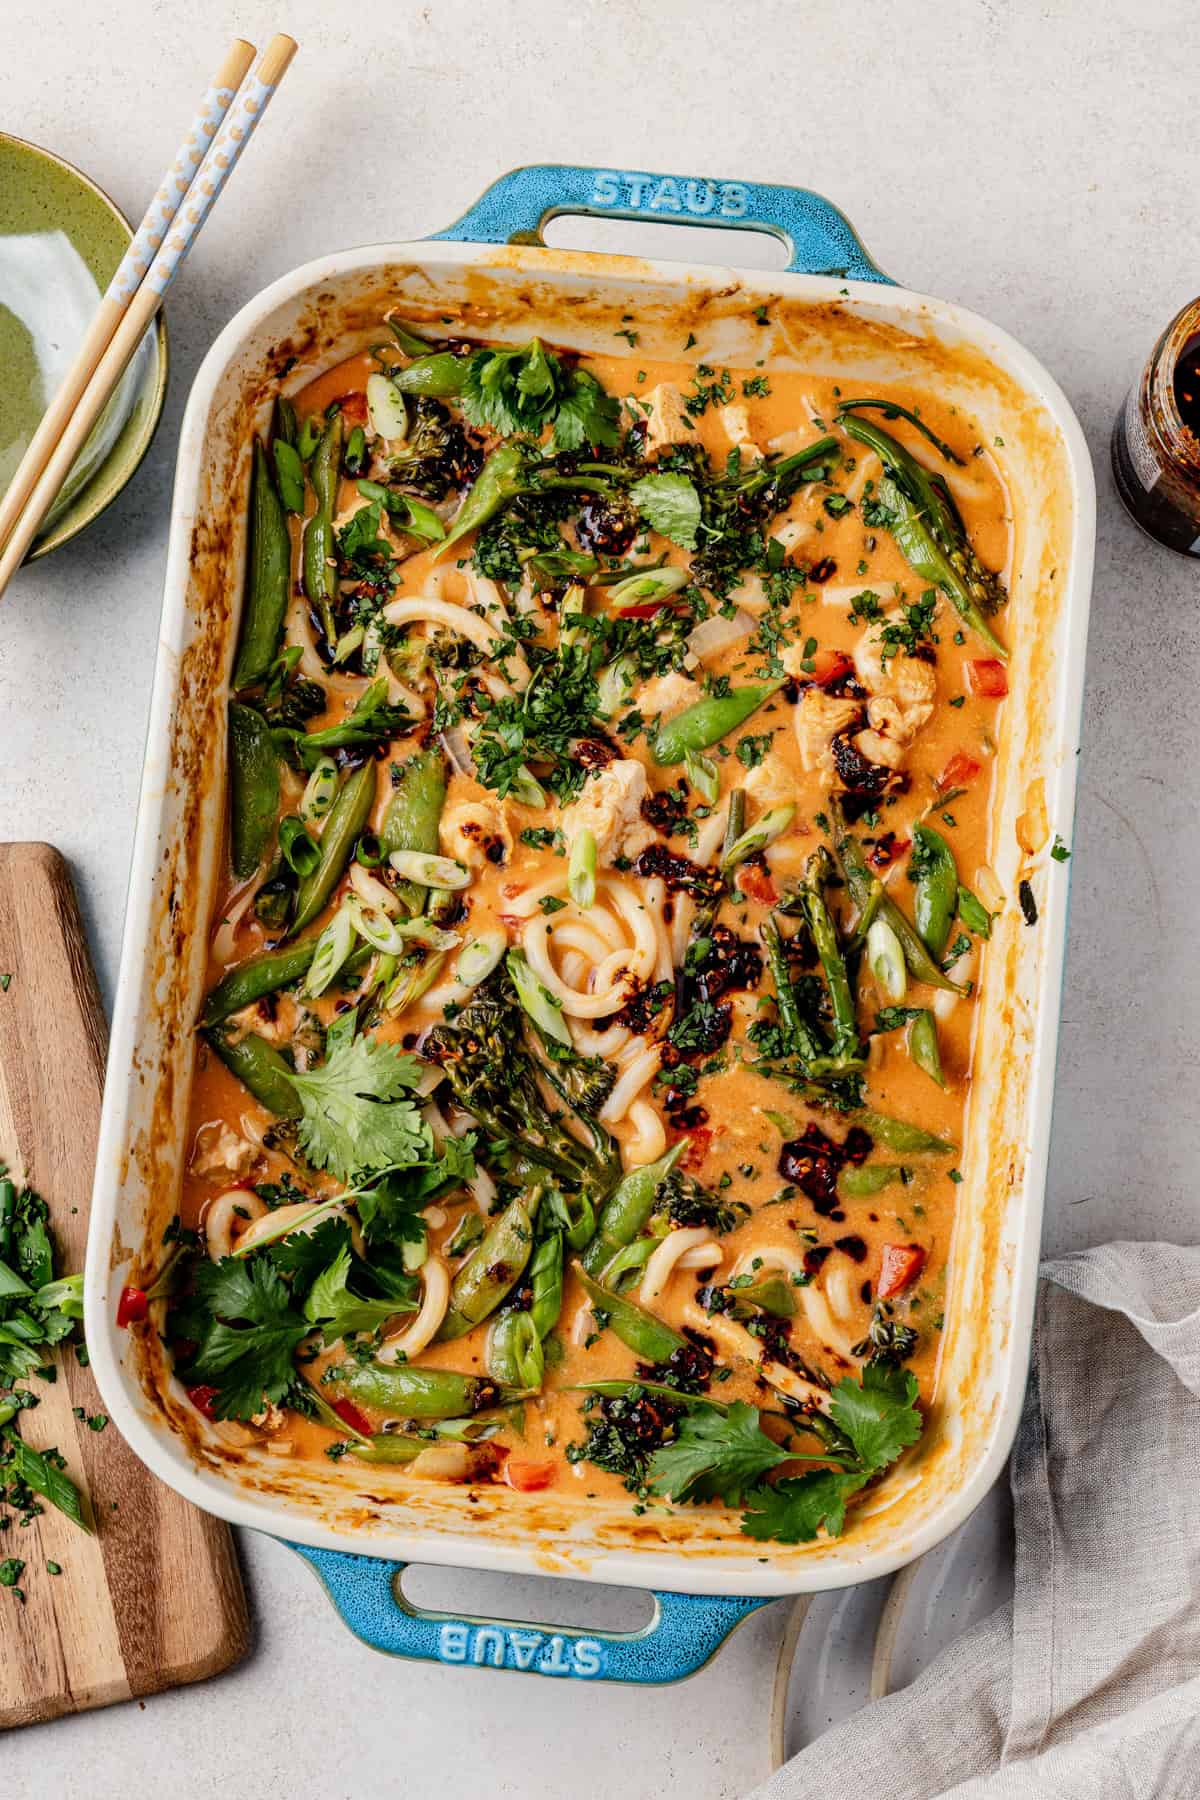
This version uses a 9×13 baking dish and your oven. You whisk the sauce together right in the pan, toss the chicken and vegetables in, cover it tightly with foil, and let the oven do the heavy lifting. Halfway through, you add the noodles and a cornstarch slurry directly into the dish, stir, and bake again until everything is thick, glossy, and done.
The result is a sauce that actually clings to the noodles instead of pooling at the bottom. The chicken comes out tender. The vegetables stay just slightly crisp. And the whole thing tastes like it simmered for hours.
This is one of my favorite tricks! The oven creates a low, even heat that no stovetop stir-fry can replicate. Trust me on this one!
If you love one-pan dinners, you’ll want to bookmark my hawaiian chicken and coconut rice and healthy chicken pad thai to make next.
What You Need to Make It
Here’s what goes into this recipe and why each piece matters.
- Full-fat coconut milk is non-negotiable. I’ve tested this with light coconut milk and the sauce never gets that thick, creamy consistency you’re after. Shake the can well before opening.
- Red curry paste is where the flavor lives. I use 3 tablespoons, which gives you big, fragrant curry flavor without it becoming searingly spicy. Start with 2 tablespoons if you’re cooking for kids or spice-sensitive eaters. Thai Kitchen is the brand I reach for because it has very mild flavor.
- Cornstarch is the move for a saucy noodle bowl. Mixed with a little water and stirred in halfway through baking, it transforms a thin coconut milk sauce into something thick and rich that coats every noodle.
- Udon noodles are my first choice here because they’re thick and chewy and hold up well. I use a 7-ounce package of Ka-Me fresh cooked udon stir fry noodles, but the uncooked (pasta-style) noodles work too. Stir-fry rice noodles work great if you need a gluten-free option.
- Veggies: Broccolini (baby broccoli) holds its texture better than regular broccoli in the oven. Snap peas, red bell pepper, and yellow onion round out the vegetable situation. It’s a great meal to use up what you have on hand.
- Fresh garlic and ginger: please don’t skip these. Finely grated makes the biggest difference. A microplane is your friend.
For serving, I always set out: lime wedges, fresh cilantro, sliced green onions, Thai basil if I can find it, and chili crisp. The chili crisp especially. It takes this over the top.
How Spicy Is It? (And How to Adjust)
This is the number one question I get with any curry recipe, so let me help!
- At 3 tablespoons of red curry paste: you get warm, fragrant, deeply flavorful curry with a gentle heat at the back of your throat. Not spicy. My kids eat it. My parents eat it. It’s the sweet spot.
- At 2 tablespoons: very mild and more coconut-forward. Great for anyone spice-sensitive or if you’re feeding very young kids.
- At 4+ tablespoons: now we’re talking real heat. I’d say this is medium-spicy territory — great if that’s your thing.
One thing to know: different brands of red curry paste vary a lot in heat. Mae Ploy runs hotter than Thai Kitchen. If you’ve never used red curry paste before, start at 2 tablespoons and taste the sauce before you bake. You can always stir more in.
How to Make Chicken Curry Noodles
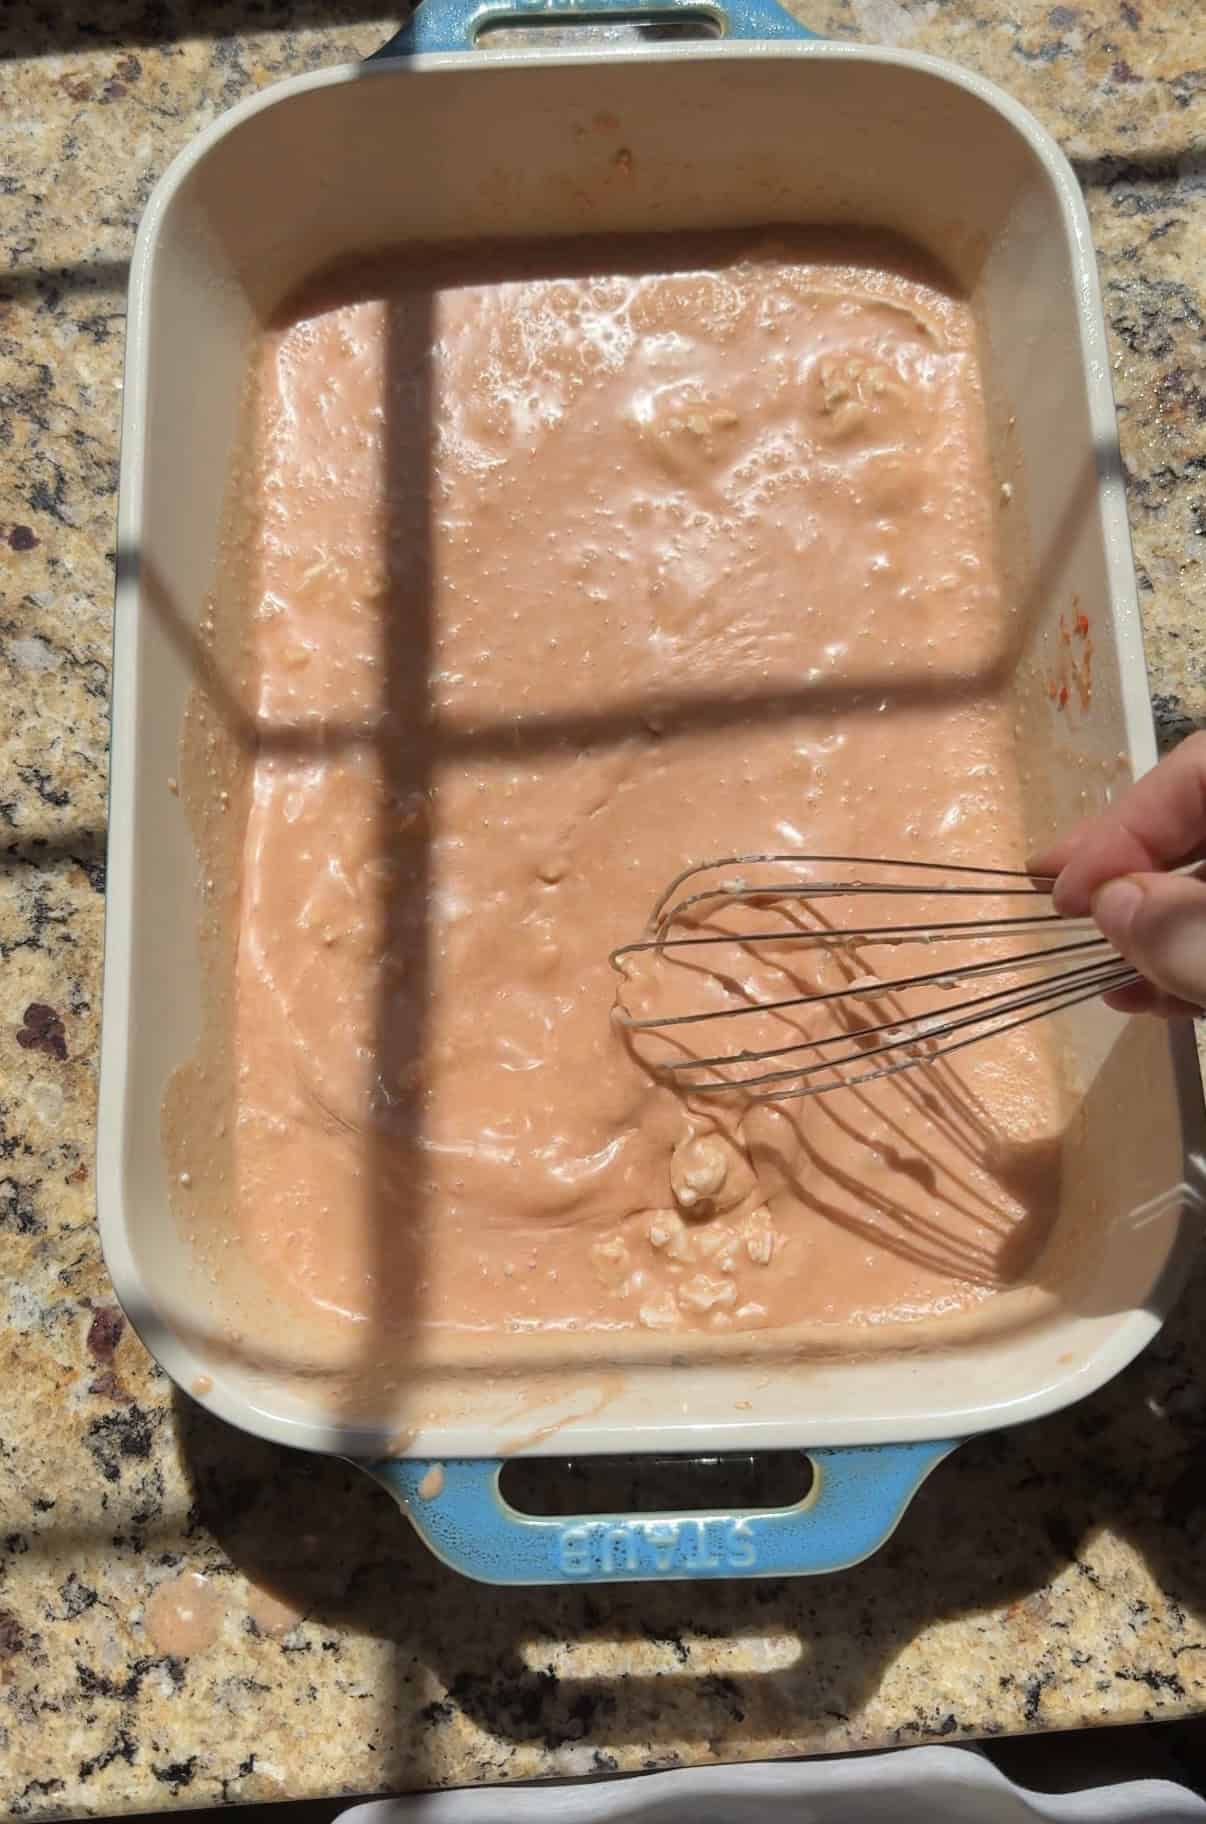
Step 1. Make the sauce: Right in the baking dish, whisk together the coconut milk, red curry paste, grated garlic, fresh grated ginger, cumin, salt, and lime juice until the curry paste.
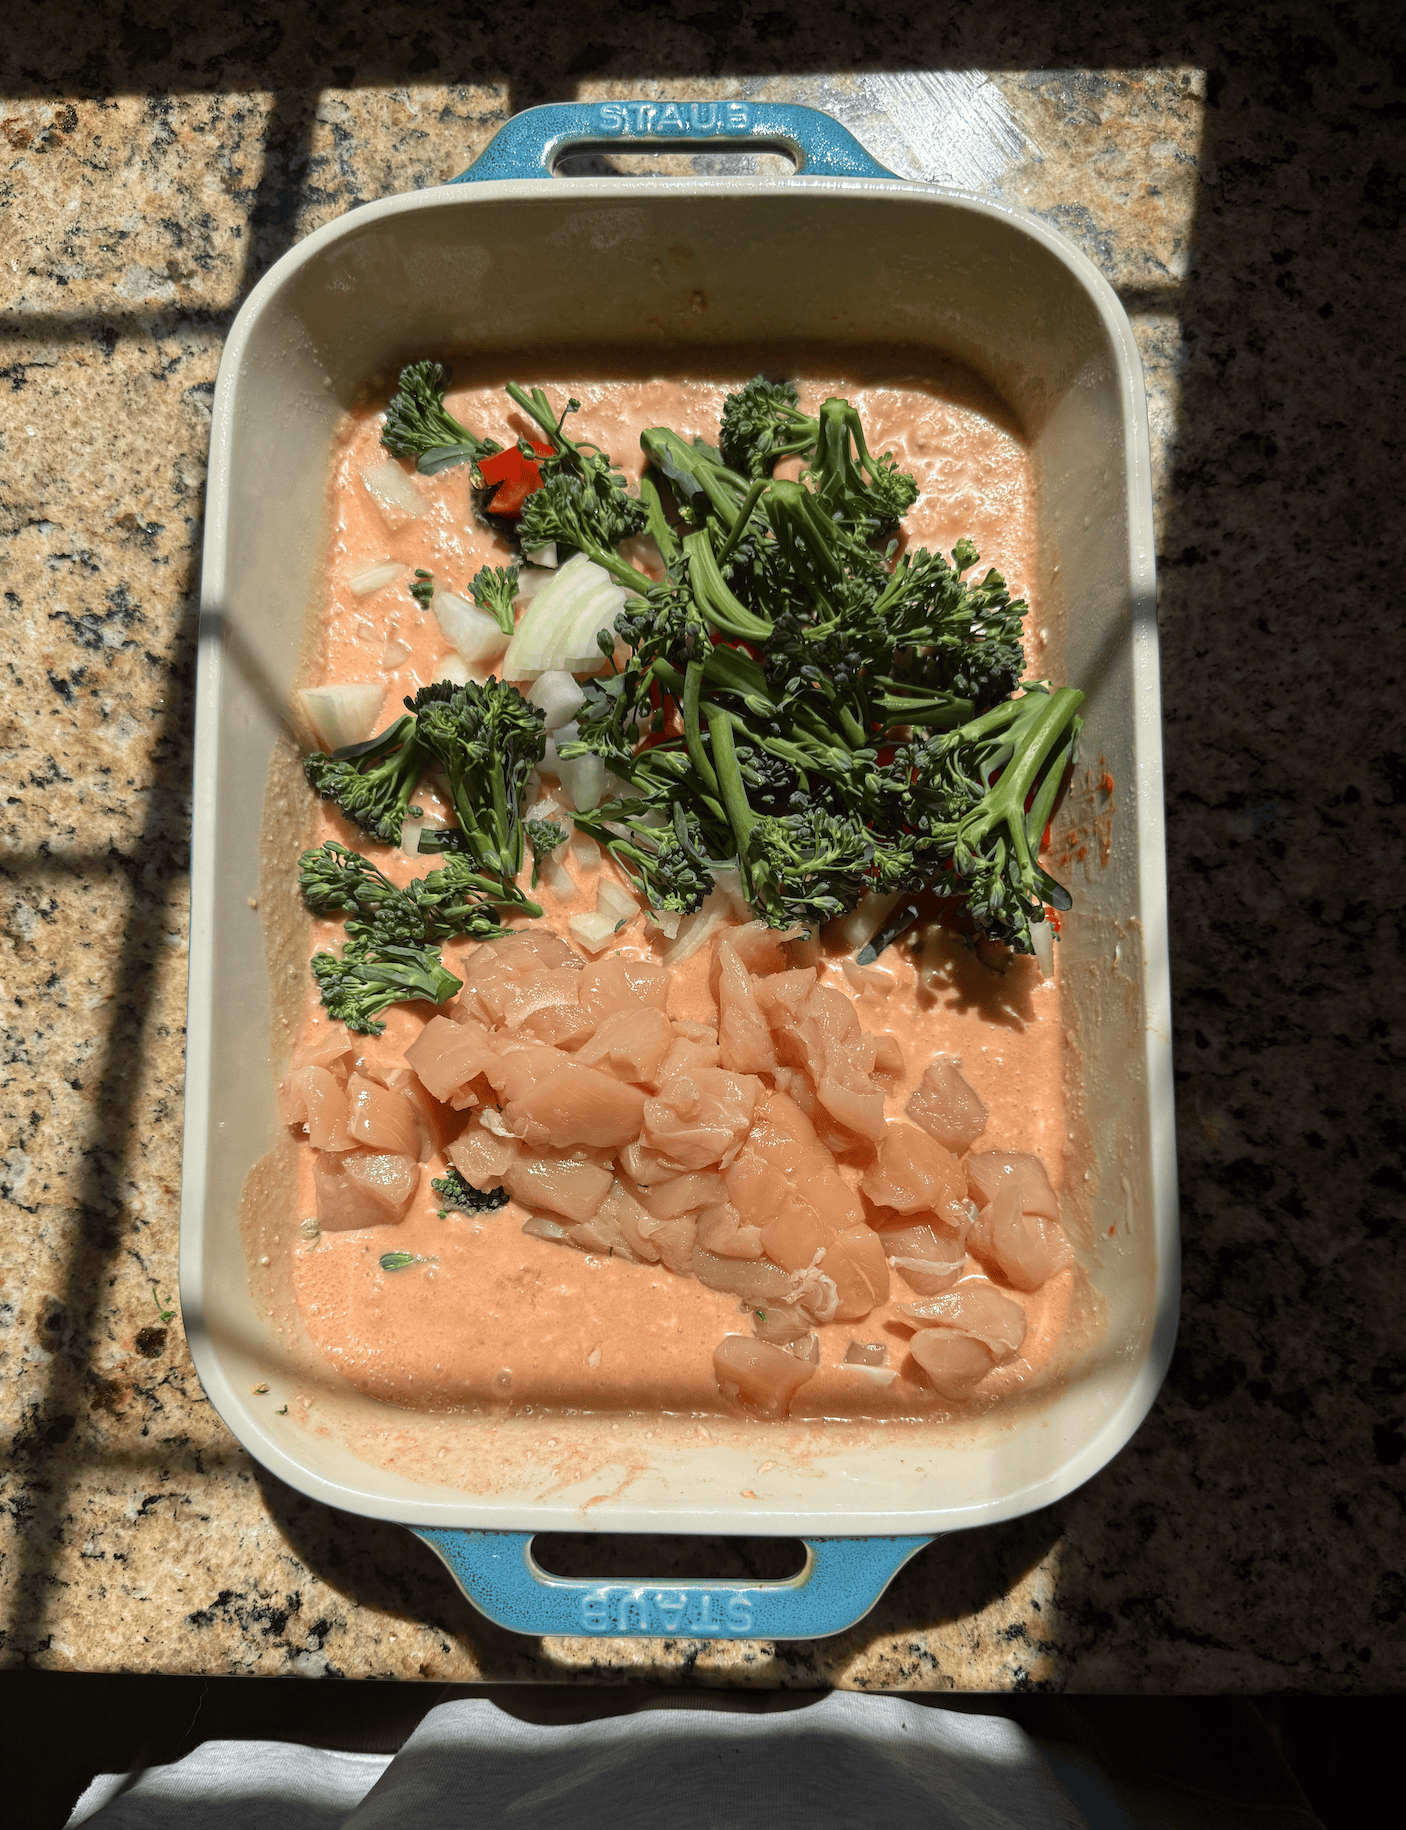
Step 2. Add the chicken and vegetables: Add your cubed chicken breast, onion, bell pepper, broccolini, and snap peas directly into the sauce. Stir everything around so it’s well coated.
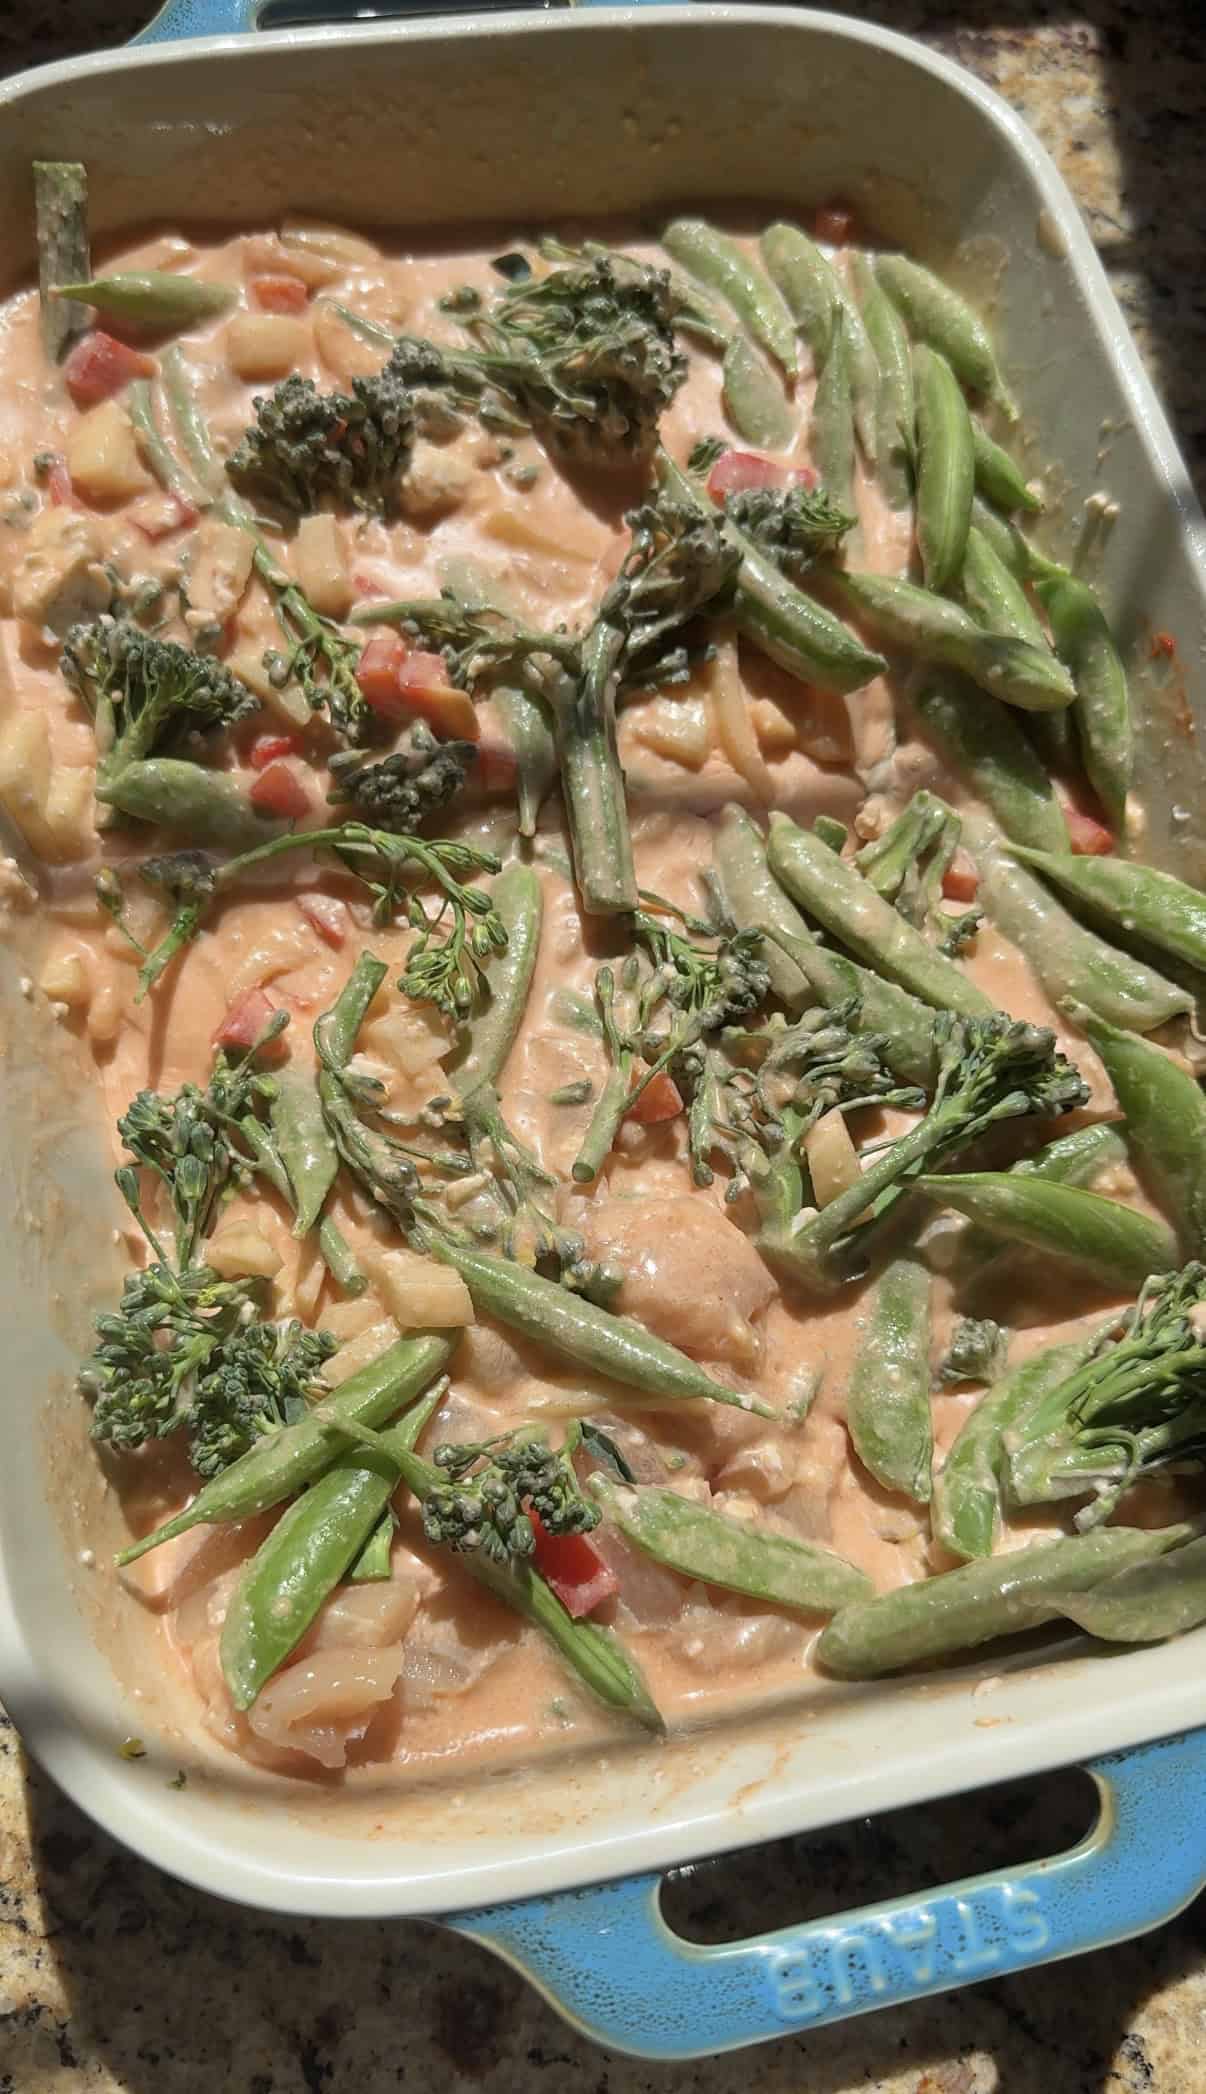
Step 3. Bake: Cover tightly with foil. This is what keeps the steam in and cooks everything evenly. Bake for 20 minutes. When you pull it out, the chicken should be mostly cooked through and the vegetables will be starting to soften and turn bright.
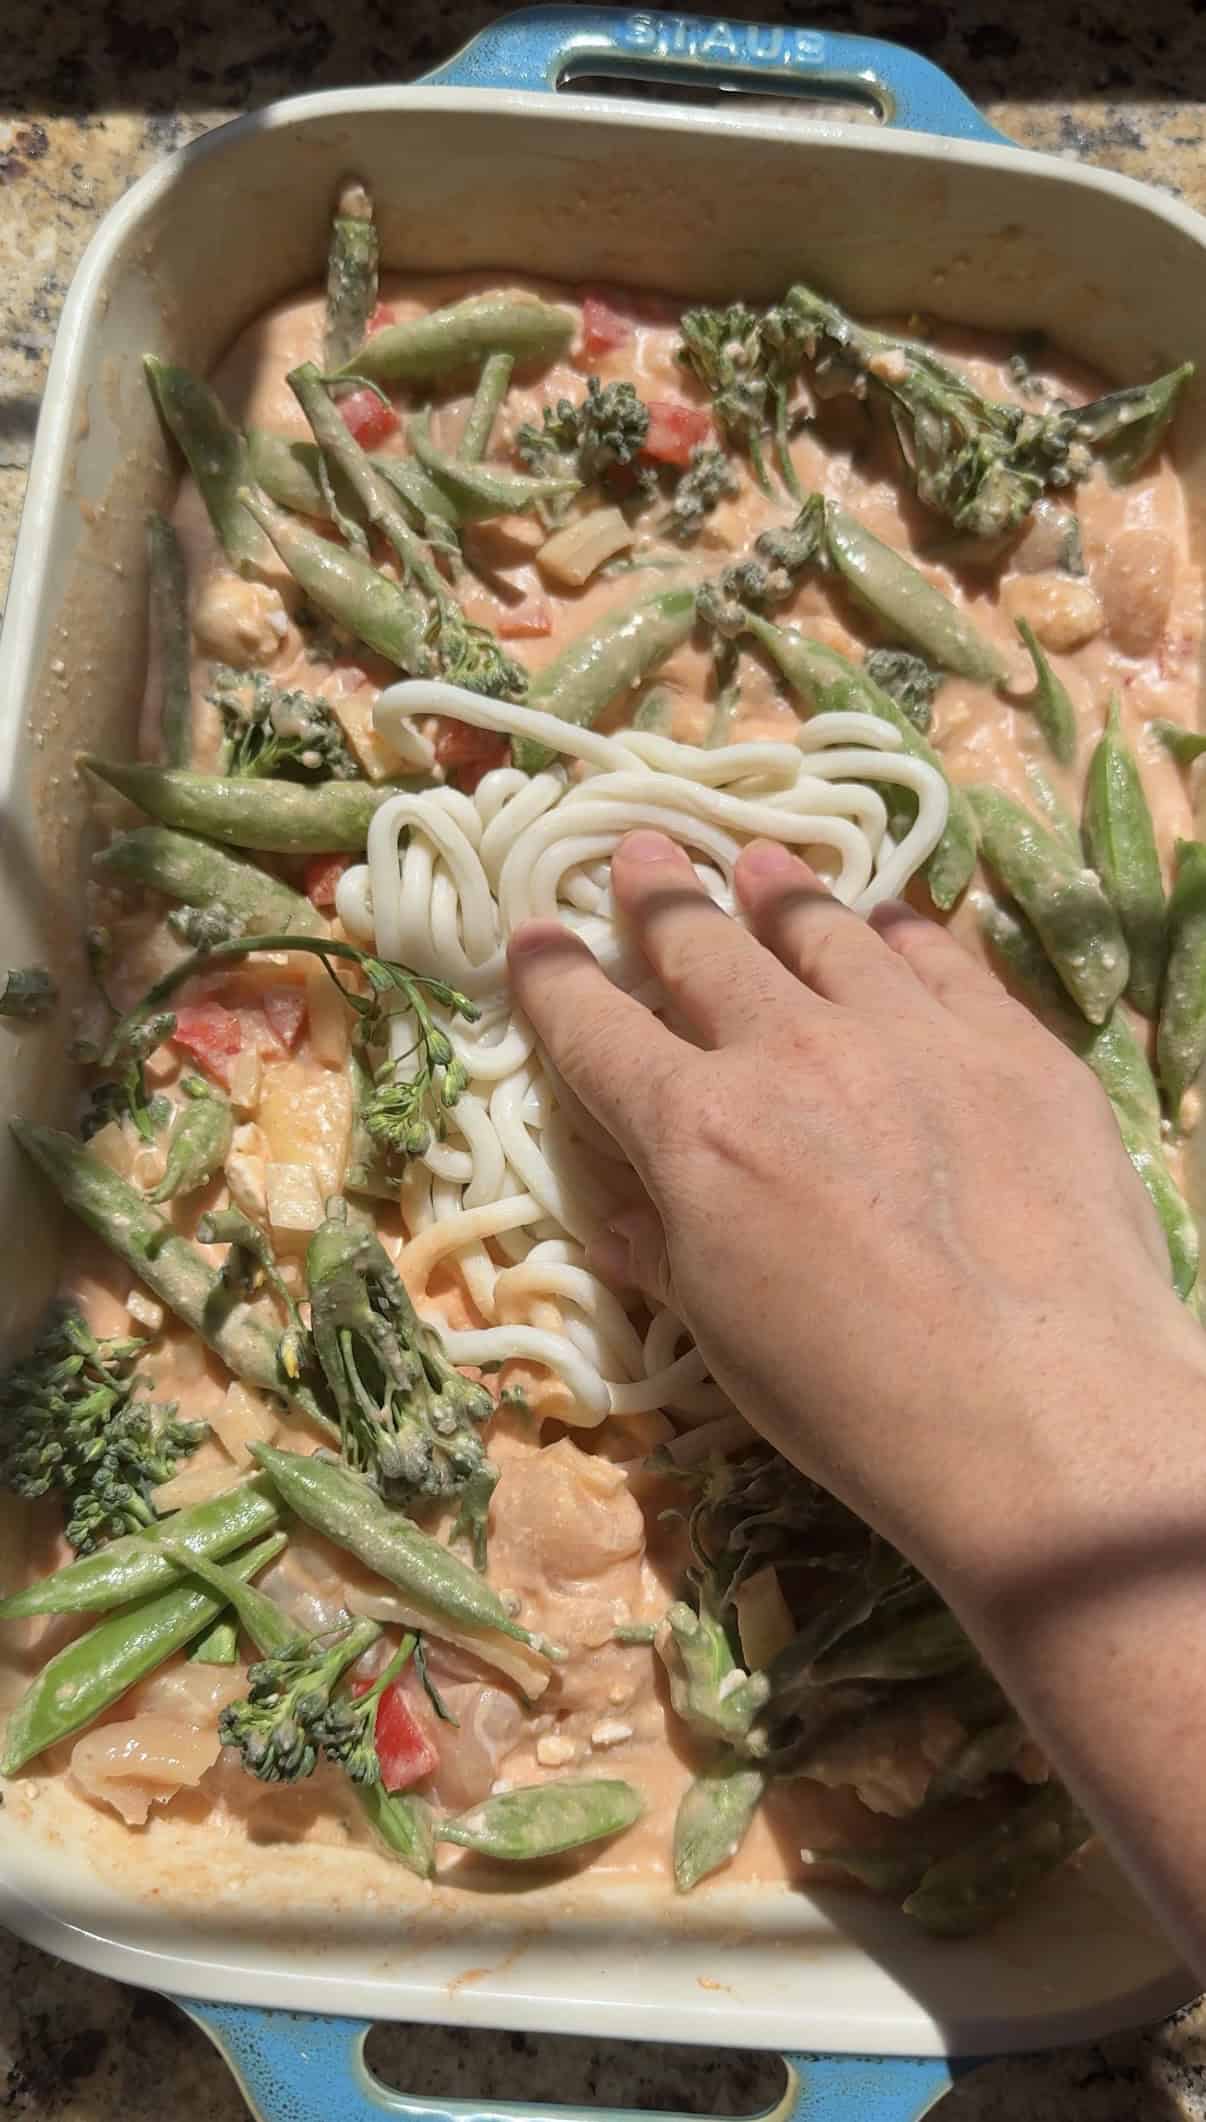
Step 4. Add noodles and cornstarch and bake again: Pull the foil back and add your udon noodles, gently pulling them apart as you mix them into the hot sauce. Pour in the cornstarch slurry. This is the moment the sauce goes from thin to thick and creamy, it’s my favorite part. Return to the oven, uncovered, and bake for another 10–15 minutes.
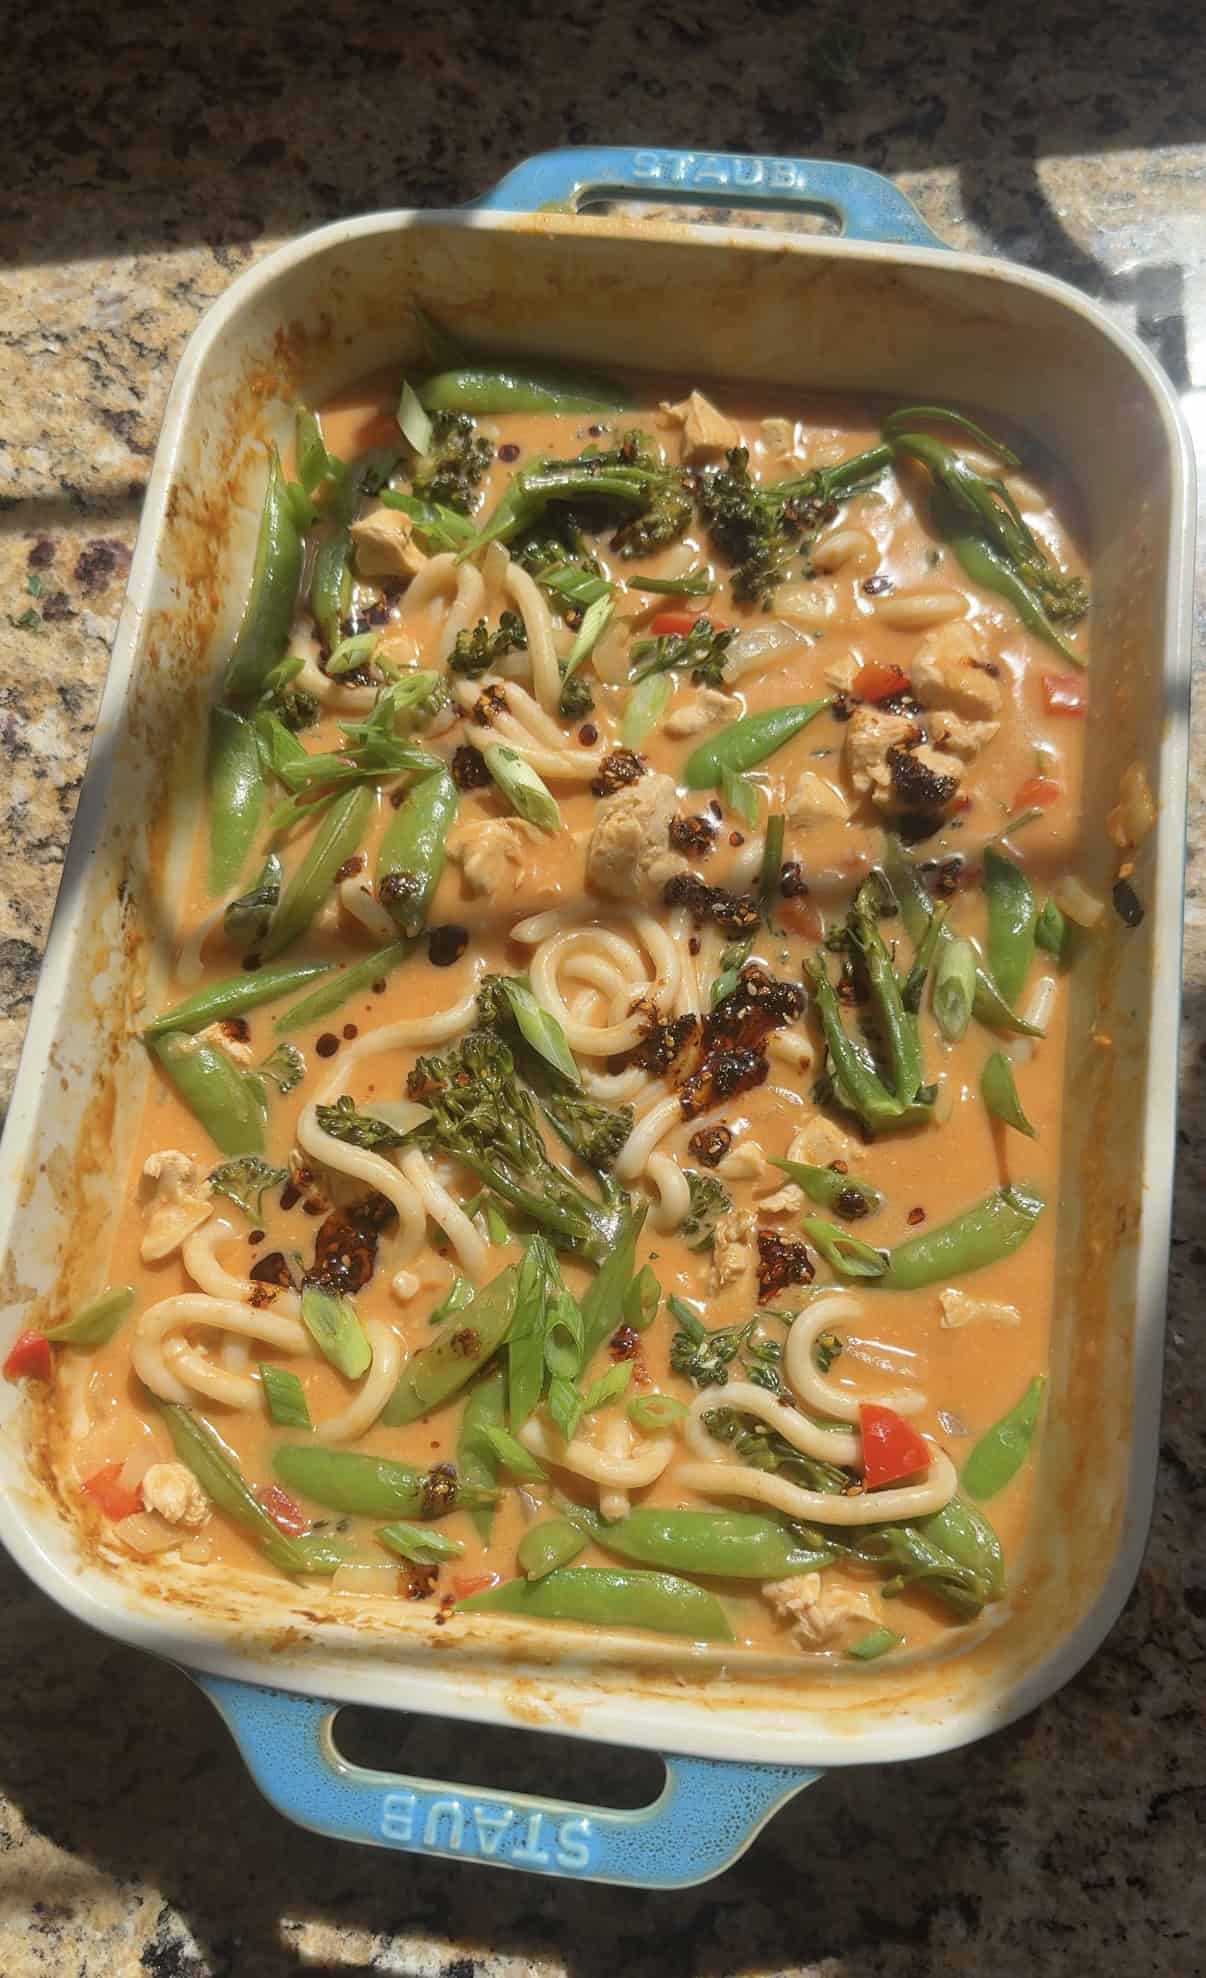
Step 5. Taste and finish: Taste the sauce. Add more salt or a little more lime juice if it needs brightness. Load up the toppings and serve right from the pan.
The Secret to a Thick, Creamy Sauce
You know how sometimes coconut curry noodles look incredible in photos but the sauce is thin and watery when you actually make it? That’s what we’re avoiding here.
Two things make this sauce thick:
- First, baking with the foil on creates a steaming environment that concentrates the coconut milk as it cooks — it reduces slightly and gets richer just from the oven heat.
- Second, the cornstarch slurry. Mix it thoroughly (no lumps) and stir it into the hot sauce right before the second bake. As it heats, it thickens everything into that glossy, restaurant-style consistency. The sauce will look loose when you first stir it in, that’s normal. Give it the full 10–15 minutes and it’ll come together.
One note: if your sauce is still thinner than you like when it comes out of the oven, you can always add another 1-2 Tablespoons of cornstarch (mixed with a splash of water) and stir it in to reach your desired consistency.
Noodle Options and What Works Best
Cooked udon noodles are my top pick. They’re thick, chewy, and stand up to the baking time without going mushy. I use Ka-Me vacuum-sealed fresh udon (found near the refrigerated section or in the Asian foods aisle). You could also use dry udon (similar texture to regular pasta before it’s cooked).
Stir-fry rice noodles work really well too. They’re thinner and soak up more sauce, which some people love. These are naturally gluten-free if that matters to you.
I would not use thin vermicelli or glass noodles in this recipe — they’ll turn to mush in the second bake. Save those for curry noodle soup.
Whatever noodle you choose: don’t pre-cook them separately. Add them straight from the package into the hot sauce. They’ll finish cooking in the dish.
How to Store and Reheat
Let the dish cool completely before storing. Leftovers go in an airtight container in the fridge for up to 4 days.
When you reheat, the noodles will have absorbed more of the sauce and things will look thicker than when they came out of the oven. Just add a splash of water or coconut milk, stir, and microwave in 60-second intervals until warmed through.
I don’t recommend freezing this one. The noodles get spongy after freezing and thawing and the texture just isn’t the same.
Meal prep tip: The sauce can be whisked together and stored in the fridge up to a day ahead. On the night you’re cooking, just pour it over the chicken and vegetables and bake as directed.
This also pairs really well as part of a bigger spread. Serve it alongside my crispy rice salad or my raw carrot salad for something fresh against the creamy curry.
Frequently Asked Questions
Yes. Boneless, skinless chicken thighs work great and stay even juicier. The cook time is the same — just make sure they hit 165°F.
You can, with one adjustment. Skip the first 20-minute bake and go straight to baking the sauce and vegetables (covered) for about 15 minutes, then add the shredded rotisserie chicken, noodles, and cornstarch together and bake uncovered for 10 more minutes.
With rice noodles instead of udon, yes. Check your red curry paste label too, most are gluten-free, but not all brands are.
A few things could cause this: light coconut milk instead of full-fat, the foil not being sealed tightly enough during the first bake (which lets steam escape), or the cornstarch not being fully dissolved before adding.
Absolutely. Zucchini, baby bok choy, shredded cabbage, carrots, and mushrooms all work. Just cut them into similar-sized pieces so they cook evenly. Very delicate greens like spinach should be stirred in right at the end, after the second bake.
It already is! Coconut milk is the only dairy-adjacent ingredient and it’s plant-based. The whole dish is naturally dairy-free.
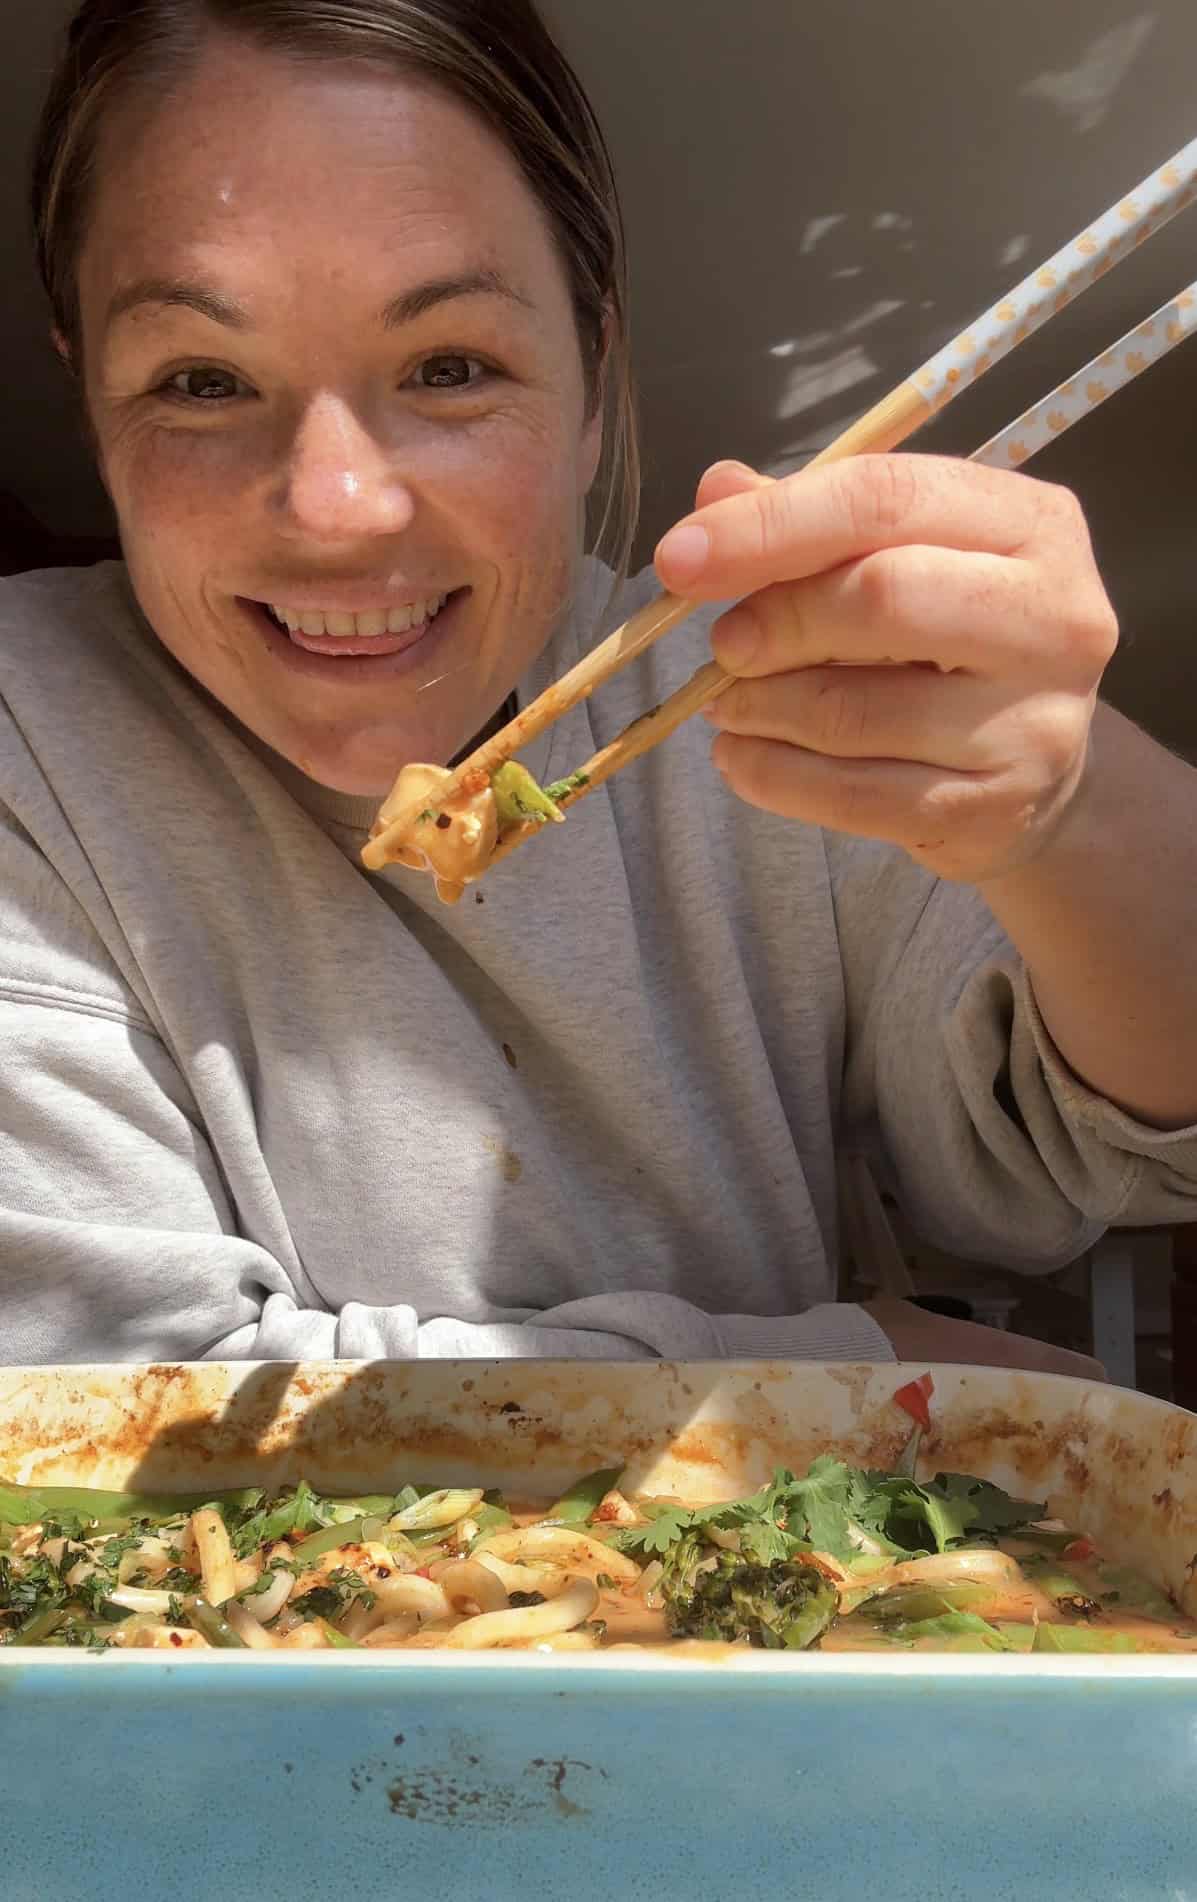
This sauce. I genuinely cannot stop going back for one more bite. The way it coats the noodles, the heat from the curry paste, the squeeze of lime at the end, it’s so good. Make it once and it’ll be on your weeknight rotation permanently.
More Delicious Curry Recipes
Coconut Curry Chicken Noodle Bake
Save this Recipe!
Ingredients
- 2 (13oz) cans full-fat coconut milk
- 2-3 tablespoons red curry paste start with less and add for more spice
- 1 teaspoon cumin
- 1 teaspoon kosher salt
- 1 Tablespoon lime juice
- 4 cloves garlic finely minced or grated
- 1 1/2 teaspoons fresh grated ginger
- 1 1/2 lbs boneless skinless chicken breast cut into 1-inch cubes
- 1 small yellow onion diced
- 1 red bell pepper diced
- 3 cups broccolini chopped (baby broccoli)
- 2 cups snap peas
- 8-10 oz udon noodles or stir-fry rice noodles
- 3 Tablespoons cornstarch or tapioca flour/starch
- Optional for serving: chopped cilantro, green onions, Thai basil, chili crisp, lime wedges
Instructions
- Preheat the oven to 425°F and grease a 9×13 baking dish.
- Mix the curry sauce: In the prepared baking dish, whisk together the coconut milk, red curry paste, cumin, salt, lime juice, garlic, and ginger until smooth and fully combined. Make sure the curry paste is well incorporated into the sauce. Taste and add more curry paste as needed. I did 3 Tablespoons without it becoming too spicy, but it's best to start with less and add more as needed.2 (13oz) cans full-fat coconut milk, 2-3 tablespoons red curry paste, 1 teaspoon cumin, 1 teaspoon kosher salt, 1 Tablespoon lime juice, 4 cloves garlic, 1 1/2 teaspoons fresh grated ginger
- Add the chicken and veggies: Add the chicken, onion, bell pepper, broccoli, and snap peas and stir to coat everything evenly in the sauce.1 1/2 lbs boneless skinless chicken breast, 1 small yellow onion, 1 red bell pepper, 3 cups broccolini, 2 cups snap peas
- Bake: Cover tightly with foil and bake for 20 minutes, until the chicken is mostly cooked through and the vegetables are starting to become tender.
- Add noodles and bake again: Remove the dish from the oven and add the udon noodles, gently separating them as you mix them into the sauce. Mix the cornstarch with a few Tablespoons of water and stir into the sauce. Bake uncovered for another 10-15 minutes, until the noodles are al dente, the sauce is thick and creamy and the chicken is cooked through to 165°F.8-10 oz udon noodles, 3 Tablespoons cornstarch
- Taste and add more salt and lime juice as needed. Garnish with fresh cilantro, chili crunch or green onions.Optional for serving: chopped cilantro, green onions, Thai basil, chili crisp, lime wedges
Nutrition
Nutrition information is automatically calculated, so should only be used as an approximation.
This post may contain affiliate links. Read our disclosure policy.


Used frozen broccoli and definitely took longer than 20 minutes to cook the chicken. Even if I didn’t, I feel like it still wasn’t long enough. I didn’t realize the chicken wasn’t all the way cooked when I put the noodles in, so now the noodles are going in for at least 20 minutes 😂 wish me luck!!
Hi Erica! Thanks for taking the time to leave a comment. I realized after reading your comment that I did end up changing the bake time because I had the same issue – but forgot to update the recipe. I will get that updated. Thanks again for letting me know!
I will make this again with a few tweaks. I will mix the coconut milk and curry in a mixing bowl separately first. I felt it was challenging to mix well in my baking dish. I would also add more curry than I did. I used 3 T and thought that was enough but after eating we concurred that 3+ would be the way to go. I also will adjust cooking time. ( btw not a 10 min prep…..easily 20). The recipe states 25 min cook time yet directions are 20 covered and 10-15 uncovered. After 35 min I did not feel like my chicken was fully cooked. Maybe my cubes were uneven or too big but I cooked for another 7 and it was better. All in all it wasn’t as quick and easy as expected but it was good and flavorful. My husband had seconds and I will make again.
This recipe was delicious. We like heat so I used the 4oz can of curry paste. I used one full fat and one lite coconut milk because that’s what I had on hand. Because I used uncooked brown rice noodles that released their starch while cooking, the dish turned out thick and creamy without having to use the cornstarch slurry. I will definitely be making this again!
Thank you so much for sharing, Deanna!
Is using frozen veggies a mistake?