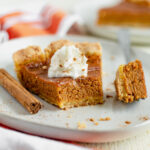
Dairy-Free Pumpkin Pie
Make this super simple dairy-free pumpkin pie for the best end to your Thanksgiving meal. The pumpkin filling is so thick and creamy and the buttery pie crust turns out perfectly every time.
PRINT RECIPE
PIN RECIPE
Servings: 8 slices
INGREDIENTS
Dairy-Free Pie Crust
- 2 1/2 cups all-purpose flour
- 1 teaspoon kosher salt
- 6 Tablespoons vegan butter cold and cubed
- 2/3 cup vegetable shortening (or pal shortening) chillled
- 1/2 cup ice water
Dairy-Free Pumpkin Pie Filling
- 1 (15 ounce) can pure pumpkin puree
- 1/2 cup full fat coconut milk shaken to blend
- ½ cup pure maple syrup
- 2 teaspoons pure vanilla extract
- 1 tablespoon pumpkin pie spice*
- ¼ teaspoon kosher salt
- 2 large eggs + 1 large egg yolk room temp
INSTRUCTIONS
Dairy-Free Pie Crust
- Mix the flour and salt in a large bowl then add the very cold butter and shortening.
- Use a pastry blender to cut the butter and shortening into the mixture until they resemble pea-sized meals.
- To make sure the water is really cold, measure out at least 1/2 cup of water then add and stir it around to keep it cold. Measure out 1/2 cup of ice water from there and pour it into the flour mixture 1 tablespoon at a time, stirring well with a wooden spoon or spatula after each addition. Stop adding water when the mixture begins to form large clumps. We used just under 1/2 cup of water.
- Transfer the pie dough to a floured work surface. The dough should come together easily and should not feel overly sticky. Using floured hands, fold the dough into itself until the flour is fully incorporated into the fats. Form it into a ball. Cut dough in half. Flatten each half into 1-inch thick discs using your hands.
Dairy-Free Pumpkin Pie Filling
- Turn the pie crust out onto a well-floured surface and roll it into a 12-inch circle. Transfer it to a 9-inch pie plate or tart pan. There should be a few inches of overhang all around the pie. There are a few different ways to finish the edges of the pie shell, but our favorite is to crimp them into a wavy pattern.
- Whisk together the pumpkin puree, coconut milk, maple syrup, vanilla extract, pumpkin pie spice, and salt in a large mixing bowl. Whisk in the eggs and egg yolk then pour it into the unbaked pie crust.
- Bake at 350°F for 45-55 minutes, until the center jiggles slightly when you give the pie a nudge. Start checking the pie after 35 minutes and cover the crust with foil or a pie cover to avoid burning. Remove it from the oven and let the pie cool on a wire rack for at least 2 hours, preferably overnight.
Recipe Equipment
9-inc Pie Dish
Rolling Pin
Notes
Total time: this includes 2 hours of the pie dough chilling and 2 hours of the pie cooling. Make the pie dough up to 5 days in advance (fridge) and save time.
Make-Ahead Options:
- 3 months in advance: make the pie crust and freeze it. Thaw it overnight in the fridge the night before you make it.
- 5 days in advance: make the pie crust and store it in the fridge.
- 3 days in advance (or less): make the pie crust and filling. Allow it to cool slightly then cover it tightly with plastic wrap and store it in the fridge for up to 3 days.
- 1 day in advance: make the entire pie and let it cool completely. Cover loosely with foil and store in the fridge or at room temperature.
Nutrition
Serving: 1slice | Calories: 460kcal | Carbohydrates: 46.9g | Protein: 6.6g | Fat: 27.5g | Cholesterol: 69.7mg | Sodium: 225mg | Fiber: 2g | Sugar: 14g | Vitamin A: 331.5IU | Vitamin C: 1.4mg
Did you make this recipe?Mention @What_mollymade or tag #WhatMollyMade so I can see it and feature you!
