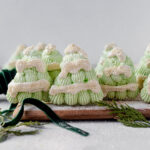
Meringue Christmas Trees
Create these gluten free meringue Christmas trees for the holidays. The 'trees' look like snow covered evergreens and are the perfect decorating project. Step by step instructions are available.
Servings: 24 trees
Equipment
- 2 piping bags
- Wilton Open Star Tip 4B Wilton
- No. 3 Round Piping Tip
Ingredients
- 5 egg whites room temperature
- 1/2 teaspoon cream of tartar
- 1 teaspoon vanilla
- 1 1/2 cups granulated sugar
- 1/8 teaspoon green gel food coloring paste or powder work too
- clear sprinkles for snow
Instructions
Make the meringue
- Preheat the oven to 225°F and line two baking sheets with parchment paper.
- Make sure your bowl and whisk are completely clean and the egg whites don’t have any egg yolk in them. Any small amount of fat will affect the results of the meringue.
- If you haven't already, separate the egg whites from the egg yolks. You can do this by passing the yolk back and forth between two halves. It's easier to separate egg white when the eggs are cold, but you want the egg whites room temperature to make the meringue. You can separate the egg white then allow them to come to room temp for 30 minutes before whisking.
- In a stand mixer fitted with the whisk attachment or a hand mixer, whisk the egg whites on medium speed until the mixture starts to foam and forms soft peaks. Add the cream of tartar, salt and vanilla and whisk until combined.
- Turn the mixer up to medium-high and continue to whisk as you slowly add the sugar 1-2 tablespoons at a time, beating well after each addition until all the sugar is fully incorporated.
- Once all of the sugar has been added, beat until sugar has just dissolved and the mixture is glossy and stiff peaks form, about 4 minutes. You can't over-beat meringue so be sure it's stiff and glossy and there isn't any grain when you rub the meringue between your fingers.
Pipe the trees
- Cut the tips of two piping bags then place a star and round piping tip in the bottom of each. Add the piping bags to a tall glass with a round top and fold the tops of the bags over the edges to make it easier to fill.
- Remove 1/4 cup of the meringue and add it to the piping bag with the round tip. Add the gel green food coloring to the rest of the meringue and whisk on medium high speed until the coloring is completely incorporated. Squeeze more coloring in as needed to reach your desired green hue. Use a rubber spatula to fill the other piping bag (with the star tip) all the way up. You may need to refill as you pipe the cookies.
- Pipe Christmas trees onto the prepared baking sheets with parchment paper 1 inch apart. Make 4 lines next to each other in a row, starting each line from the bottom and piping up. Repeat this with three lines then two on top of that to create tree shapes.
- Use the reserved white meringue to pipe snow caps on the trees in creative ways then sprinkle clear or white sprinkles on the white meringue to make them look more shiny.
Bake
- Bake the meringue for 1 hour, until they are firm to touch, then turn off the oven and leave the cookies in the oven until they are cool so they dry out completely. A great time to make these cookies is at night then turn them off and leave them in the oven overnight until they are completely cool.
- As soon as the meringue is cool, transfer the cookies to an airtight container to avoid adding any extra moisture.
Nutrition
Serving: 1cookie | Calories: 49kcal | Carbohydrates: 12.6g | Protein: 0.7g | Sodium: 11.6mg | Sugar: 12.5g