
This post may contain affiliate links. Read our disclosure policy.
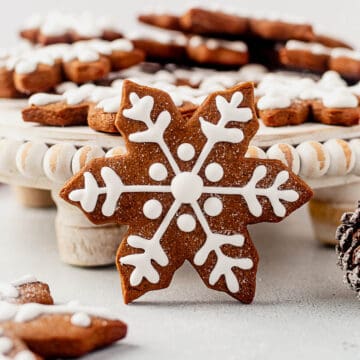
These gluten free dairy free sugar cookies are easy to roll out and they don’t spread! They’re the best for icing, frosting and decorating for Christmas.

Table of Contents
- What makes this sugar cookie recipe gluten free?
- Ingredients for gluten free dairy free cut out cookies
- What can I use instead of butter in sugar cookies?
- How to make gluten free dairy free sugar cookies
- What’s the best thickness for sugar cookies?
- How to keep sugar cookies from spreading
- Icing options
- Tips for decorating with royal icing
- Expert recipe tips
- Gluten-Free Dairy-Free Sugar Cookies Recipe
Sugar cookies are the most versatile cookies and are the perfect blank canvas for creativity to decorate! The options are endless to cut out, roll our and decorate. But before you can do that, you have to have a fool proof sugar cookie recipe.
What makes this sugar cookie recipe gluten free?
I wanted to keep it simple for you (minimal ingredients!) so I tested these gluten free sugar cookies with a 1:1 all purpose gluten free baking flour. I used Bob’s Red Mill and had amazing success.
One thing to note: make sure your flour includes xanthum gum in it. Some blends don’t have that already in it, but it’s needed for this recipe. Just check the bag quickly before you buy!
Ingredients for gluten free dairy free cut out cookies
- 1:1 gluten free baking flour
- baking powder
- salt
- high quality vegan butter
- granulated sugar
- egg
- vanilla
- almond extract (this gives it the best flavor!)
What can I use instead of butter in sugar cookies?
The best option to replace butter in cookies is a quality vegan butter. We really love Myokos butter made from cashews. It tastes amazing in these dairy free sugar cookies!
How to make gluten free dairy free sugar cookies
- Dry ingredients: Whisk together all of the dry ingredients in a medium bowl and set aside.
- Cream the butter: Next, beat the butter and sugar together for 2-3 minutes (don’t skip this step!)
- Beat in the ingredients: Add the egg, vanilla and almond extract and beat again for 1-2 minutes. Add the dry ingredients slowly until the flour is incorporated and the dough starts to pull away from the sides of the bowl.
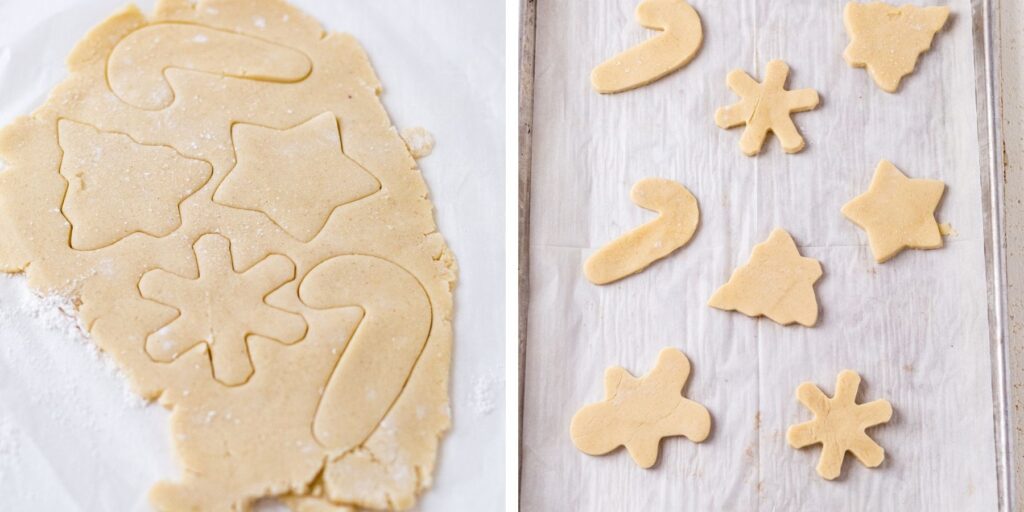
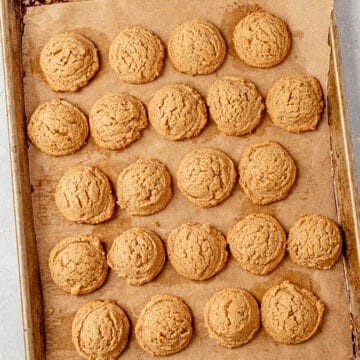
- Roll: Roll the dough out into 1/4 inch thickness and wrap in plastic wrap then chill for at least 2 hours.
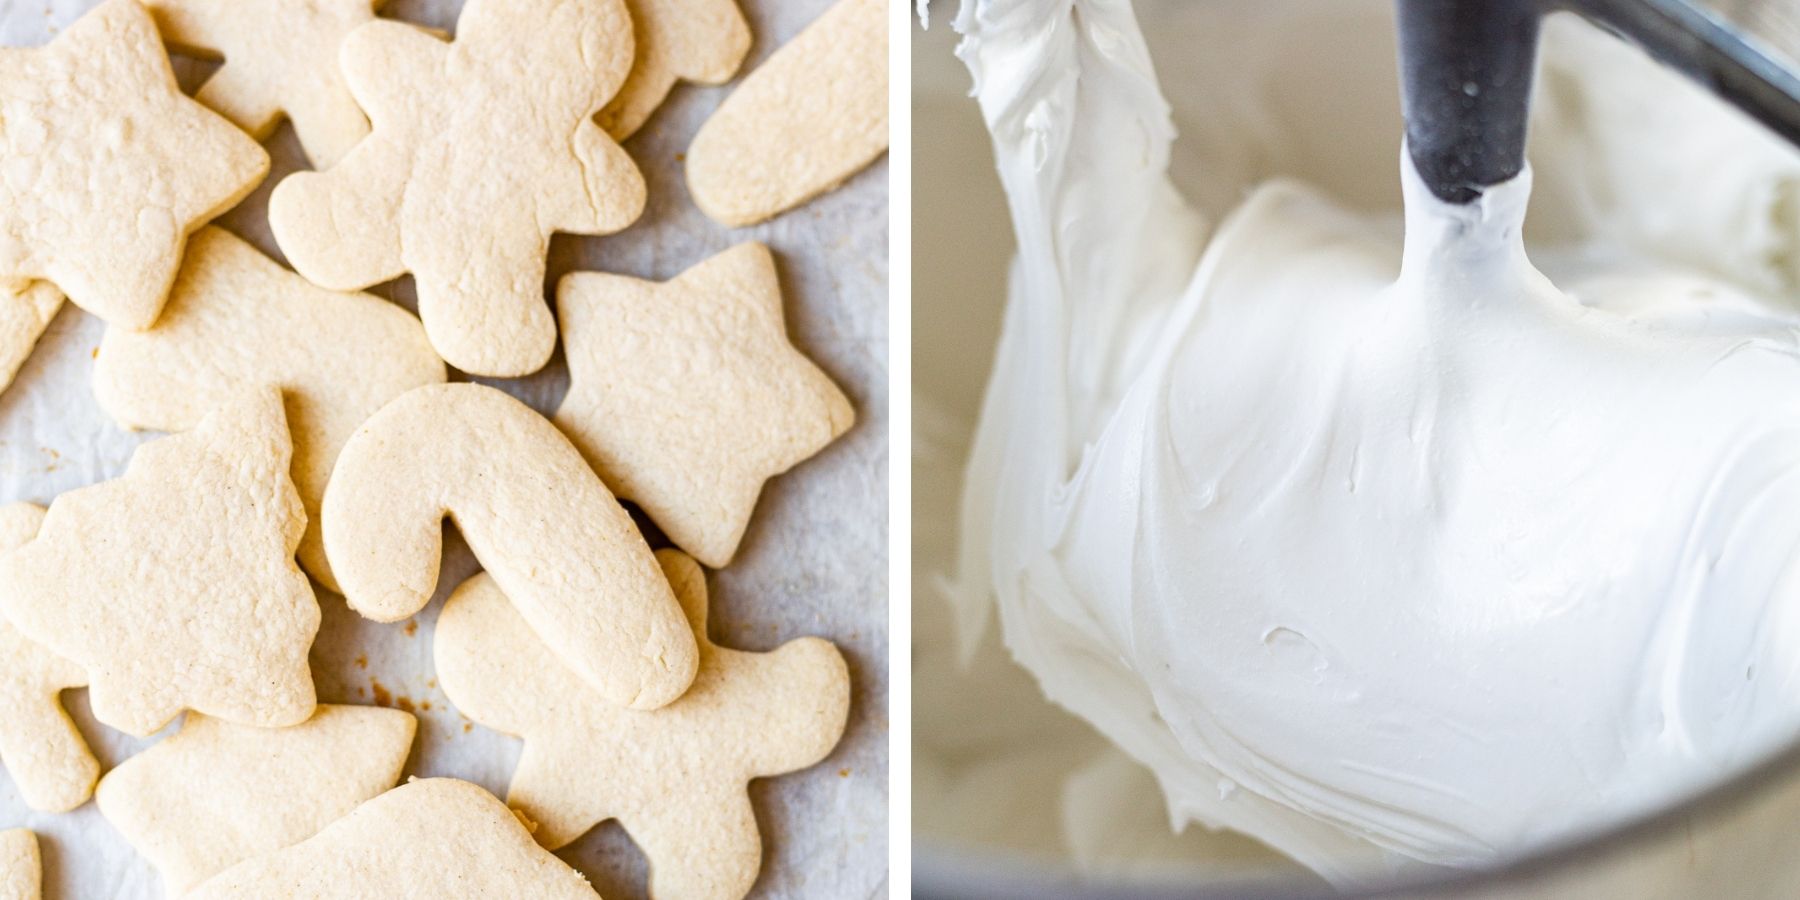
- Cut and bake: Cut the dough out and bake at 350°F for 8-10 minutes. Allow to cool completely before icing!
What’s the best thickness for sugar cookies?
The best thickness for sugar cookies is just under 1/4 inch thick. You don’t want them thin and crispy, but you also don’t want too much dough that they start puffing too much and losing their shape.
How to know the thickness: you can use a measuring stick if you want it very precise, but you could also use your finger. I like to put my fingertip next to the dough. If it comes about halfway up your fingernail you’re in good shape!
How to keep sugar cookies from spreading
The number one tip to keep your sugar cookies from spreading is chilling the dough! Do not skip. I know it’s a bummer when you want cookies right now and then the recipe tells you to chill the dough, but try and plan ahead so these cookies don’t spread.
Another tip: make sure you have the right temperature of butter when you’re mixing the dough. Room temperature butter means it’s been sitting out for 30 minutes to 1 hour. You still want it firm, but it will leave a little indent when you push in.
Icing options
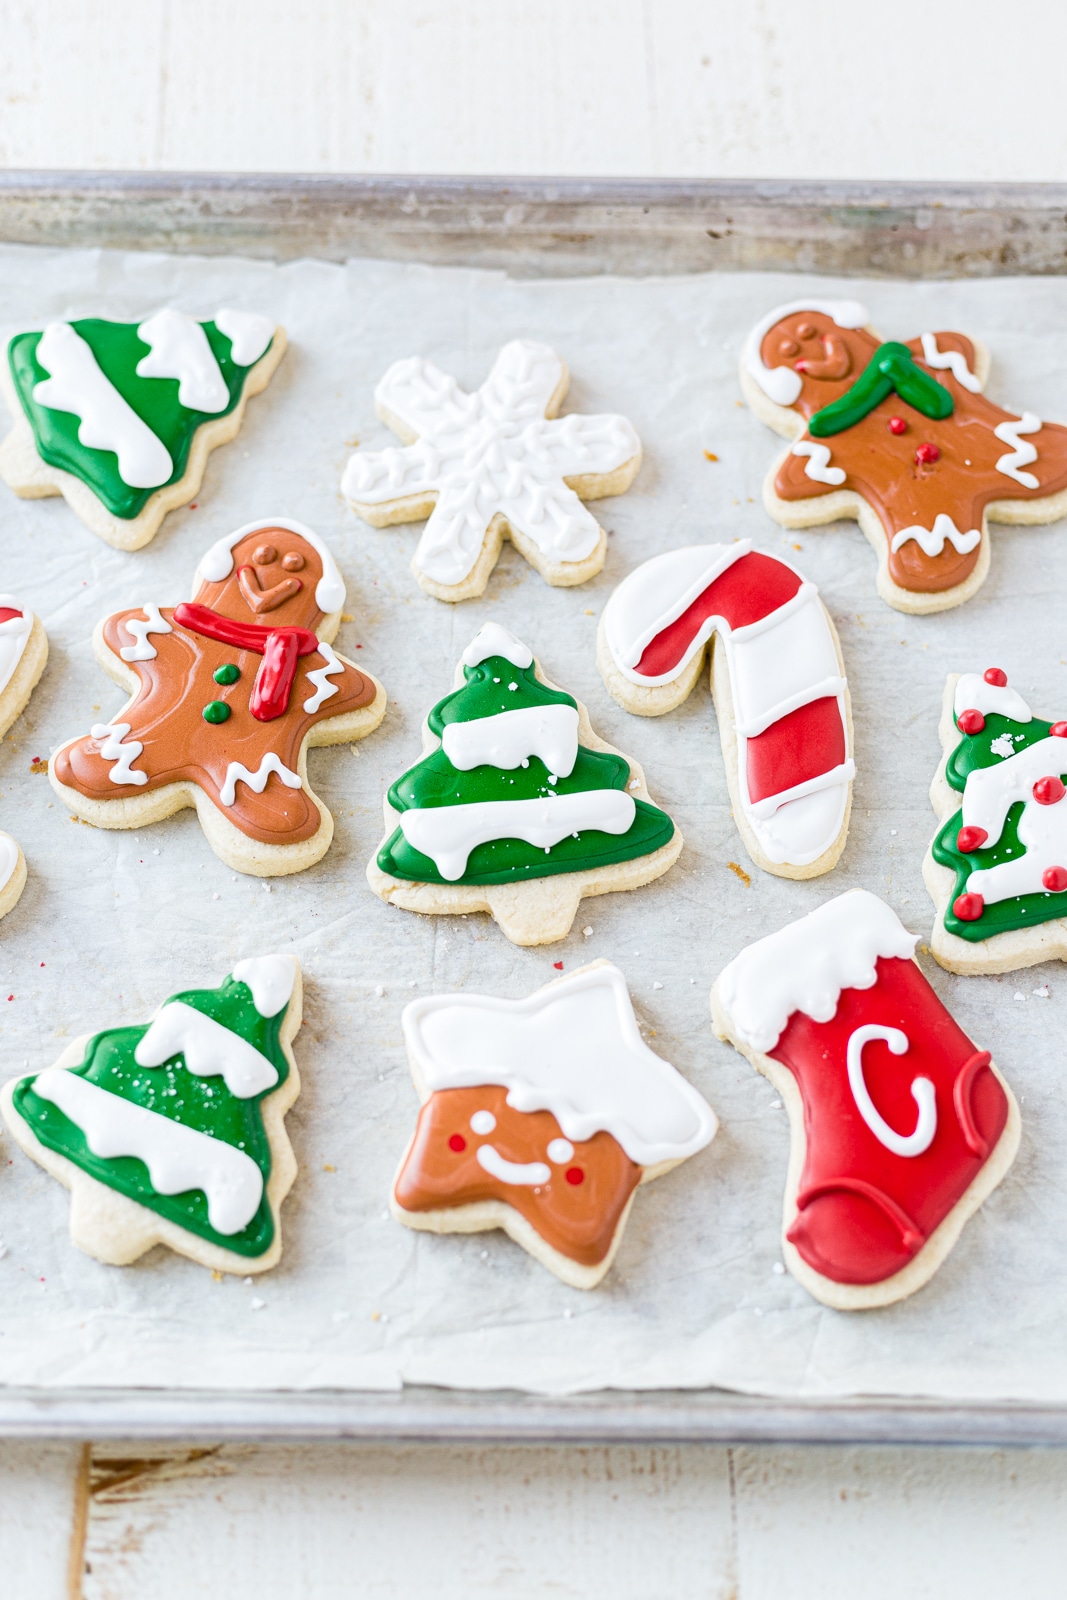
I love the way royal icing looks on these gluten free sugar cookies! You can do so many fun designs, like turn stars into faces and add initials to stockings. You can also make buttercream frosting with vegan butter or buy pre-made dairy free frosting. I love Simple Mills frosting because it’s paleo-approved.
Tips for decorating with royal icing
- Have the right tools: piping bags, Wilton tips (I like No. 2), bowls, gel food coloring and meringue powder. You can purchase this cookie decorating kit if it’s easier.
- You’ll need a border and fill icing for each color. The boarder goes around the outside and is a thicker consistency and the fill icing is thinner and melts out making a smooth finish. See recipe directions for steps!
- Label each piping bag to stay organized. For example, write on the bag “red fill” and “red border” so you know.
- Place the cookies in the fridge if you want the icing to set faster.
- Store your icing in an air tight container for up to 3 days if you want to make more cookies.
Expert recipe tips
- Roll out the dough before chilling: Once the dough is chilled it won’t be as easy to work with, so having it rolled out first helps!
- Roll out the dough on a piece of parchment paper inside a baking sheet. This makes is so easy to transfer to the fridge.
- Flour the bottom of the parchment paper before you roll the dough out to prevent any sticking.
If you love this recipe as much as I do, don’t forget to leave a comment and star review. Follow me on Instagram and tag me so I can see your cookies!
More gluten free cookies:

Gluten-Free Dairy-Free Sugar Cookies

Save this Recipe!
Ingredients
For the cookies:
- 2 1/4 cups (333g) 1:1 gluten-free flour (with xanthan gum), we used Bob's Red Mill (Note 1)
- 1/2 teaspoon baking powder
- 1/2 teaspoon salt
- 3/4 cup 1 1/2 sticks unsalted vegan butter (we like Miyoko)
- 3/4 cup (150g) granulated sugar
- 1 egg room temperature
- 1 1/2 teaspoons vanilla extract
- 1/4 teaspoon almond extract
For the royal icing (optional)
- 1 (2 pound) package powdered (confectioners) sugar
- 5 tablespoons meringue powder
- 3/4 cup room temperature water
- 1 teaspoon almond extract
- Assorted gel food coloring
- Assorted sprinkles for decorating
For thicker icing:
- Use a store bought vanilla frosting or Simple Mills vanilla frosting for paleo option
Instructions
To make the cookies:
- In a medium bowl, whisk together the gluten free flour, baking powder and salt and set aside.
- In the bowl of a stand mixer (or a large bowl if using a hand mixer), beat the vegan butter and sugar together using the paddle attachment for 2-3 minutes. Do not skip this step. Add the egg, vanilla and almond extract and beat again for 1-2 minutes. Scrape down the sides of the bowl then add half of the dry ingredients and beat until combined. Add the second half of the dry ingredients and mix again on low until combined and the dough starts pulling away from the sides of the bowl.
- Place a large piece of parchment paper on the counter and sprinkle generously with gluten free flour. Dump the dough out onto the parchment paper then flour the top of the dough. Roll the dough out to 1/4 inch thick, add more flour to the top of the dough as needed so the rolling pin doesn't stick. Transfer the parchment paper to a large baking sheet.
- Cover the baking sheet with foil or wrap it in plastic wrap and refrigerate for at least 2 hours or up to 3 days. You can also freeze the dough at this point. See notes for freezer instructions.
- When you’re ready to bake the dough, preheat the oven to 350°F. Remove the baking sheet with the dough from the oven and pick up the parchment paper and dough and place it on the counter. Add another piece of parchment paper to the baking sheet and set aside. Keep the dough in the fridge as much as possible while you wait to put it in the oven to avoid any spreading.
- Use cookie cutter to make shapes out of the dough. Arrange them on the prepared baking sheet 2-3 inches apart. When there isn’t anymore room to cut out cookies from the dough, roll it back up into a ball and re-roll it out to 1/4 inch thickness. Repeat the process until all the dough is gone. You may need to work in batches to fit all the cookies on the sheet.
- Bake the cookies in the preheated oven for 8-10 minutes until just set and the bottom edges of the cookies turn a light golden brown. Transfer the cookies to a wire rack to cool completely before icing.
To make the royal icing:
- Add the powdered sugar and meringue powder to the bowl of a stand mixer fitted with the paddle attachment (hand mixer will work too). Mix on low for 30 seconds to combine.
- With the mixer on low, slowly add the room temperature water then add the almond extract. Increase the mixer to medium-high speed and beat until stiff peaks form (4-5 minutes). When you lift the paddle out of the icing the frosting should create peaks.
- To make several colors: separate the icing evenly into the amount of colors needed (if you want 4 colors, divide evenly between 4 bowls). Add the gel food coloring until your reach your desired color hue.
- To make the border icing: To one color of icing (let's say green), add water 1 teaspoon at a time until your icing thins a bit. When you pull the spoon out it should still hold its peak but not be too thick to pipe out of a bag. This is your border icing for the outside of the cookies. Remove half of the icing from the bowl and place in a piping bag or icing bottle.
- To make the fill icing: To the same green icing, add water 1 teaspoon of water at a time to thin the consistency even more. When you lift a spoon out the icing it should drizzle back down and smooth out in 5-10 seconds. If it takes longer than that, add a bit more water. Place this icing in a piping bag or icing bottle next to the border icing. You will end up with 2 consistencies for each color. If you're making 4 colors, you'll have 8 piping bags/bottles. It helps if you label the bags before adding the icing to them.
- Ice your cookies: use the border icing to outline the cookies then use your fill icing to flood the middle of the cookie. The border acts as a dam to keep the flood icing in. If you want details to flood into the cookie you can add them now or place the flooded cookies in the fridge for a few minutes to help them set then add more border colors on top. Get creative, they don't have to be perfect!
- Store in an air tight container for up to one week.
Notes
Nutrition
Nutrition information is automatically calculated, so should only be used as an approximation.


When you expand the recipe to 2x and 3x the butter ingredient doesn’t change!!
1.5 sticks for all 3 sizes?? Really messed up our cookies
Why are there no amounts of ingredients listed?
I loved this recipe it brought so much joy to me and my daughter. I’m no expert baker and this was easy so grateful ❤️❤️❤️
I followed this recipe completely and my cookies ended up SUPER dry and crumbly. I tried to re-roll it out but it just kept crumbling, so it was useless. Had to throw it all away. 🙁 Made me so sad given that I waited so long for it to be in the fridge before I could officially start. Unsure what I did wrong here. 🙁
hey, so my kiddo is allergic to wheat, dairy, egg, nuts, among other things… any ideas of an egg substitute that will work for these cookies and keep her safe? thanks for the help.
Hey Ashley! Have you tried a flax egg? I haven’t tried it in this recipe but I think it would work!
Hey Molly!
I made the gluten free sugar cookie cute outs (used Krusteaz GF all purpose w/ xanthum gum) and they are very sandy. Any tips to have more of a cookie taste instead of crumbly sandy cookie?
Thanks!
I usually use that flour mix too, but I tried the one listed and had good results. I did use only 2 cups in the mix and saved the last quarter cup as my dusting flour. I also used buttercream to frost because I like the taste over icing. The first day they were more of a dry cookie, but second day they really softened up, and I think the butter cream and time helped. My family really enjoyed the cookies and I loved the simplicity of the recipe so my little could help with the whole process.
Thanks, Molly! Glad to hear that!
Can this be made with shortening? I’m trying to use what o have on hand…
I made them with Crisco sticks so they would also be dairy free. They are a little sandy and they took longer than I expected to bake but the flavor is OK.
Hey Kate! It could be the type of flour you use. I’ve found in baking that not all 1:1 gluten free flours are equal. Make sure you’re using a 1:1 flour blend, not just a GF flour becuase that makes a difference. I would try Bob’s red mill 1:1 baking flour!