
This post may contain affiliate links. Read our disclosure policy.

Good gravy! This gluten-free gravy recipe is smooth, rich, and full of flavor for topping your favorite holiday foods! This easy recipe is even better when you use the pan drippings from your turkey and it takes minutes to whisk together. Follow our make-ahead instructions for a quick, no-fail Turkey gravy.
Need another gluten-free Thanksgiving recipe? Try gluten-free stuffing, gluten and dairy-free green bean casserole, or maple roasted brussels sprouts and butternut squash.
A good gravy has a couple of components including 1) a solid roux to thicken it, 2) flavorful broth and/or turkey drippings, and 3) enough salt to bring out the flavors.
I recently went to a Thanksgiving cooking and prep workshop with the Ohio Poultry Association. We learned all about holiday sides, how to cook the perfect turkey, and all of the secrets to the best gravy.
Gravy can get a bad rep around the holidays. It’s one of those things we don’t make all of the time, so we don’t get a lot of practice. But it’s so much easier than you might think! There are a few simple steps and I’m going to walk you through each one.
Consider this your ultimate gravy guide! We’re using gluten-free flour in this recipe, but you don’t have to. If you aren’t gluten-free, you can use all-purpose flour instead.
For more gluten-free sauces, check out our library of gluten free recipes like gluten-free enchilada sauce or Whole30 BBQ sauce.
Why You’ll Love This Homemade Gluten-Free Gravy
- Easy recipe: This easy gluten-free gravy recipe takes a few minutes to pull together when the turkey comes out of the oven. Better yet, follow our make-ahead steps for the easiest gravy you’ll ever make.
- Just like classic gravy: in fact, use all-purpose flour and you have best traditional gravy too. Anyone can follow this recipe!
- Smooth and delicious: This smooth gravy has just the right consistency and adds a rich, natural flavor to your holiday spread.
- Holiday dinner staple: Save this recipe for Thanksgiving Day, Christmas dinner, or even just Sunday dinners.
Need more turkey recipes? Try this citrus turkey brine for the most flavorful turkey. You can use it along with this cheesecloth turkey recipe.
Grab These Ingredients
Here are the simple ingredients for this flavorful gluten-free gravy. Most are pantry staples and easy to find in the grocery store. Jump down to the recipe card for exact measurements.
- Fat: Fat like unsalted butter is a staple ingredient for a roux. Feel free to use dairy-free butter or ghee as the gravy base.
- Shallot: this is a secret ingredient that takes most recipes to the next level. Minced shallots add a ton of flavor to the base.
- Gluten-free flour blend: A thickener: While in a traditional gravy, you’d use all-purpose flour or wheat flour, for this gluten-free recipe, we’ll be using gluten-free flour (we like Bob’s Red Mill). We tested this recipe with an all-purpose flour blend, which does not contain xanthan gum. Don’t make an extra trip if all you have is one with xanthan gum, it will still work.
- Broth: You can use chicken stock, turkey broth, vegetable broth, or even beef broth. I’m providing a great starting point, but feel free to add more broth as needed. Measure with your heart!
- Turkey drippings: this is what is going to give your gravy SO MUCH FLAVOR if you’re making this for Thanksgiving dinner. If you aren’t making this for the holidays, just swap for broth and add a few more seasonings and herbs like salt, pepper, rosemary, sage, Worcestershire sauce, garlic powder, and onion powder.
- White wine: use this to deglaze all of the flavorful pan drippings from the turkey. You can swap it for turkey broth or chicken too.
- Seasoning: Always taste your gluten-free gravy and add salt and pepper and any fresh herbs as needed.
- Heavy cream: Add just a splash at the end to add a creamy element.
Note: a lot of recipes call for a thickening agent like cornstarch, tapioca starch, or arrowroot powder to thicken. This traditional gravy relies on only the roux to thicken it.
How to Make Gluten Free Gravy
The full printable recipe is below, but let’s walk through the steps to make the best gluten-free gravy, with some photos and a video so you have a clear idea of what to expect. Follow these step-by-step instructions to make sure it turns out every time.
Make the Gravy Base
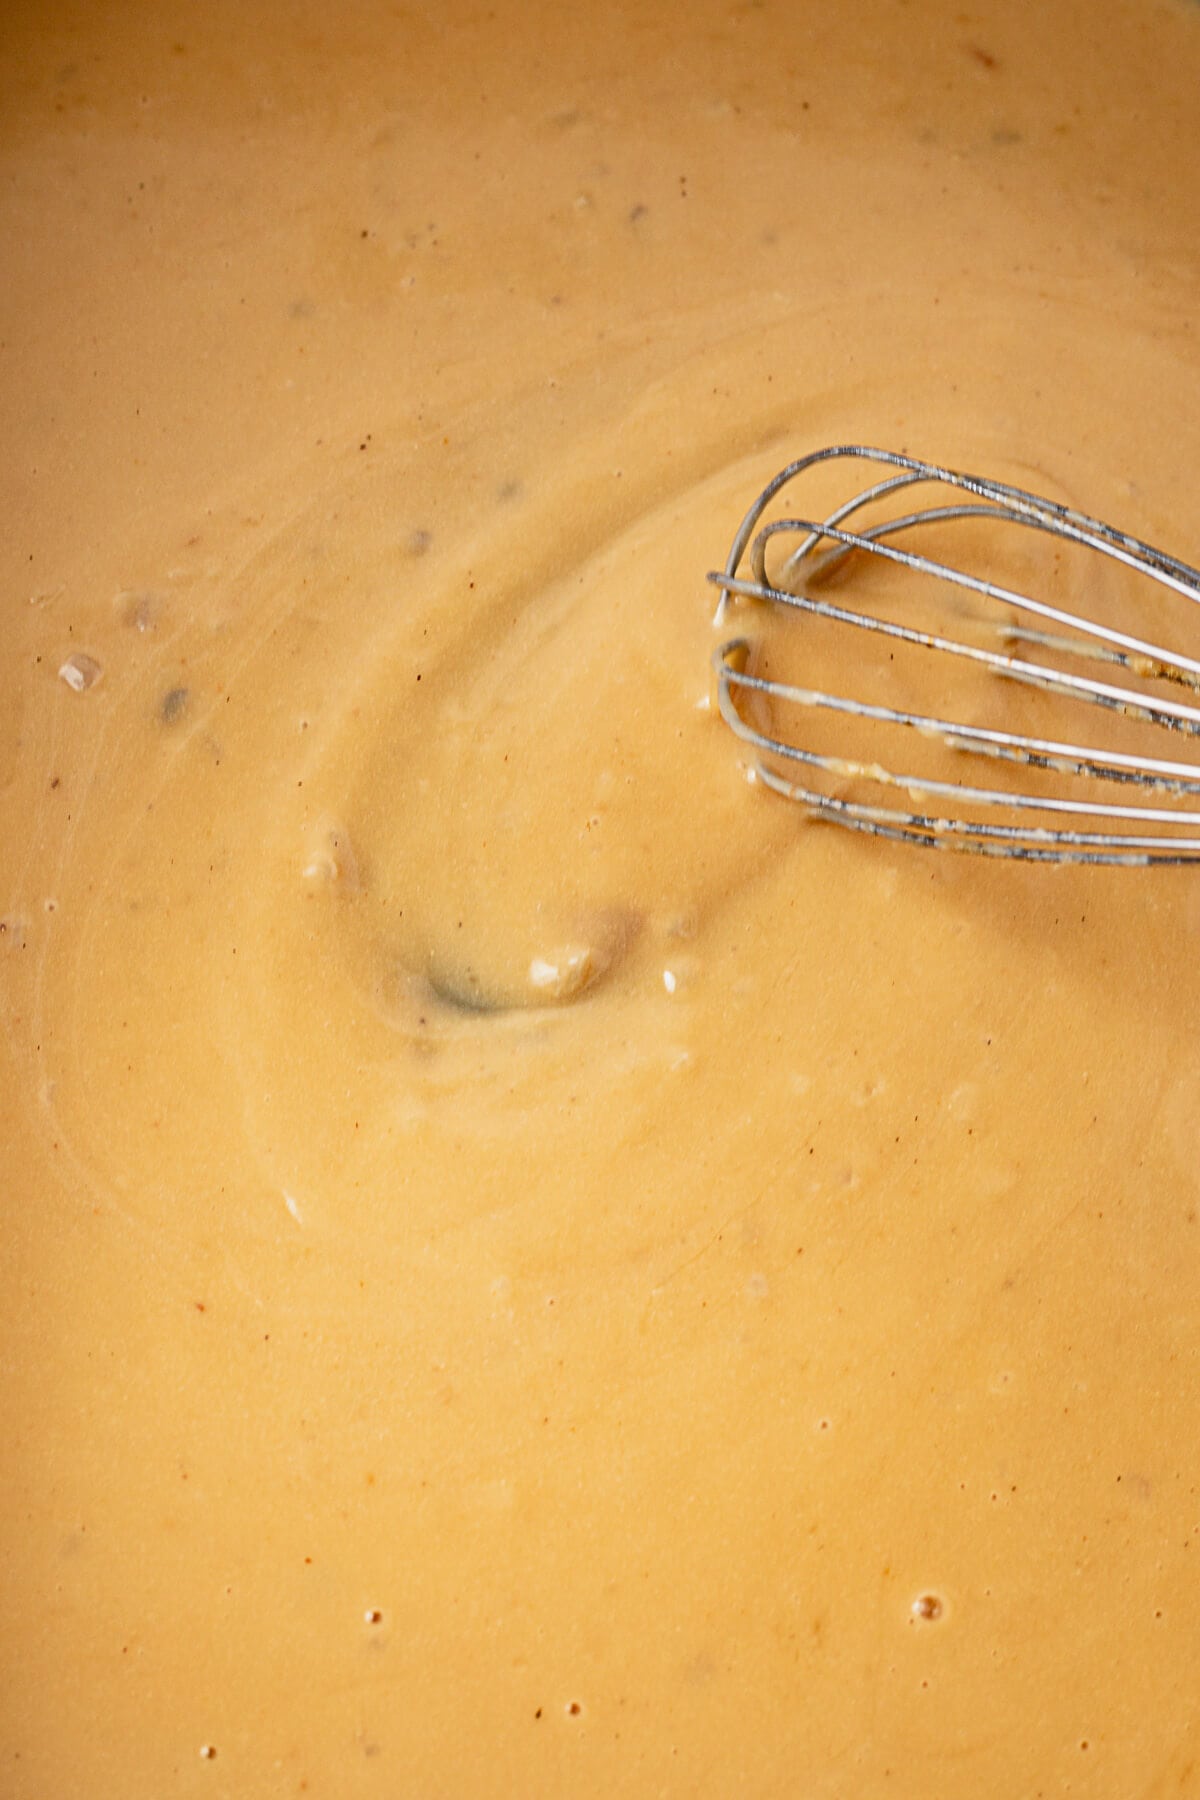
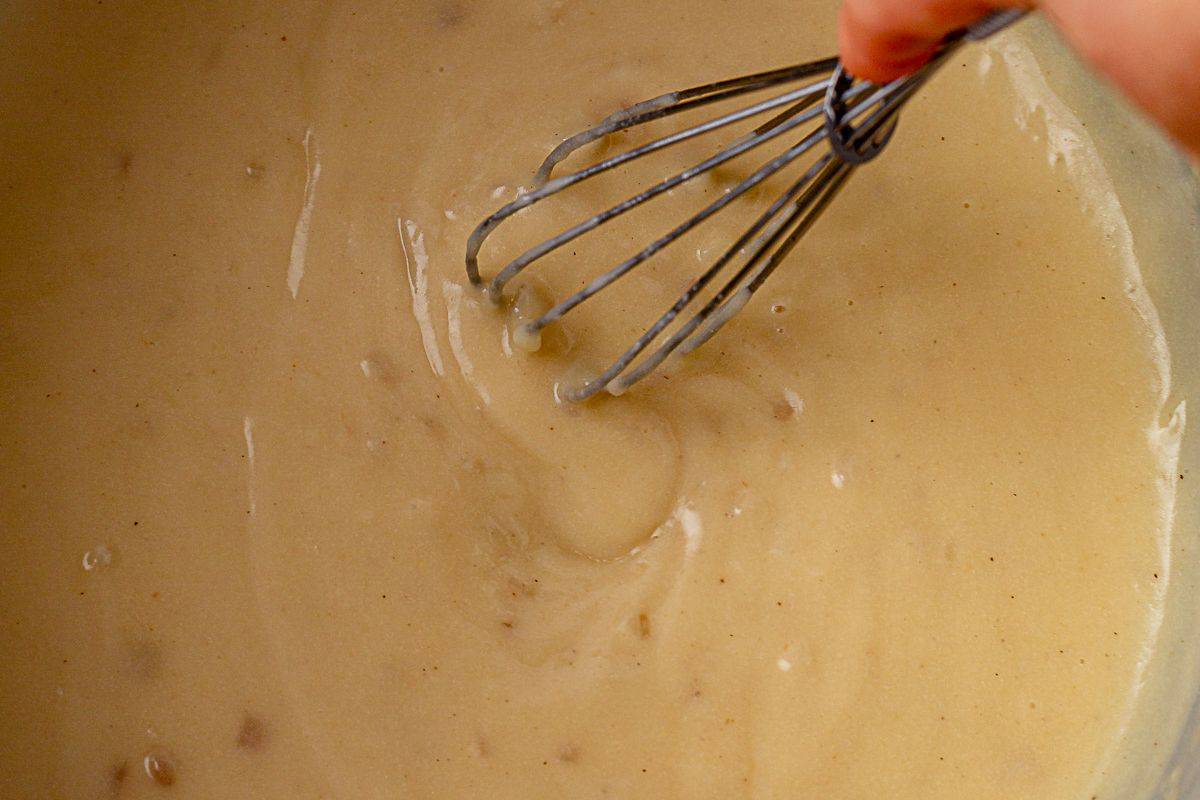
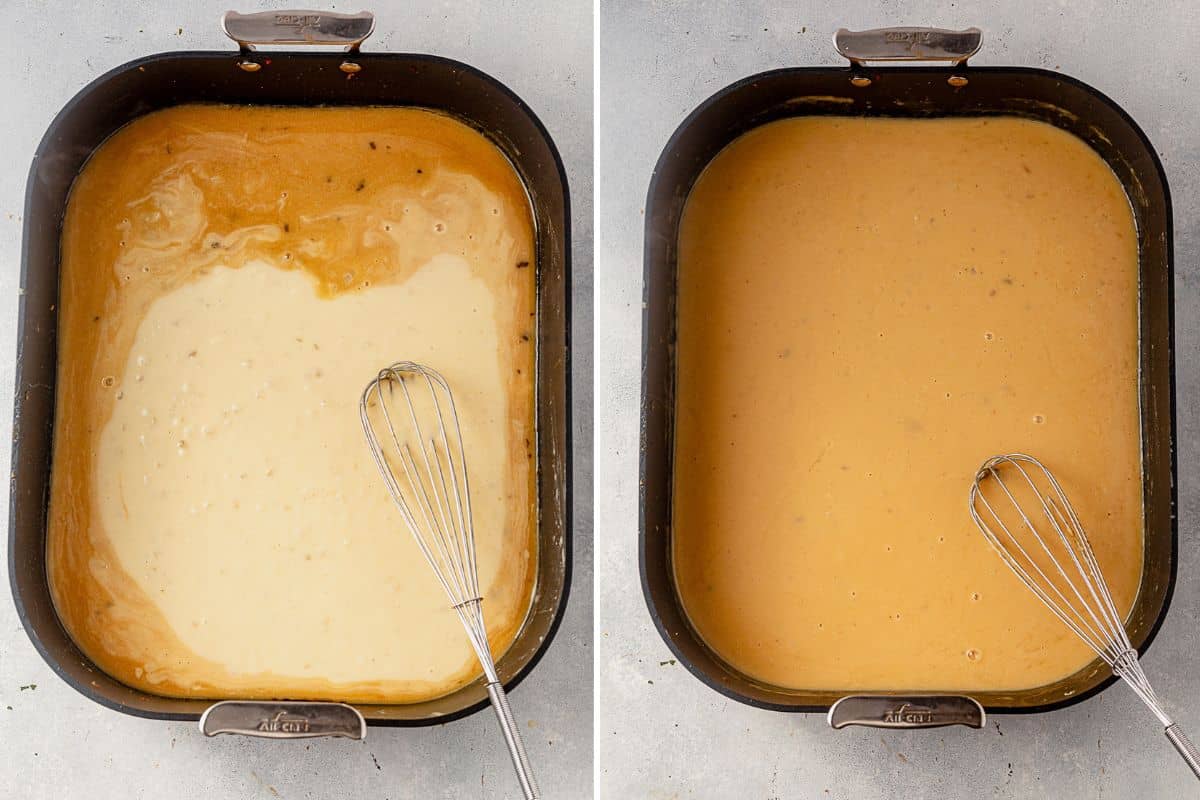
Make a roux: melt butter in a medium saucepan over medium heat. Add the minced shallot and cook until soft. Sprinkle gluten-free flour on top and whisk to create a paste. Continue to cook for 4-5 minutes, stirring frequently, to cook the flour. This helps remove any raw flour taste from the gravy.
Whisk the broth: Turn the heat up to medium-high and pour a steady stream of broth into the roux, whisking constantly. Continue to stir until it’s smooth and thickened. The mixture will thicken as it gets warmer. Add a splash of broth as needed to reach the consistency you see in these photos.
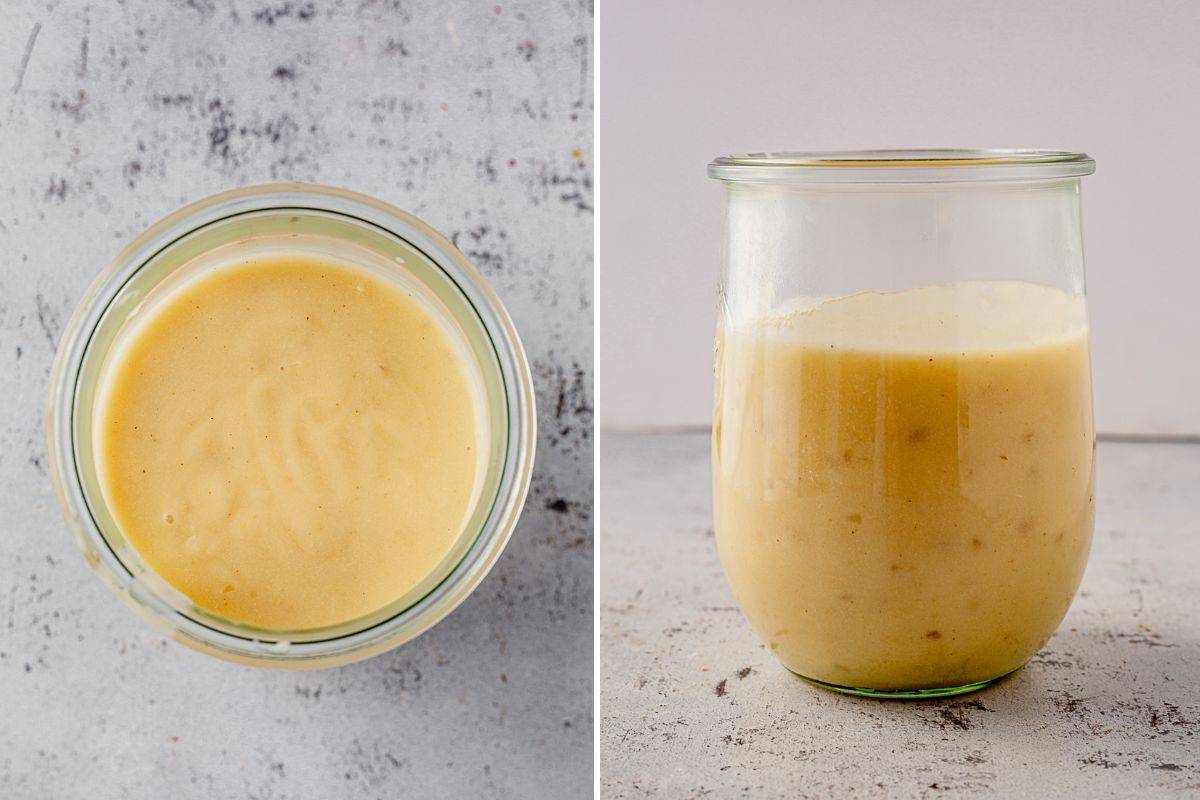
Store for later: remove the mixture from the heat and stir in kosher salt and fresh cracked black pepper. Allow it to cool completely and transfer it in an airtight container and store it for up to 3 days. We love these particular glass Weck jars.
Not making this ahead of time? Leave it on the stove for up to 2-3 hours and pour it into the turkey drippings as directed below. Or follow the instructions in the recipe notes if you aren’t using turkey drippings.
Finish with the Turkey Drippings
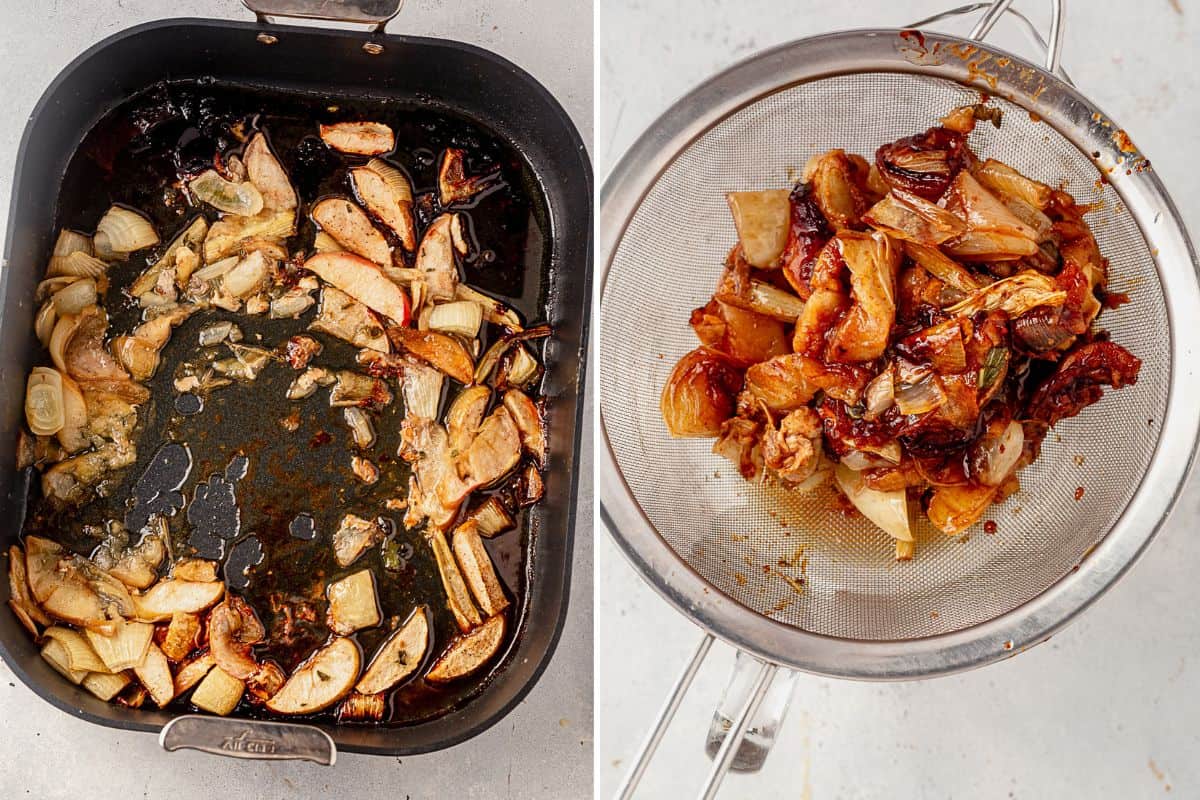
Strain the drippings: transfer the roasted turkey to a serving platter. Place a fine mesh sieve over a measuring glass or bowl and transfer the turkey drippings into the strainer. You could be left with all the brown bits on the bottom of the roasting pan.
Success tip: I spoon any veggies like celery, onion, apples, etc into the strainer carefully lift the roasting pan and drain the remaining liquid (see video in the recipe card below).
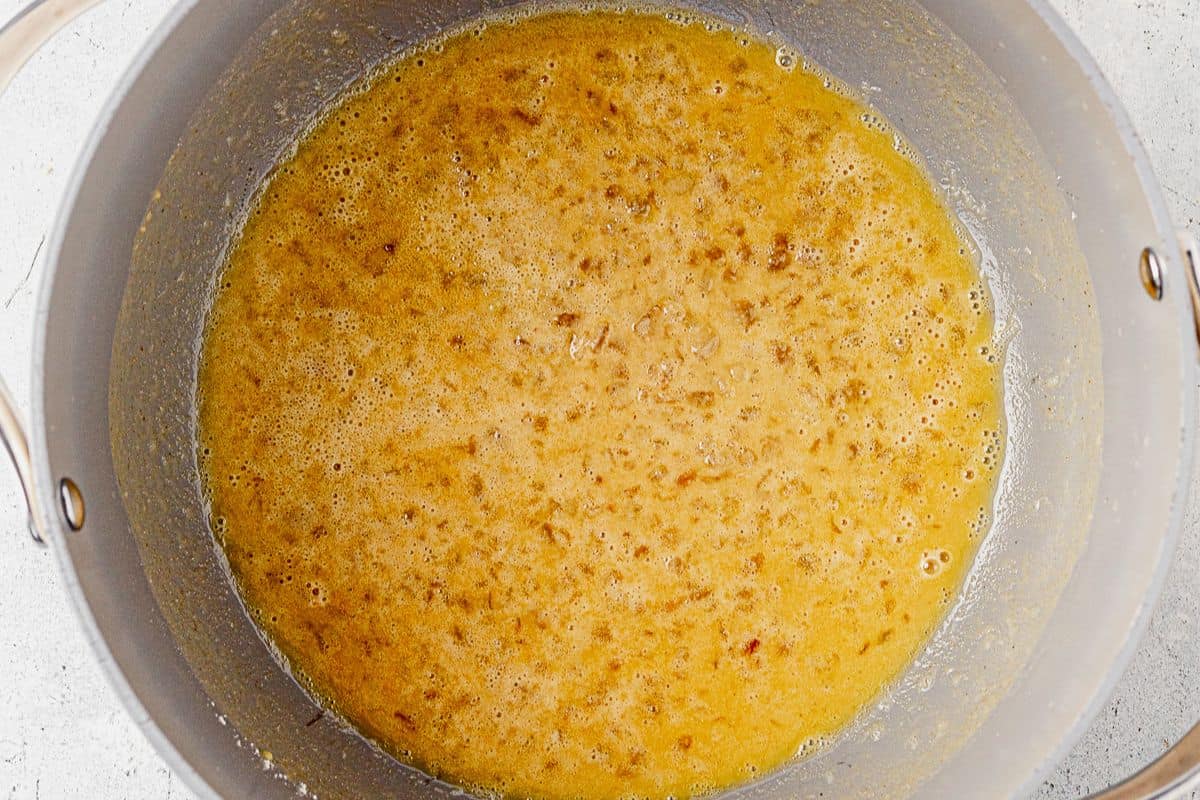
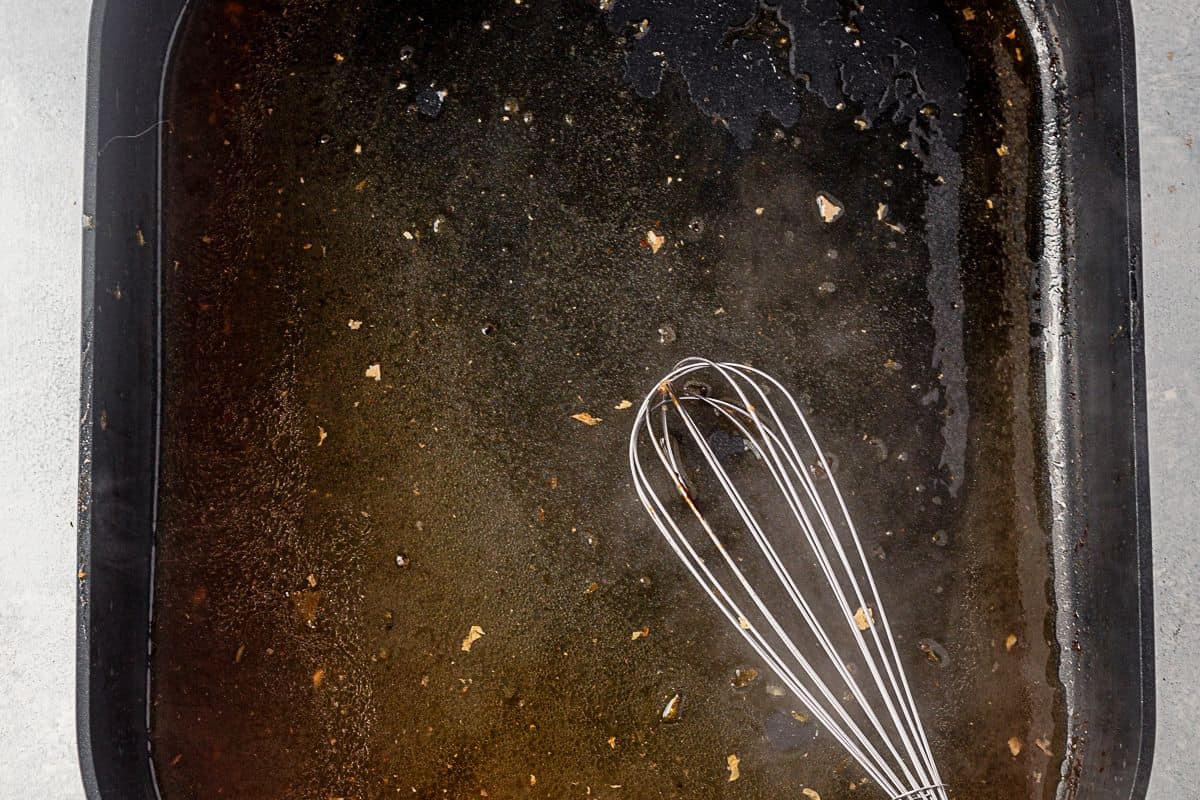
Deglaze the pan: place the roasting pan on the stove over two burners set to medium heat. Pour in the white wine, or broth, and scrape all of the brown bits from the bottom of the pan. Continue to cook and simmer for 2-3 minutes to reduce and cook off the alcohol.
Not using pan drippings? Pour white wine, 3/4 cup of broth, Worcestershire sauce, heavy cream, salt, onion powder, garlic powder, and black pepper into the gravy base. Stir, taste, and adjust seasoning as needed before serving.
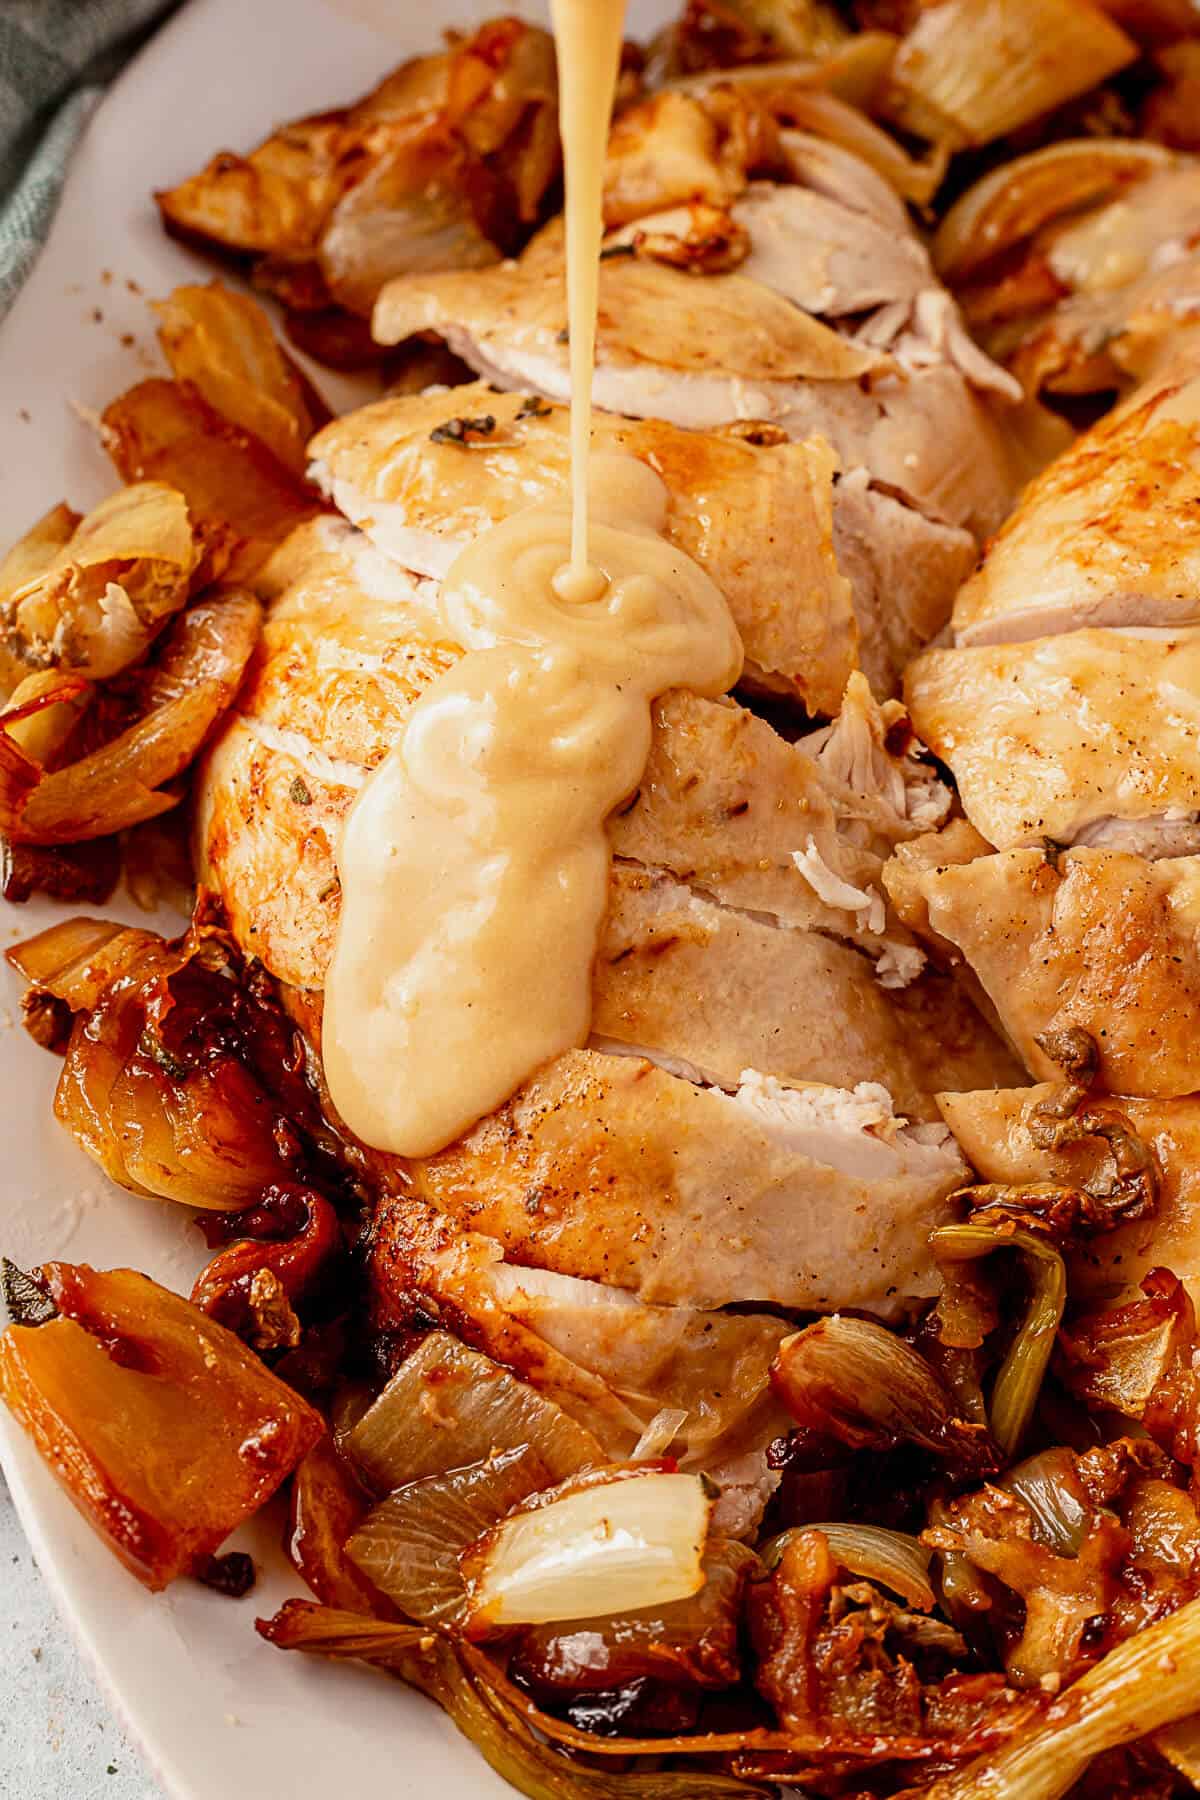
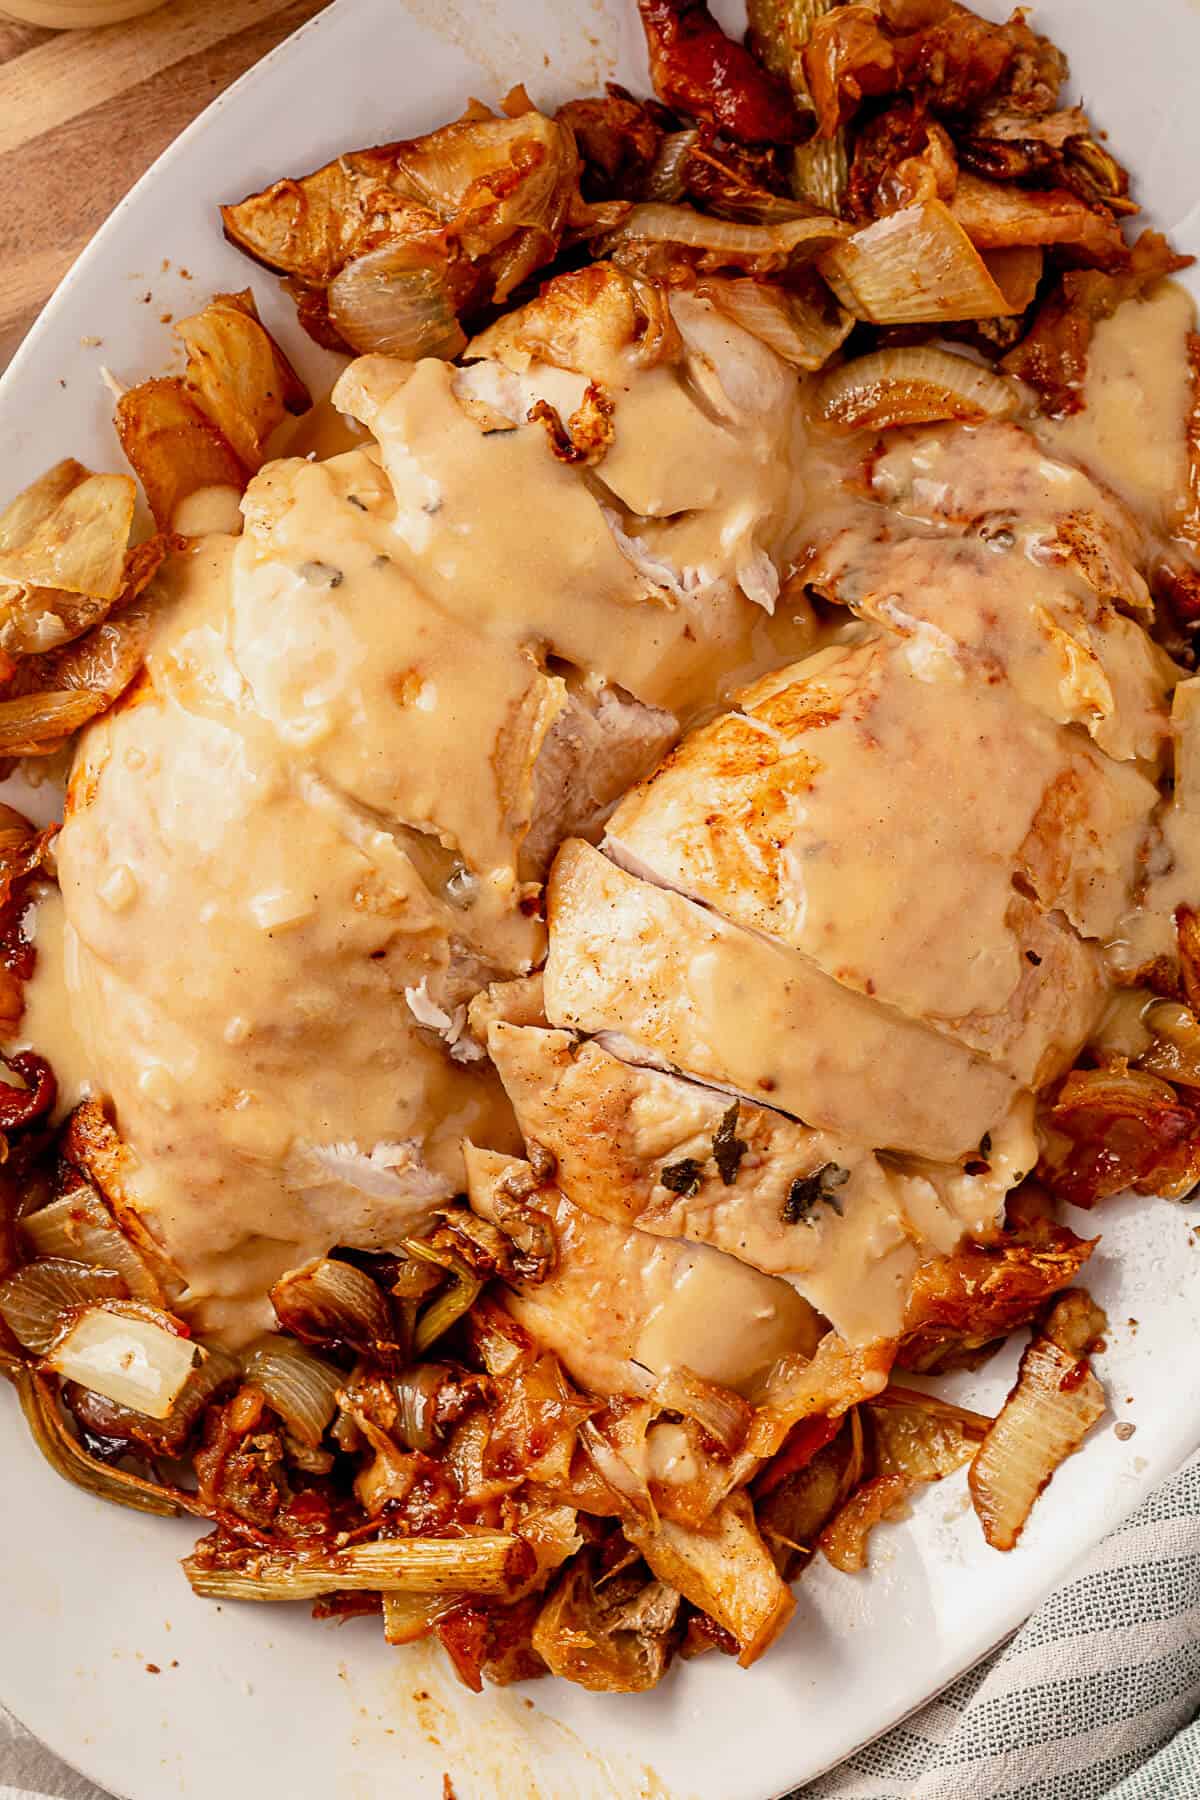
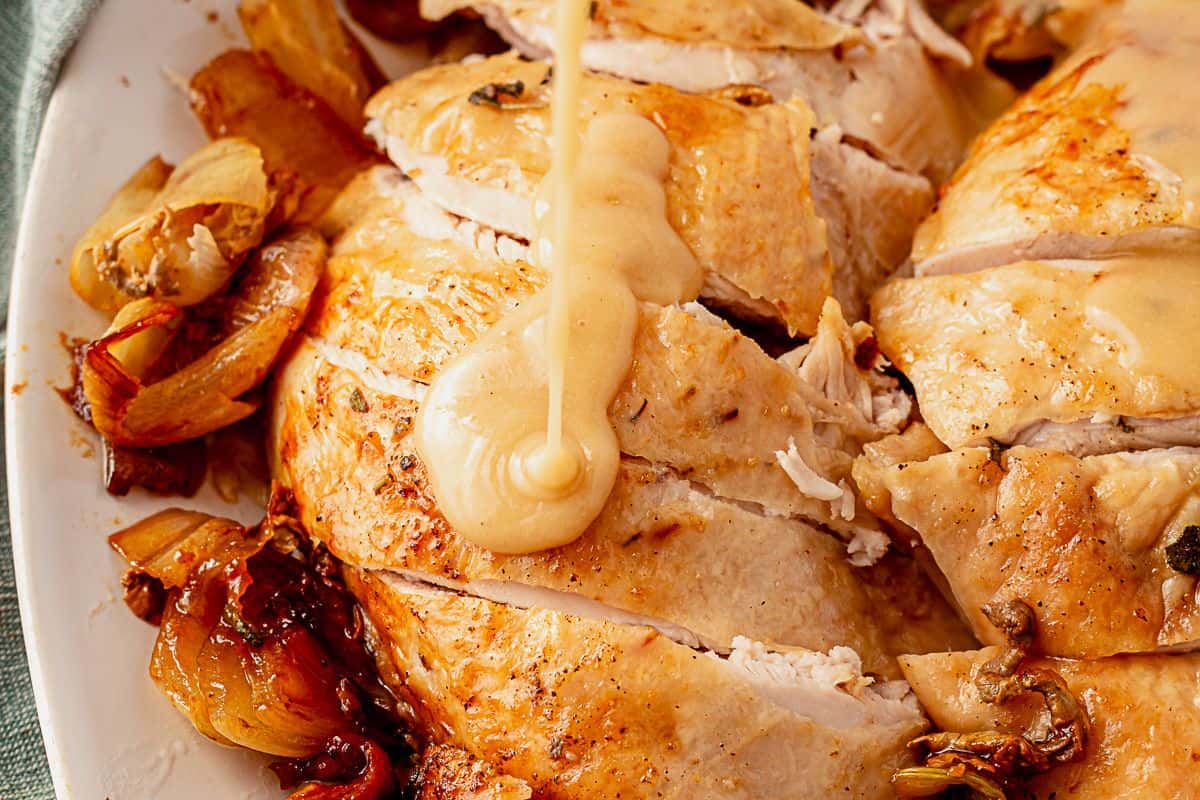
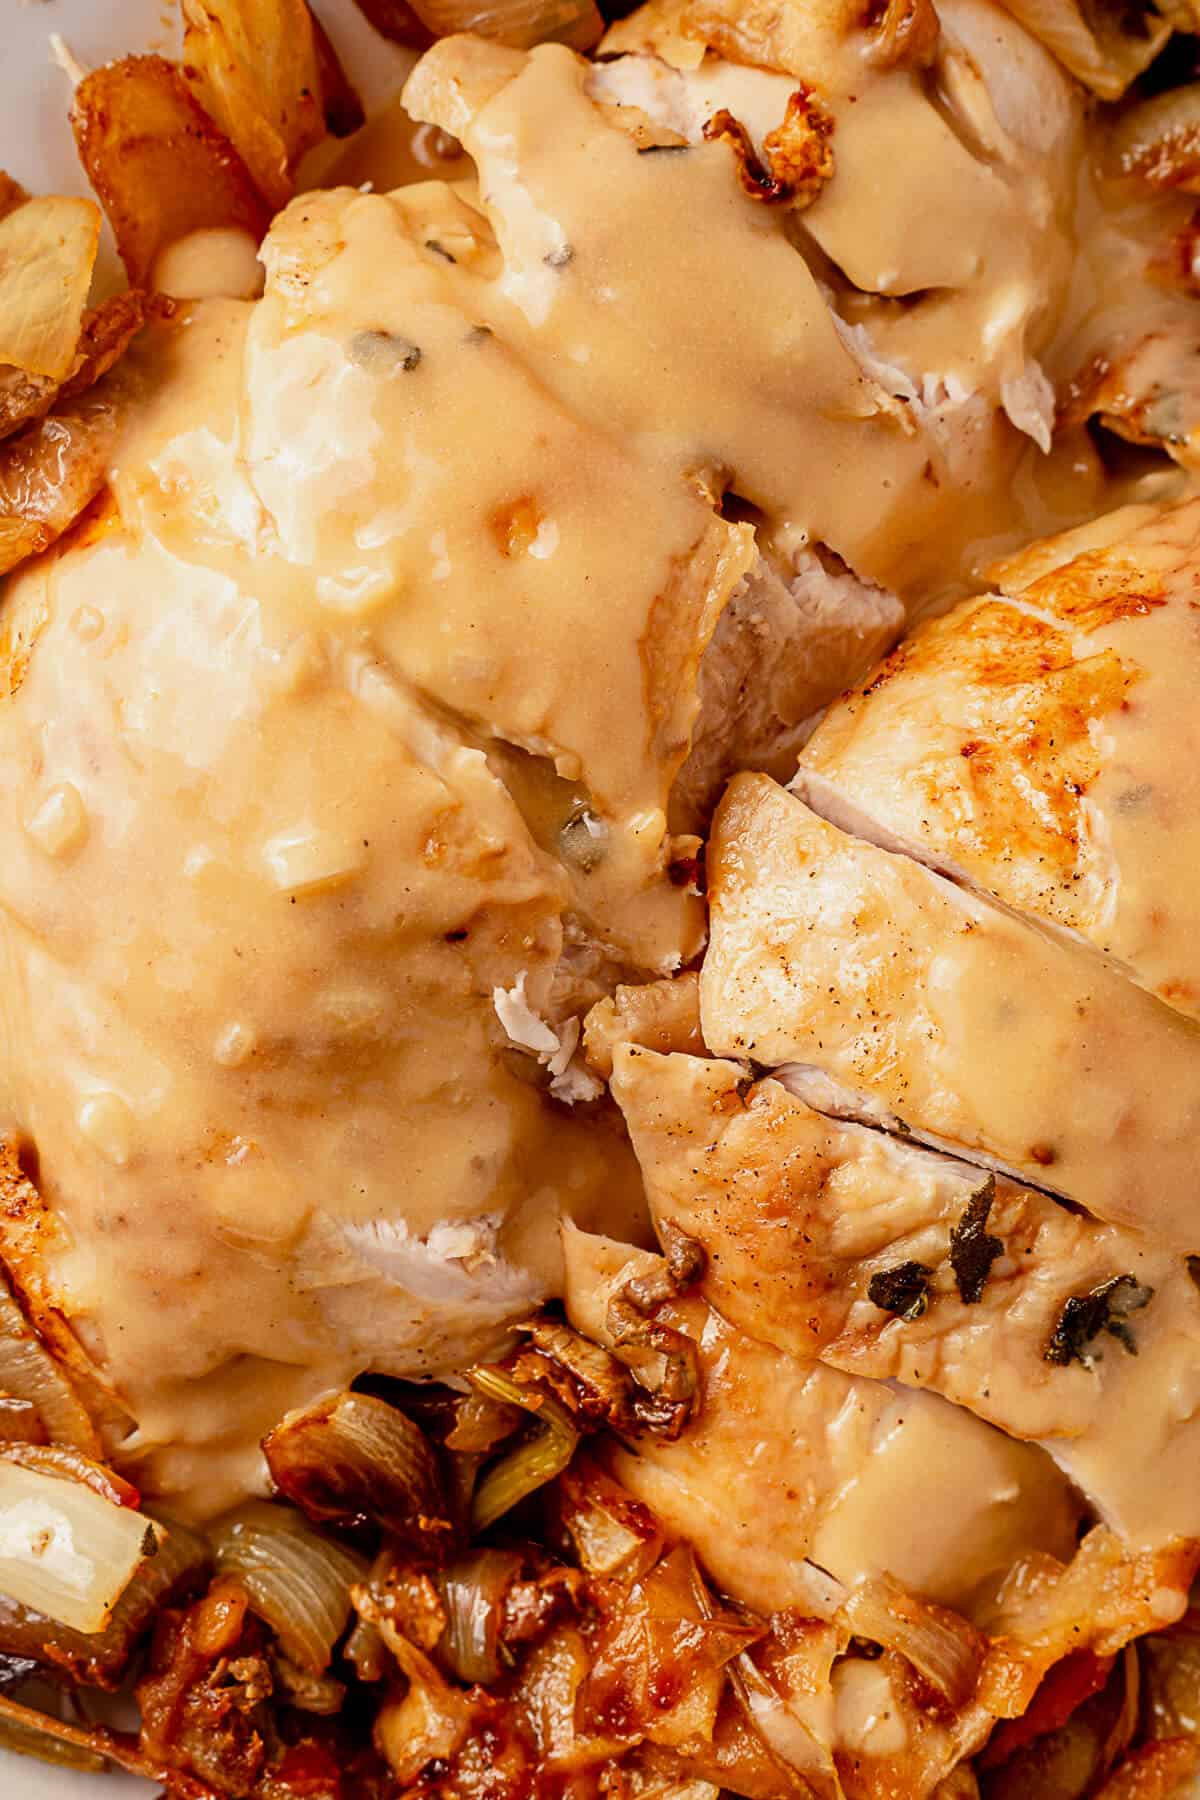
Add the gravy base: reduce the heat to low and slowly whisk in the gravy base. Continue to stir and cook until thickened, about 2 minutes. If the gravy is too thick, pour in the strained pan juices a little at a time until you reach your desired consistency. Use chicken broth or turkey broth if you need more.
Final touches: whisk in a few tablespoons of heavy cream, if desired. Taste and add more salt and pepper as needed.
Serve: Transfer the turkey gravy to a gravy boat and serve warm.
Success tip: keep the gravy over very low heat if you’re serving it shortly or turn the heat off and warm again right before serving. It may thicken more as it cools or cooks down so keep some broth or drippings close and stir in a bit more as needed.
Pro Tips
- Add extra vegetables to the bottom of your roasting pan when you’re cooking the turkey. It gives the turkey more flavor, but it’s going to give your gravy THE BEST FLAVOR.
- Taste the pan drippings before adding it to the gravy. Remove any charred or burnt bits on the bottom of the pan before whisking in the gravy base.
- Keep the gravy over very low heat if you’re serving it shortly or turn the heat off and warm again right before serving. It may thicken more as it cools or cooks down so keep some broth or drippings close and stir in a bit more as needed.
- Save the majority of seasoning until the end. Gravy will continue to cook down and the flavors will concentrate. If you add salt to soon, you could end up witht a very salty gravy.
- Always use a whisk to stir gravy. This ensures a smooth gravy with no clumps!
Troubleshooting Turkey Gravy
The two best ways to thicken gravy are to let it simmer and reduce over low heat, or create a roux in a separate small saucepan and stir it in to thicken. You can also create a slurry of water and cornstarch, but that’s my third option.
Make sure to cook the roux on low heat for 4-5 minutes to cook the flour. This removes in raw flour taste.
Use a whisk and slowly stir in the broth for the gravy base.
What To Serve With Gluten Free Gravy
- Add this homemade gravy to your favorite sides for holiday meals like the best dairy free mashed potatoes or our gluten-free stuffing.
- Pour it over cauliflower mashed potatoes to add savory flavor.
- Have it with a roast beef dish like our roasted beef tenderloin deluxe or Instant pot roast and potatoes. It’s of course a great recipe to your Thanksgiving turkey. If you’re going the less traditional route, you can still use it on an air fyer turkey breast or leftover turkey sandiwches.
- Speaking of leftovers, use the leftover gravy from your Thanksgiving meal and have it the next morning on these gluten-free biscuits for a delicious biscuits and gravy breakfast.
Storing Tips
Allow the gravy to cool to room temperature before storing in an airtight container in the fridge for up to 4 days.
You can transfer the gravy to a plastic bag and freeze it flat for up to 3 months. Thaw overnight in the fridge and warm in a saucepan on the stove. Add broth as needed to reach your desired consistency.
If you make this recipe, I’d love for you to give it a star rating ★ below. You can also tag me on Instagram so I can see it!
More Thanksgiving Dishes
- Roasted rainbow carrots
- Dairy-free green bean casserole
- Thanksgiving salad with spiced vinaigrette
- Hasselback sweet potatoes
- Sourdough stuffing
Make-Ahead Gluten Free Gravy

Save this Recipe!
Ingredients
- 1/2 cup (56g) unsalted butter cubed (Note 1)
- 1 medium shallot minced
- 1/2 cup (59g) gluten-free all purpose flour without xanthan gum (Note 2)
- 3 cups (710ml) low-sodium chicken broth or turkey broth
- 1/2 teaspoon kosher salt
- Fresh ground black pepper to taste
- Turkey pan drippings OR 3/4 cup (177ml) of chicken or turkey broth plus more as needed
- 1/2 cup (118ml) dry white wine like Pinot Grigio (or sub more broth)
- 2 Tablespoons (29ml) heavy cream optional
Instructions
- Make the gravy base. Melt the butter in a medium to large saucepan over medium heat. Add the shallots and cook for 4-5 minutes, until soft.
- Sprinkle the flour on top of the melted butter and stir for 1 minute to create a thick paste. Continue to cook for 4-5 minutes, stirring frequently, to cook the flour. This helps remove any raw flour taste from the gravy.
- Turn the heat up to medium-high and whisk in the broth. Continue to cook to a boil and whisk frequently for 2-3 minutes, or until thickened.
- Remove the mixture from the heat and stir in the salt and pepper. Cool completely and store in an airtight container or jar for up to 3 days. If you aren't making this ahead of time, turn the heat off and leave the roux on the stove until the turkey is done. Continue with the next steps as directed.
- Finish the gravy with turkey drippings (Note 3 without turkey drippings). When the turkey is done roasting, remove it to a platter or cutting board to rest. Remove the roasting rack if using one. Carefully pour the turkey drippings from the bottom of the pan through a fine mesh sieve to strain into a measuring cup or bowl.
- Place the roasting pan over two burners both set to medium heat. Add the white wine and scrape the brown bits (fond) from the bottom of the pan with a wooden spoon or spatula. Simmer for 2-3 minutes, to reduce and cook off the alcohol.
- Reduce the heat to low and slowly whisk in the gravy base. Simmer until smooth and slightly thickened, about 2 minutes. If the gravy is too thick, add a splash of the reserved turkey juices to thin it out. When the gravy reaches your desired consistency, stir in the heavy cream if using. Taste and adjust add more kosher salt and black pepper as needed. Keep the gravy over very low heat until you’re ready to serve. It may thicken more as it warms so add more pan drippings or broth as needed.
Notes
Video
Equipment
- Medium Saucepan
- Airtight container optional for storing the gravy base
Nutrition
Nutrition information is automatically calculated, so should only be used as an approximation.


